MQTT Device Access
Overview
This document details the complete process of accessing devices to the Neuron platform via the MQTT protocol. This method is suitable for various types of devices. The core requirement is to ensure that the data format reported by the device strictly matches the platform configuration, enabling accurate data parsing and stable access.
Before You Start
Confirm Data Source
If you need to bring existing device data from message queues like Kafka into the platform, you should choose the MQTT method. 【Kafka Pre-configuration Guide】.
Permission Configuration
To ensure the following operational process proceeds normally, please confirm that you have Project Administrator permissions.
Prerequisite Configuration
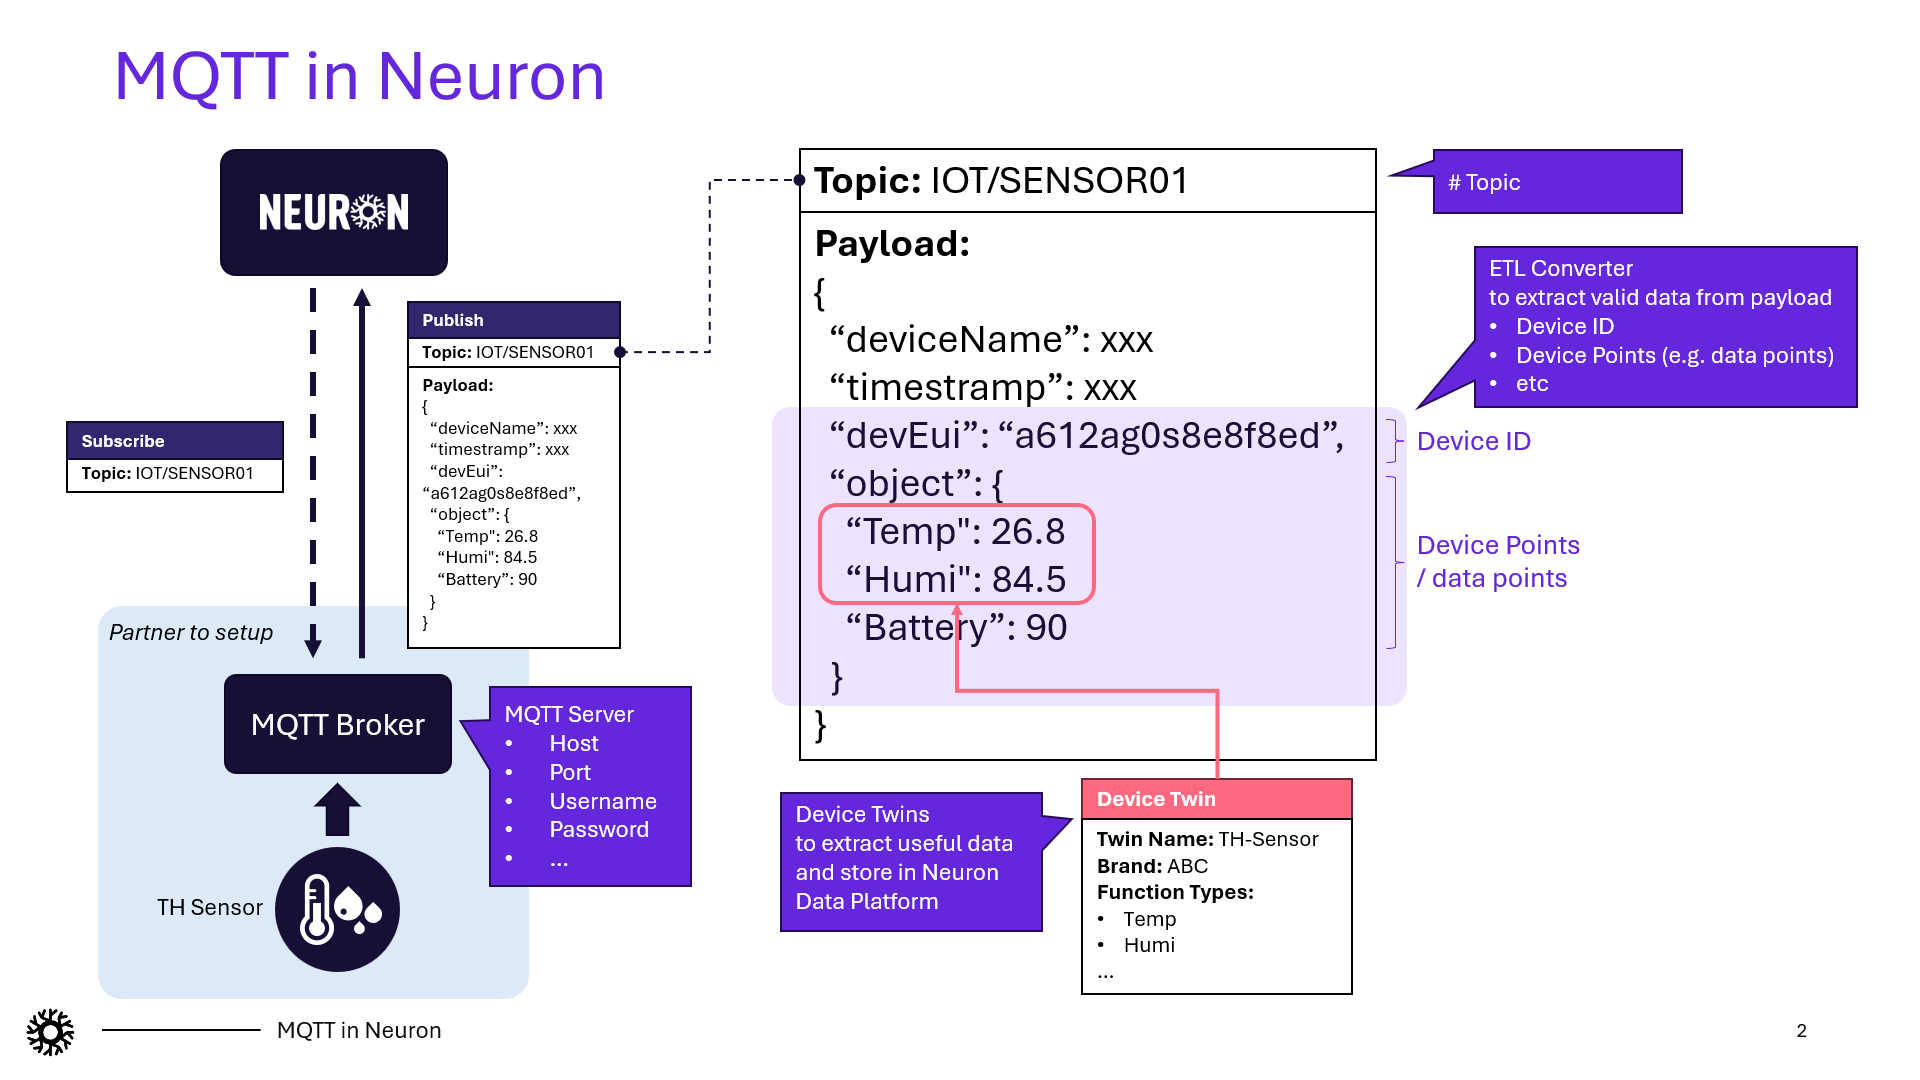
Your device will send data through an MQTT Server. The Neuron Data Platform will subscribe to device data based on the MQTT Server and Topic you configure. Therefore, you need to first correctly configure the MQTT Server and Topic you are using. The Payload in the Topic must contain real-time data for each point of the device. Please ensure that the point names (name) in the Payload match the Function Type names in the Neuron platform's Device Twins (case-insensitive); otherwise, the platform will not recognize the corresponding data.
Devices accessed via MQTT need to confirm and configure in advance:
- MQTT Server
- Topic
- Data format reported by the device
Configure MQTT Server
Click MQTT Management - MQTT Server in the left menu to view existing MQTT Servers in the system. Click the Add button to add your MQTT Server.

Fill in the MQTT Server information:
- Name: Must be unique. Required;
- Host/Port: Input according to the MQTT Server information. Required;
- Username/Password: Fill in if available;
- SSL Certificate: The host prefix without a certificate is
tcp://, with a certificate it isssl://;- Interface without certificate:

- Interface with certificate (SSL configuration):


- Interface without certificate:
- Status: Enable.

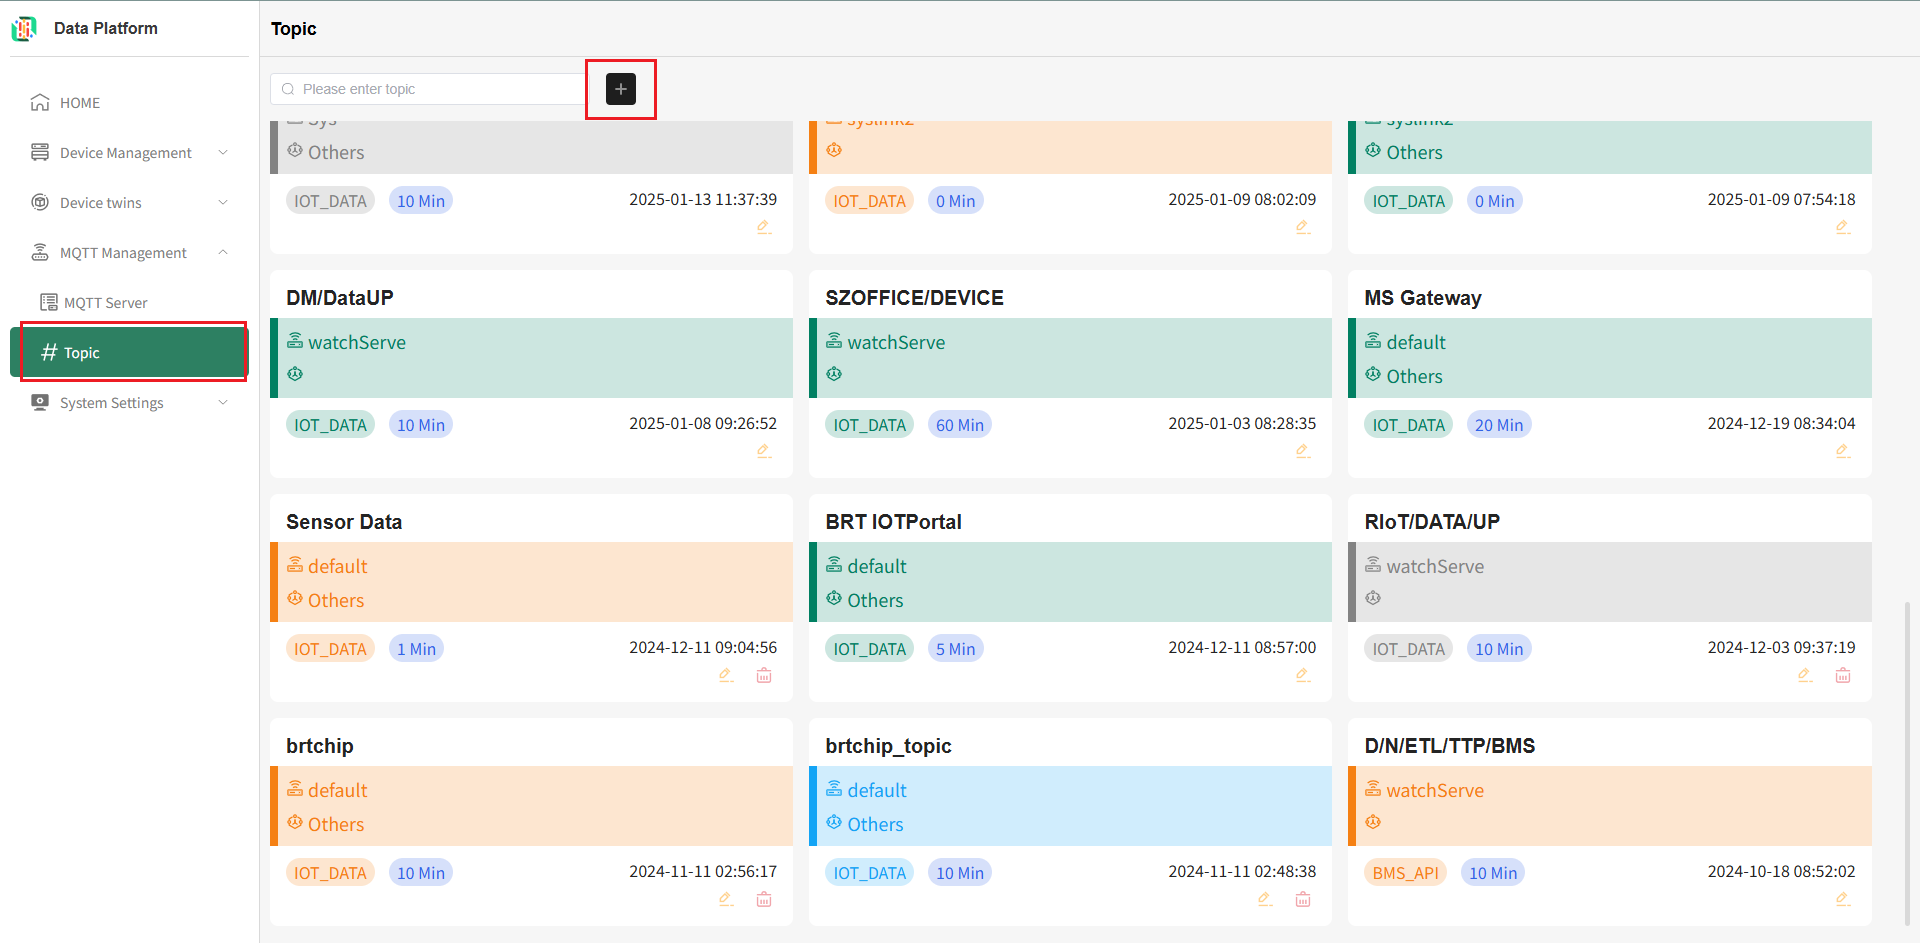
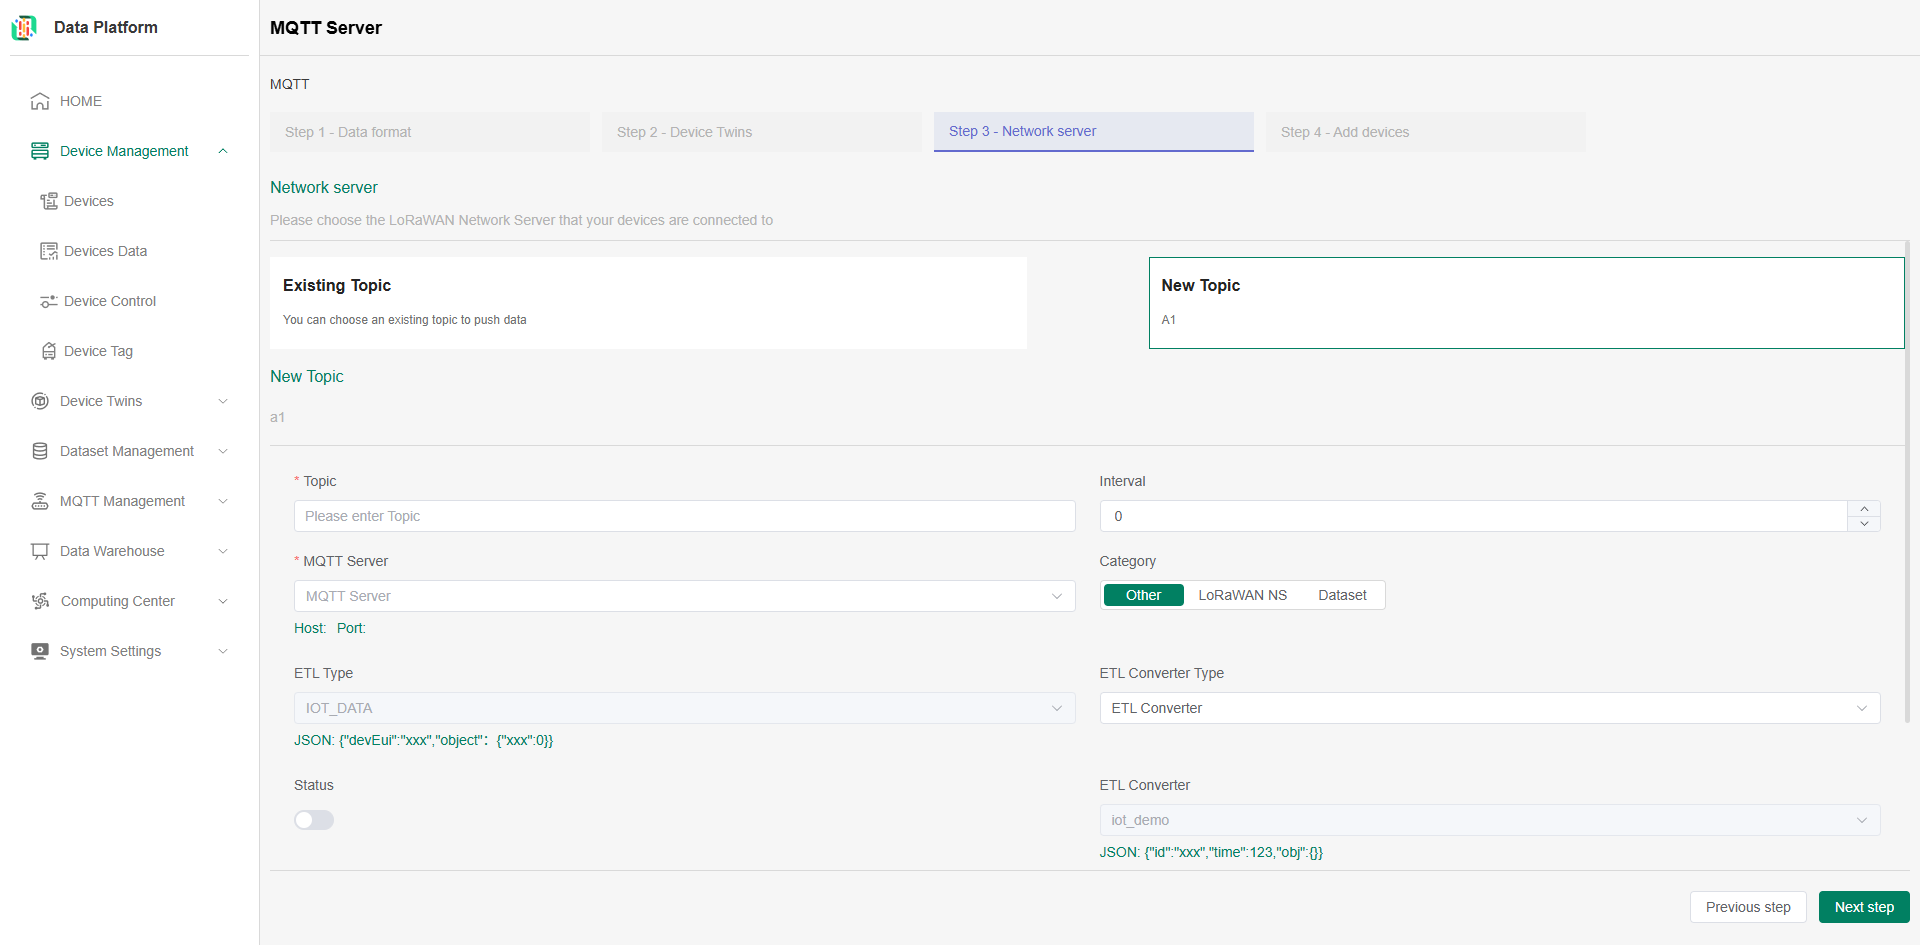
Configure Topic
Click MQTT Management - Topic in the left menu to view existing Topics in the system. Click the Add button to add a new topic.
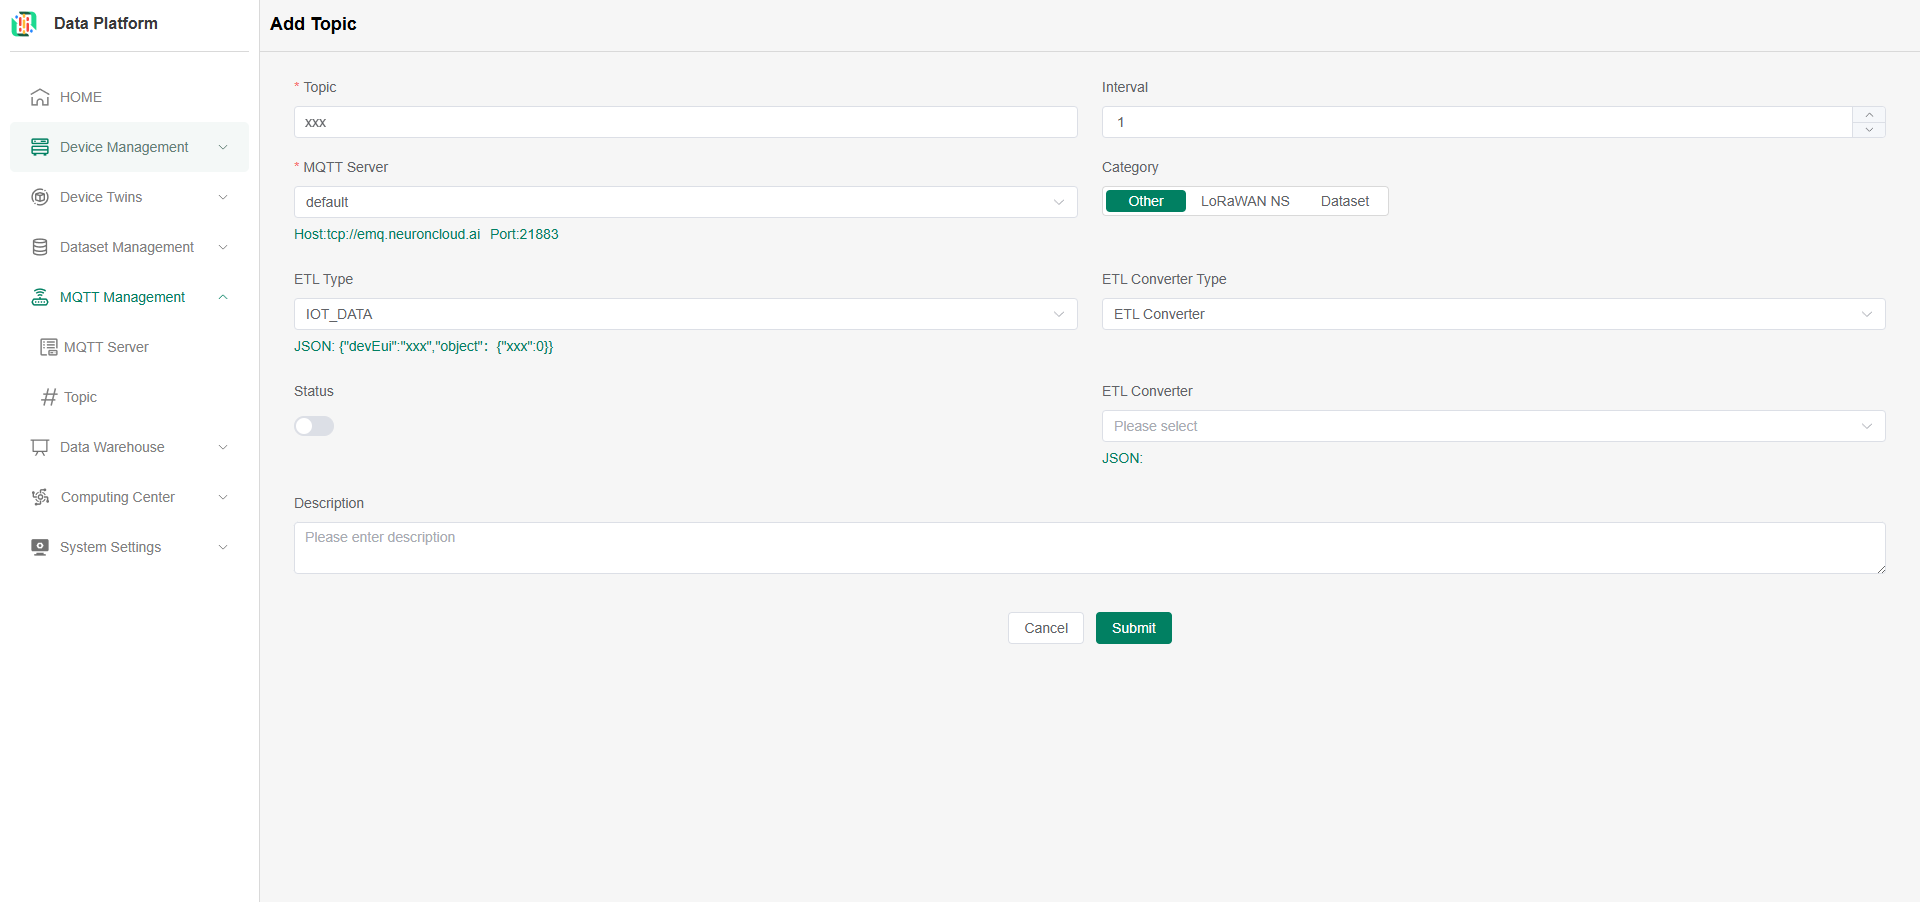
- Topic: Required. Enter the Topic to subscribe to.
- MQTT Server: Required. Select the MQTT Server to use. If none exists, add one first (Configure MQTT Server).
- Category: The system is divided into three categories.
- Other: Default selection, indicates the Topic only supports Exact Match (the topic name must be completely consistent for successful subscription, only allows topic level separator
/and normal UTF-8 characters, cannot contain+and#). - LoRaWAN NS: Indicates the Topic supports Wildcards (Wildcard format is not a complete, specific topic name but a topic filter used for subscription, which can match multiple specific topics, usually containing
+or#characters). - Dataset: This feature is not yet available.
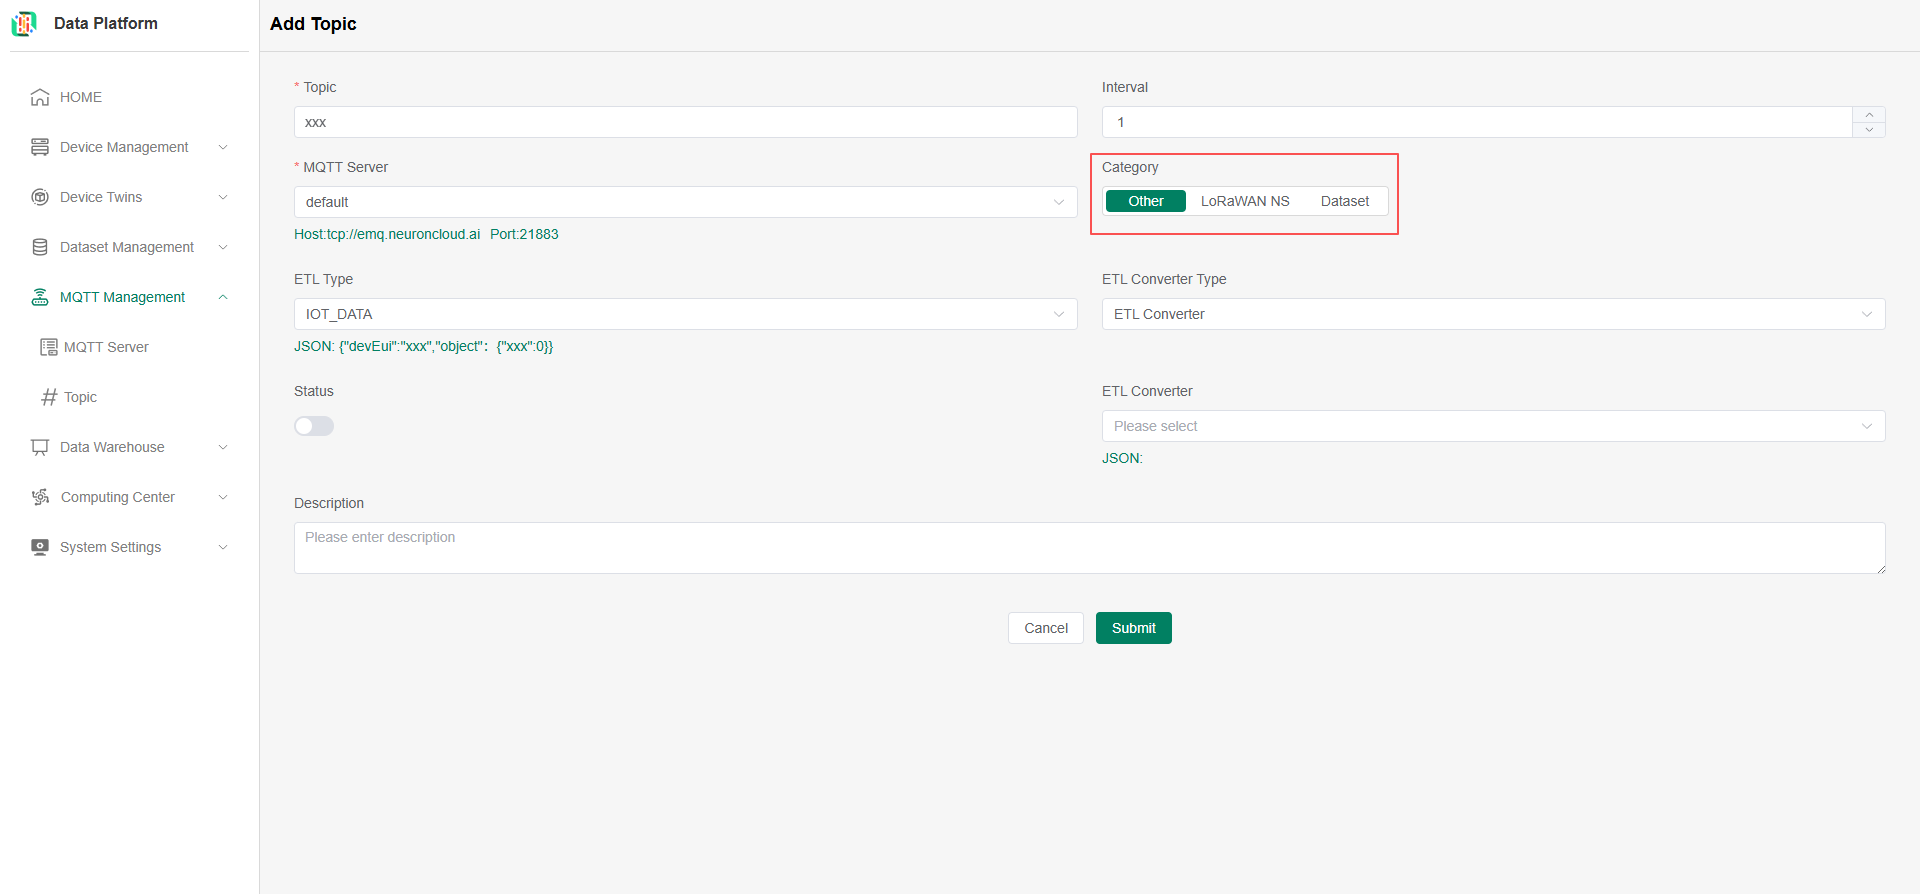
- Other: Default selection, indicates the Topic only supports Exact Match (the topic name must be completely consistent for successful subscription, only allows topic level separator
- ETL Type: Required. Select the data type (IoT/BMS/OpenAPI, etc.). For example: For IoT devices, select IOT_DATA; for BMS devices, select BMS_API; for access via openAPI, select openAPI.
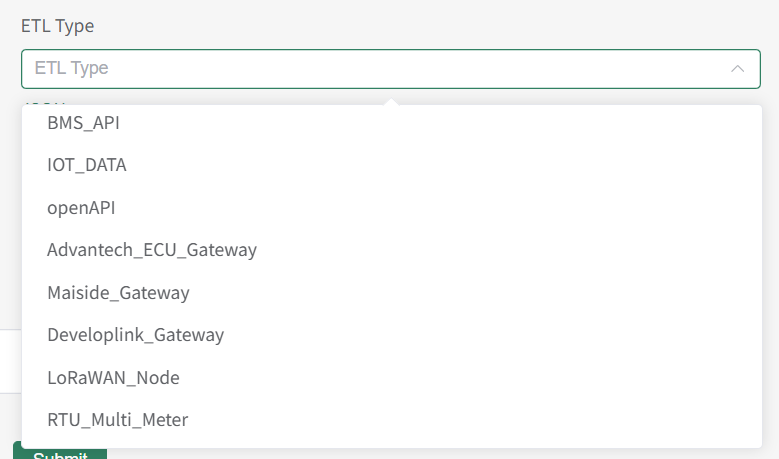

- After selection, check the JSON format below to see if it matches the data format reported by your device. The system will subscribe and parse this JSON according to the MQTT Server information. If the format does not match, device access will fail, and you need to Select/Add an ETL Converter (see below Configure ETL Converter).
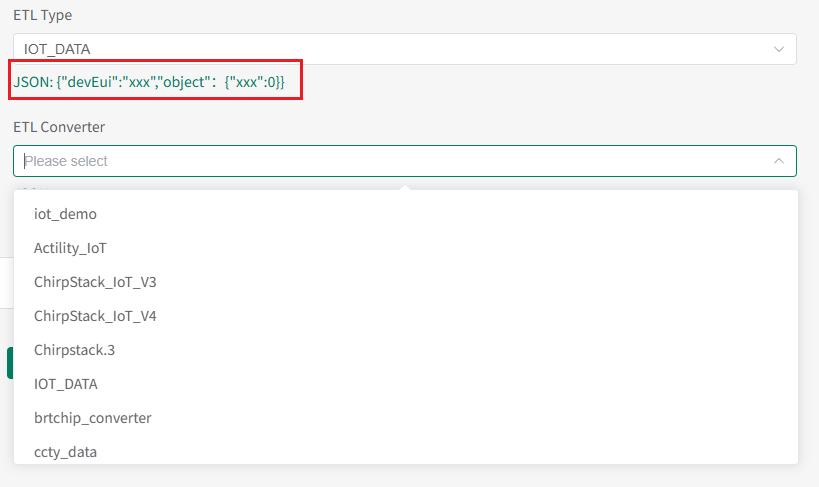
- ETL Converter Type: If the default JSON format does not match your device, an ETL Converter is needed as a bridge to precisely specify the matching relationship between the single device data object and the system's required data format. Currently, only ETL Converter is supported; JS Converter is coming soon;

- ETL Converter: Given the data format mismatch, Add and select your ETL Converter (see below Configure ETL Converter);
- Status: Enable.
Configure ETL Converter
If the default JSON format does not match your device, you need to configure an ETL Converter for format conversion.
Click System Settings - ETL Converter in the left menu to view existing ETL Converters in the system. Click the Add button to add a new ETL Converter.

Fill in the ETL Converter information.
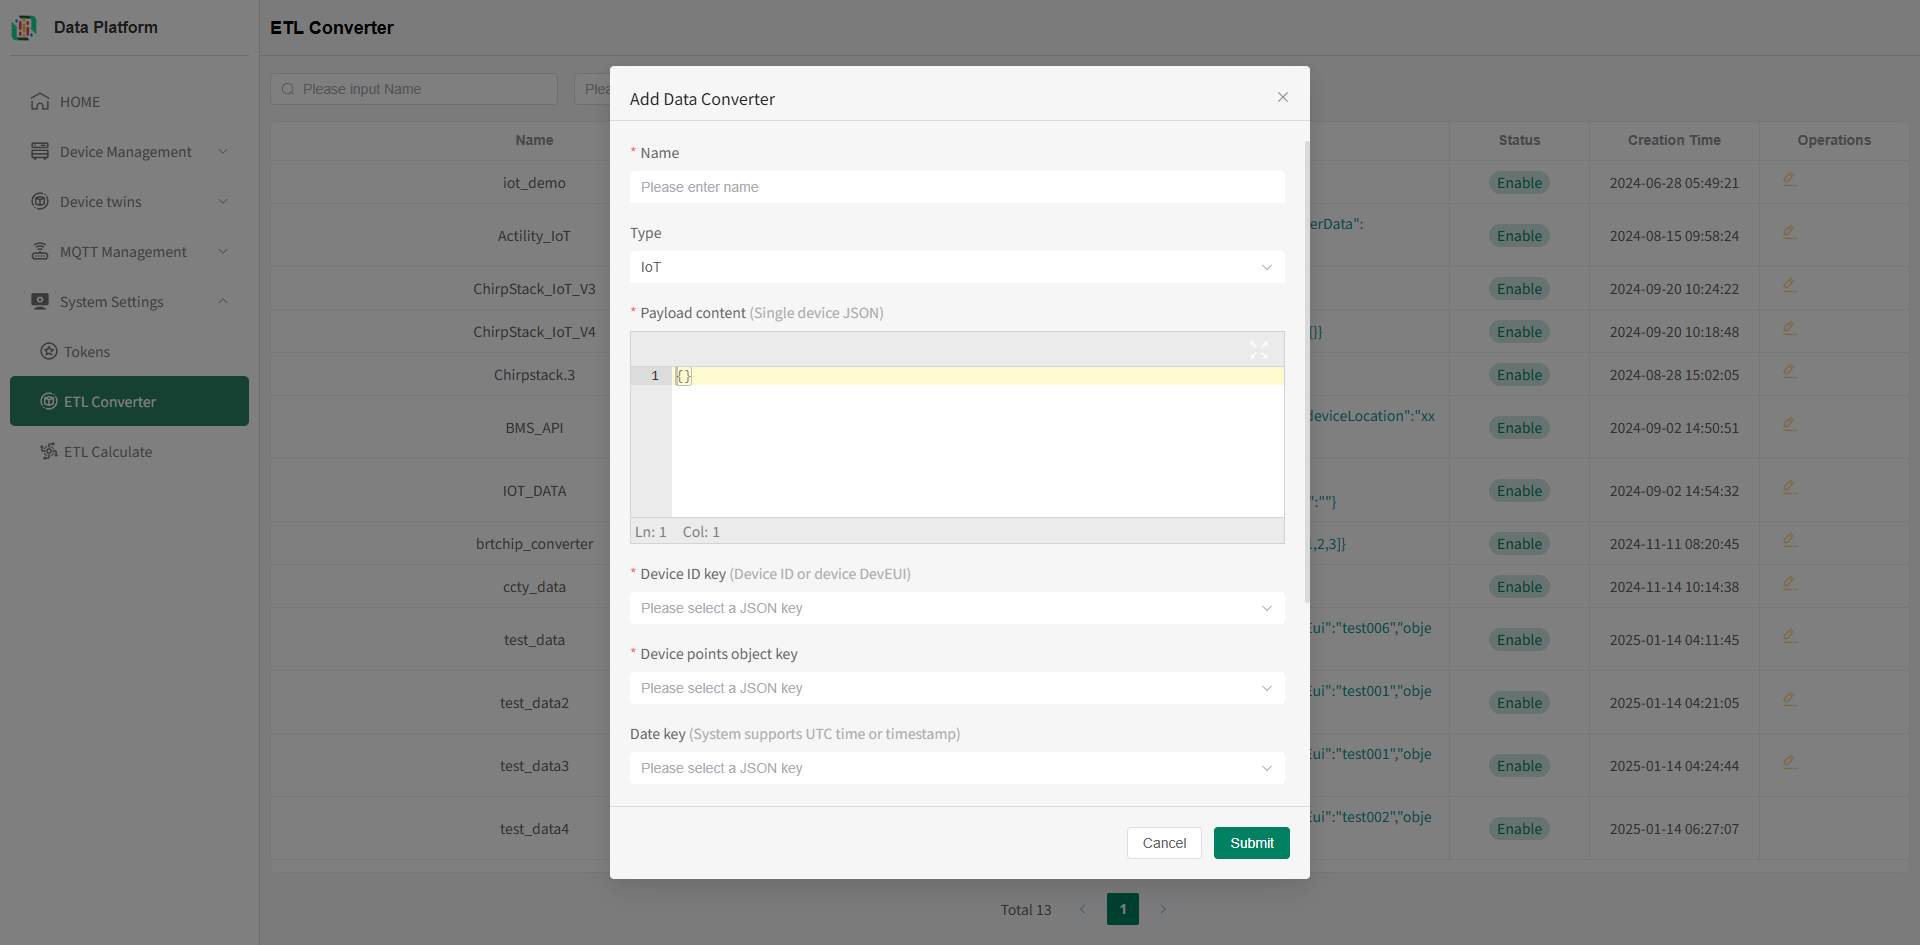
- Name: Must be unique. Required;
- Type: IoT / Non IoT;
- Payload content: The JSON format of the data reported by the device. Required;
- Device ID key: Matches the unique ID in the JSON used to identify the device, usually Device ID / DevEUI. Required;
- Device points object key: Matches the points of the device-reported data in the JSON. Required;
- Date key: Matches the time of the device-reported data in the JSON;
- Device name key: The device name used for display in the platform after matching;
- Device location key: The device location information used for marking in the platform after matching;
- Status: Enable.
For operations, see 【ETL Converter】.
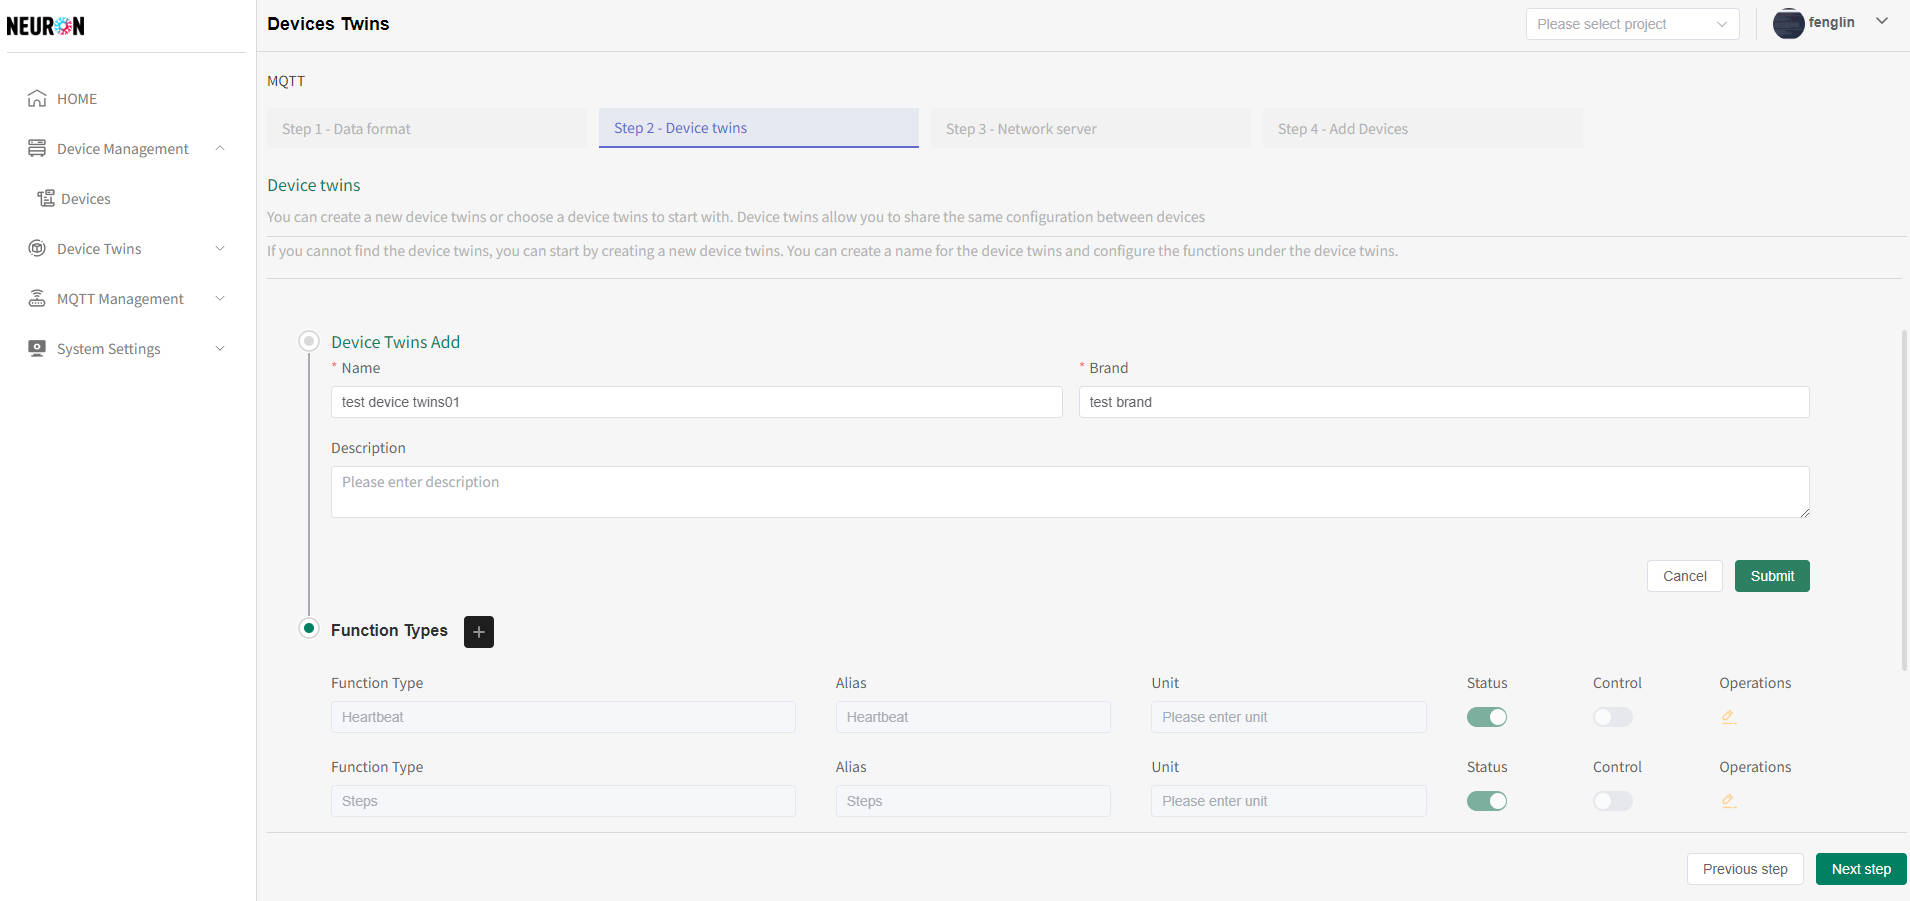
Configure Device Twins
Device Twins Definition: Within the Neuron platform, a collection of devices of the same type with identical capabilities or characteristics is referred to as a Device Twins.
Device twins can be pre-configured in the platform's Device Twins List before device access, or configured step-by-step during the device access process. For details, please see 【Device Twins Management】.
Select Access Method
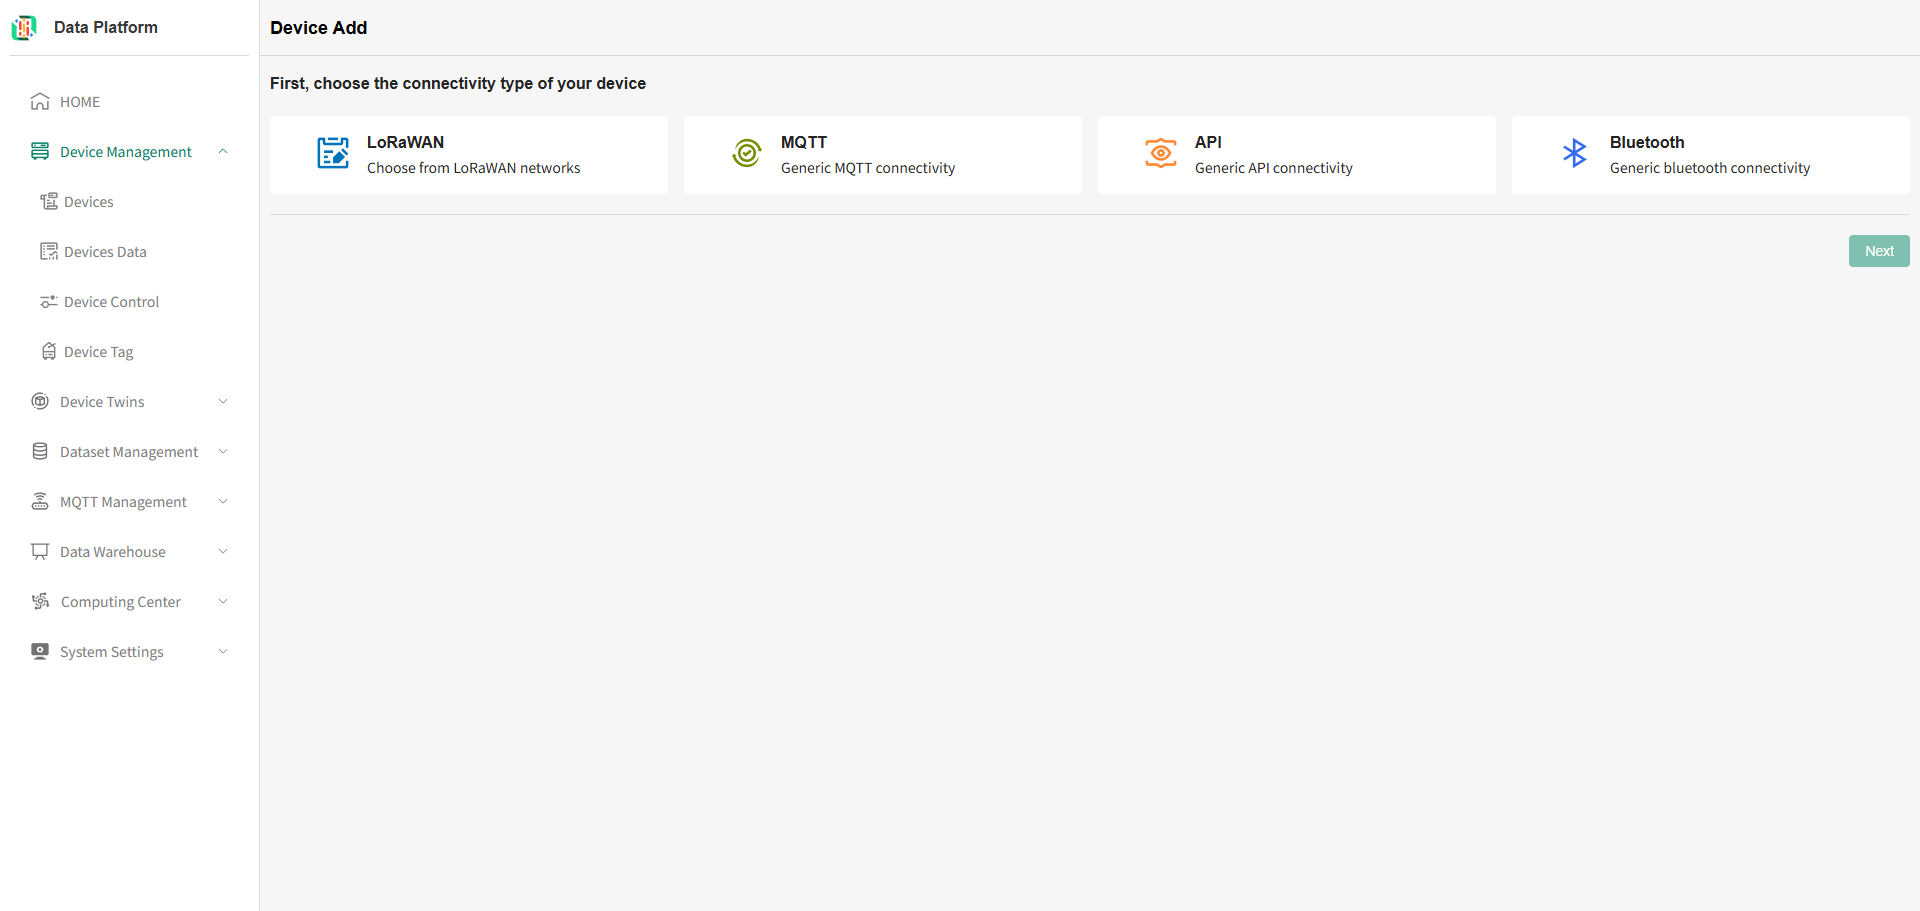
Click the "Add" button on the Device Management List Page to enter the device access process.
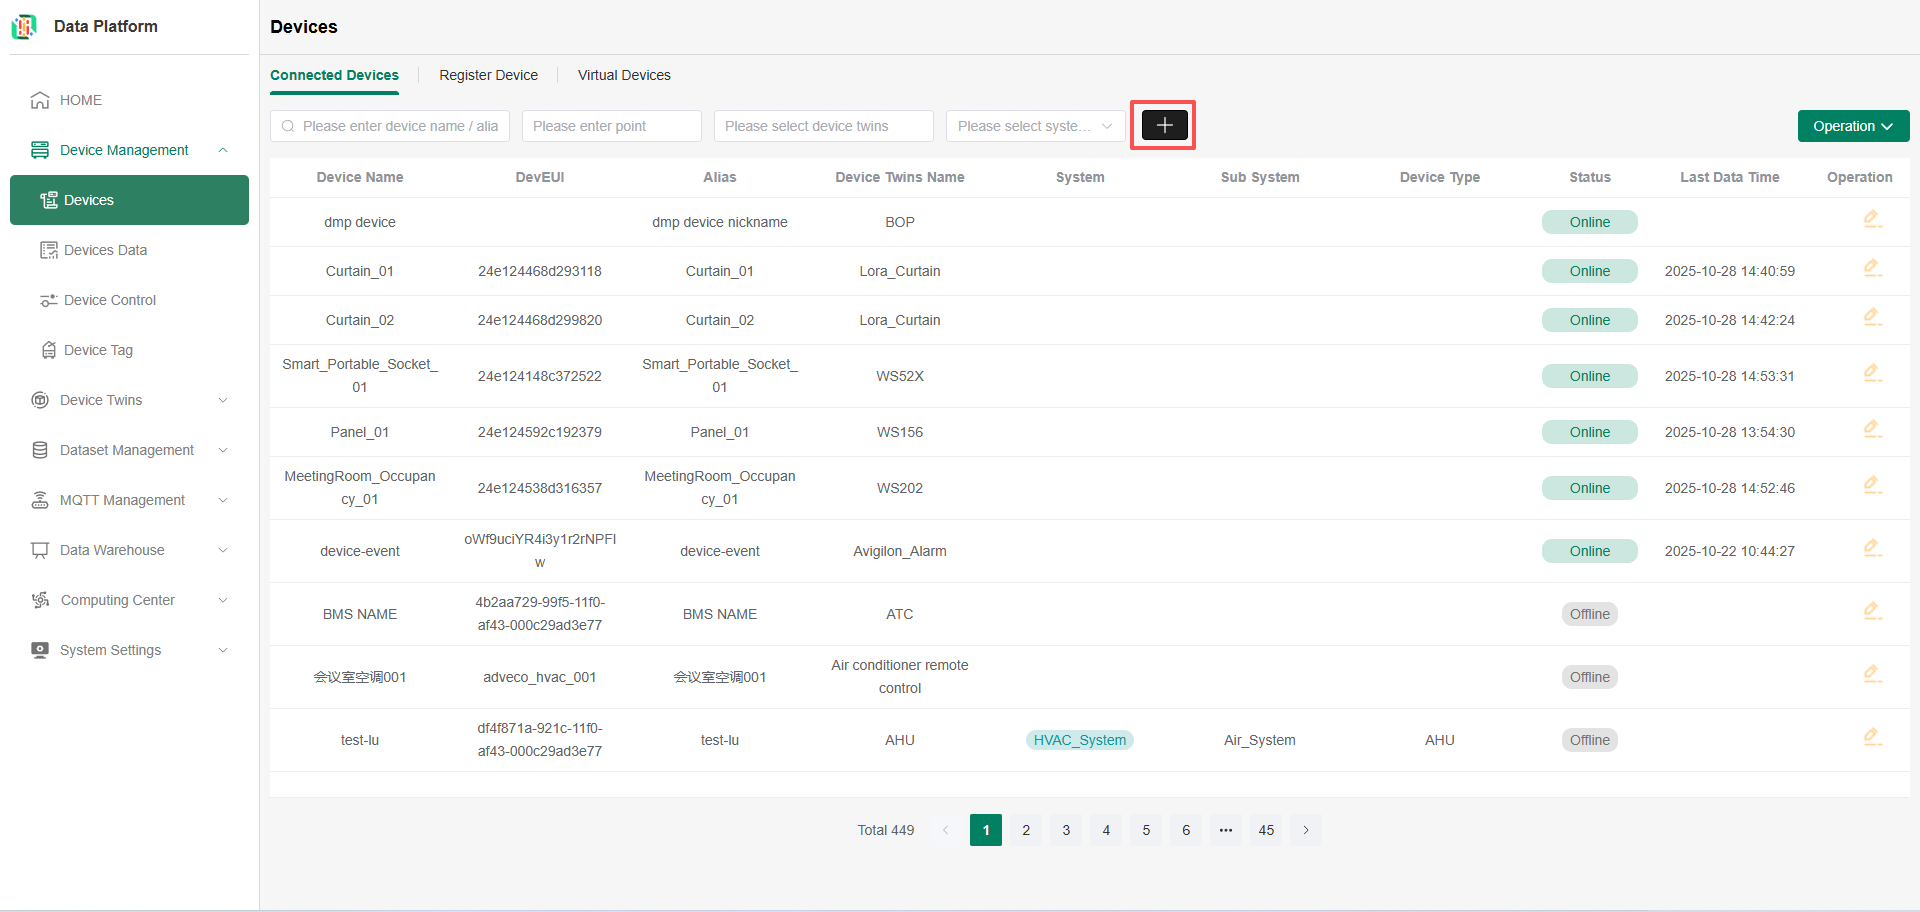
Select MQTT as the access method, then click Next.
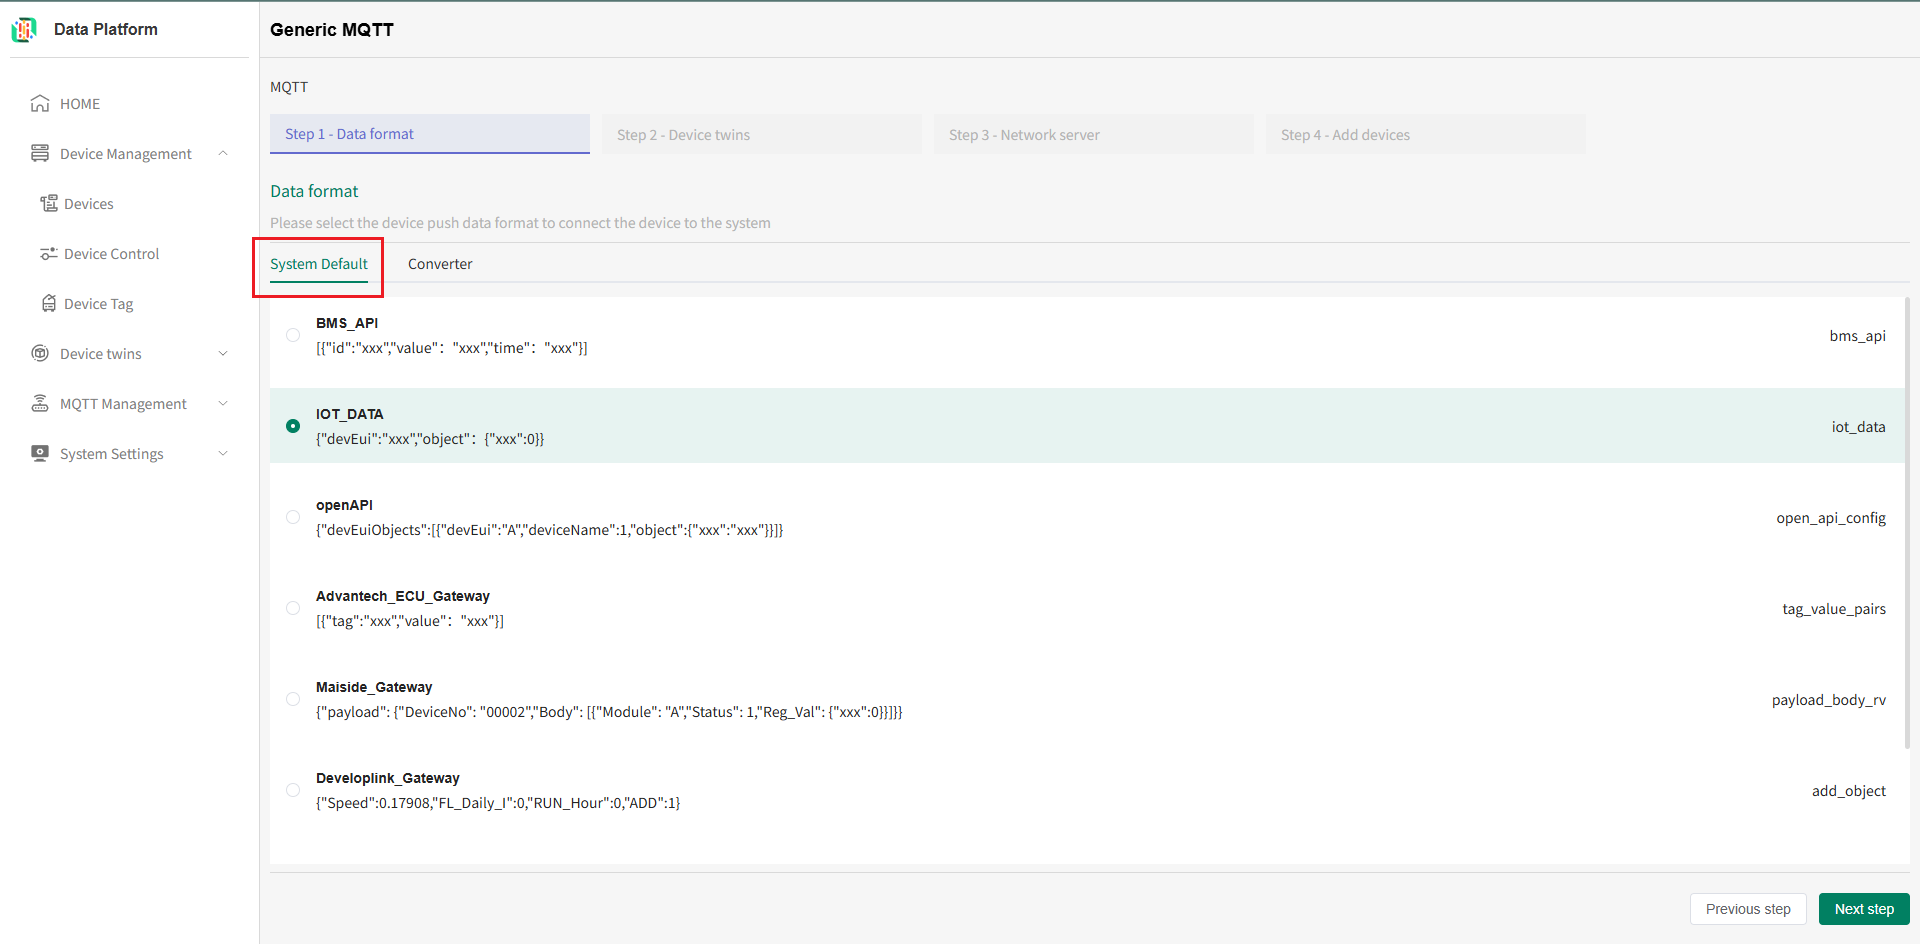
Select Data Reporting Format
The push of device data has strict format matching rules. The system will subscribe and parse according to the MQTT server information you configured. If the selected data reporting JSON format does not match the actual reporting format, device access will fail, and you need to Select/Add an ETL Converter (see above or check 【ETL Converter】).
Select System Preset Format
The list displays system preset formats by default. Select a matching format and click Next to configure the device twins.
Select Created ETL Converter
If your device reporting format does not match the system presets, you need to Select/Add an ETL Converter. The system will parse the data based on the format in the selected converter.
Click to switch to the Converter panel and select an already created ETL Converter.
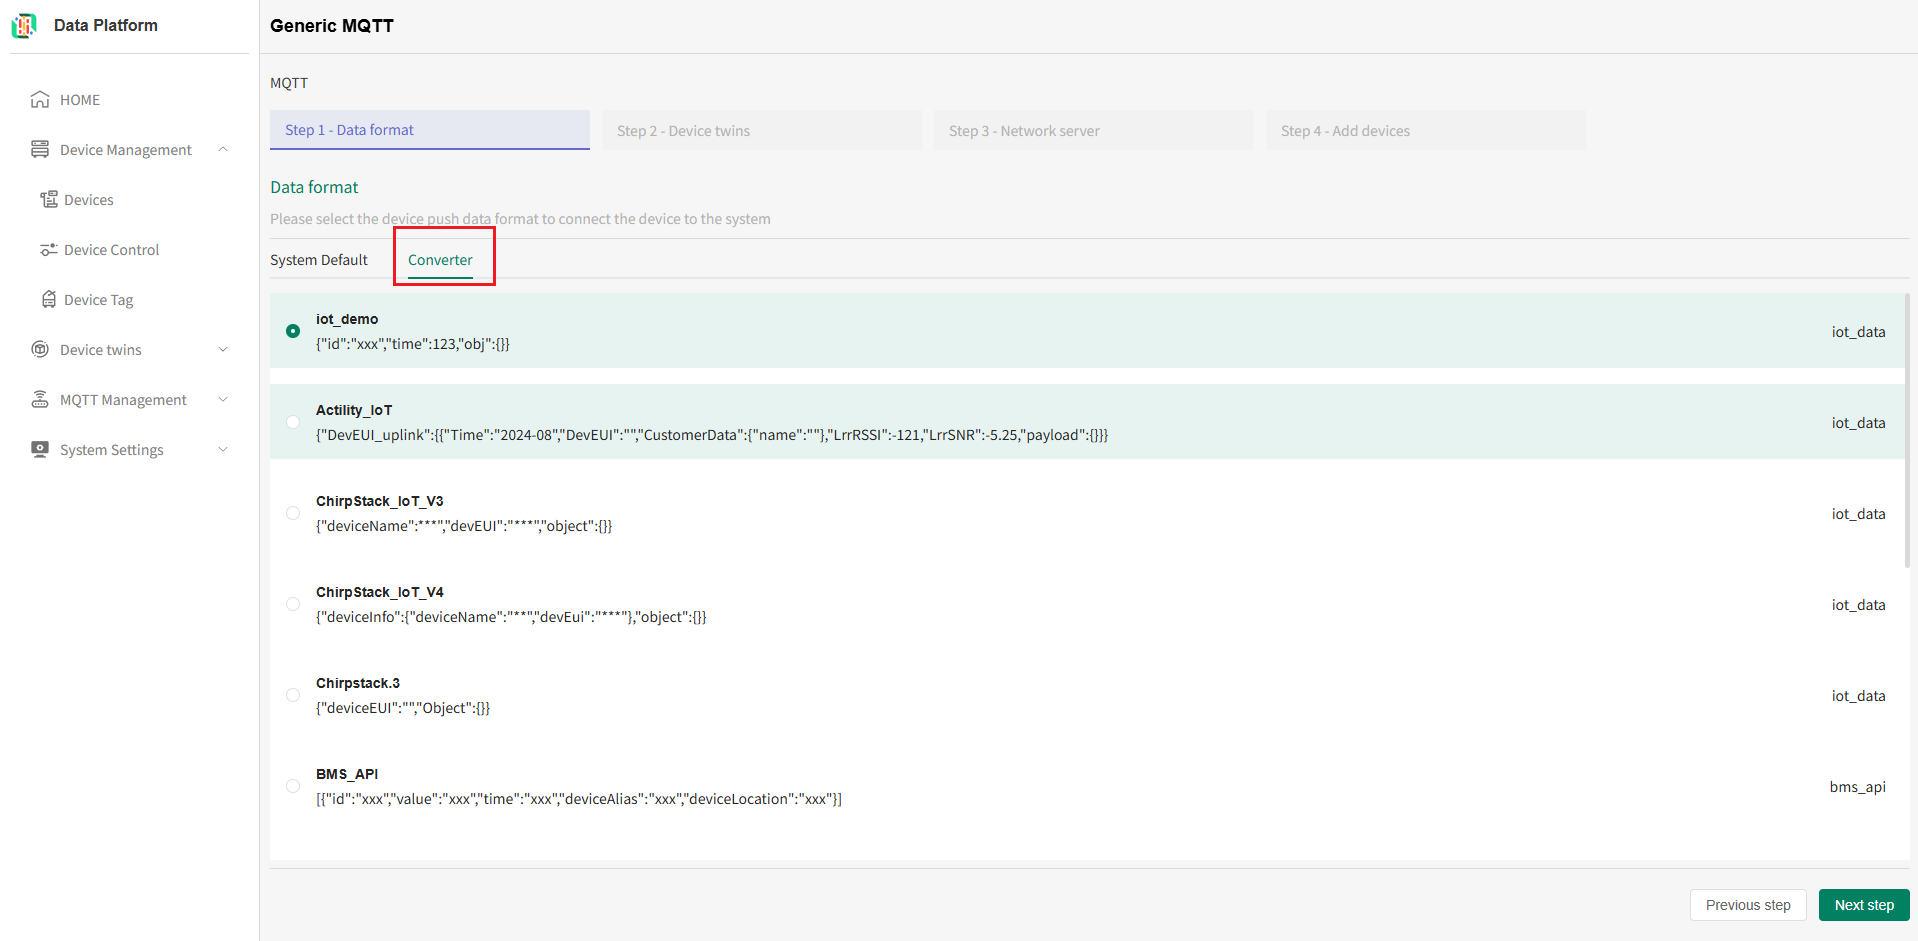
If you need to add a new ETL Converter, for operations, see 【ETL Converter】.
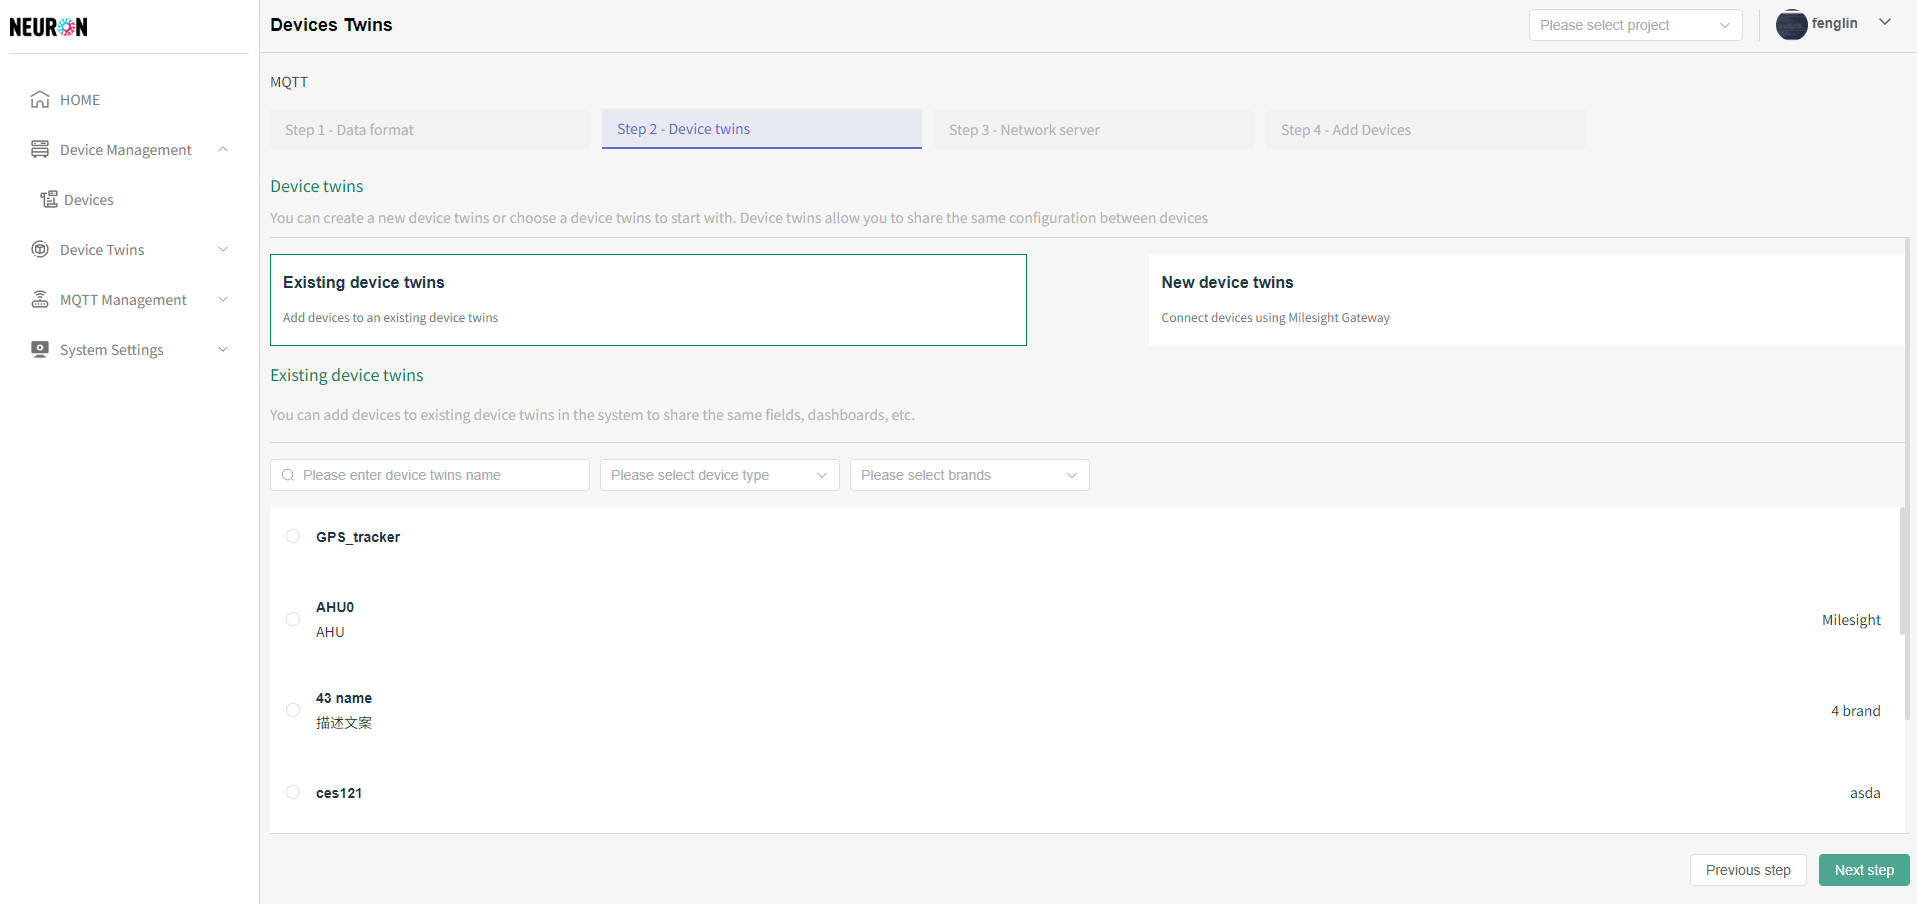
Select Device Twins
Select Existing Device Twins
Supports quick search by device twins name/type/brand.
Add New Device Twins
Click the Add Device Twins button to enter the addition interface. After filling in the device twins information, click the "Submit" button to create the device twins.
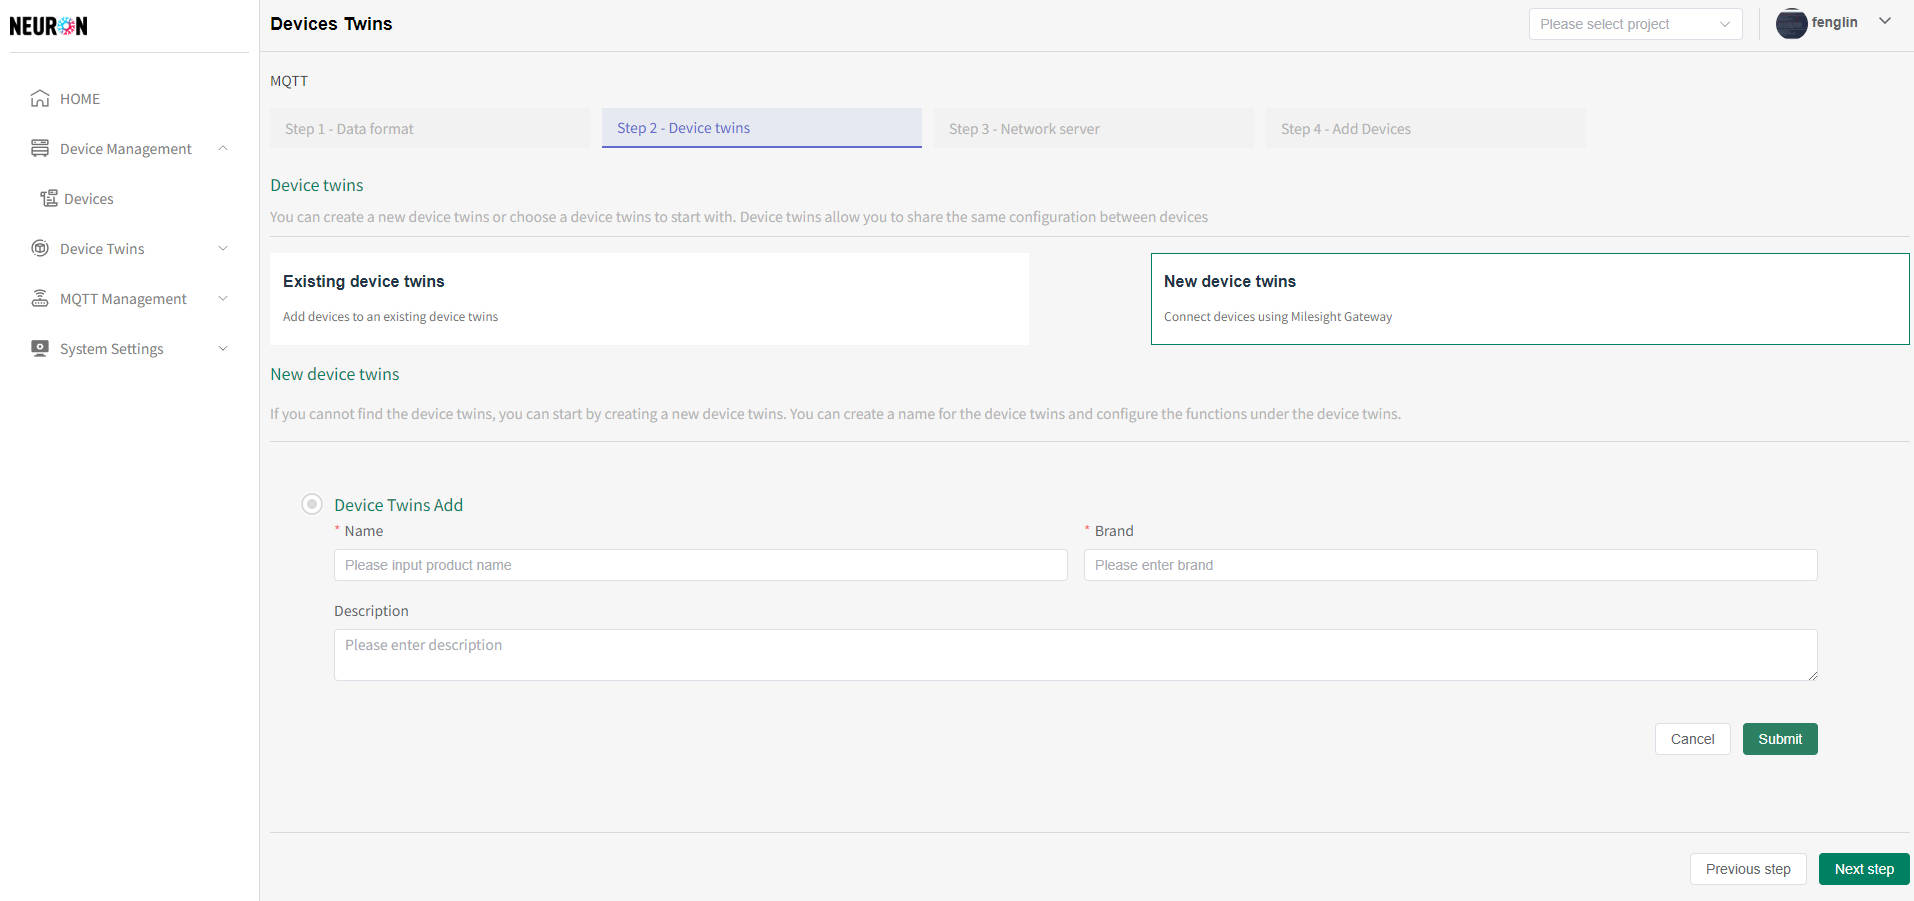
Note: Device twins names cannot be repeated. The system verifies name uniqueness upon submission; adding will fail if the name is duplicated.
Configure Function Type (Point)
After successfully creating the device twins, you can directly configure the Function Types under this device twins.
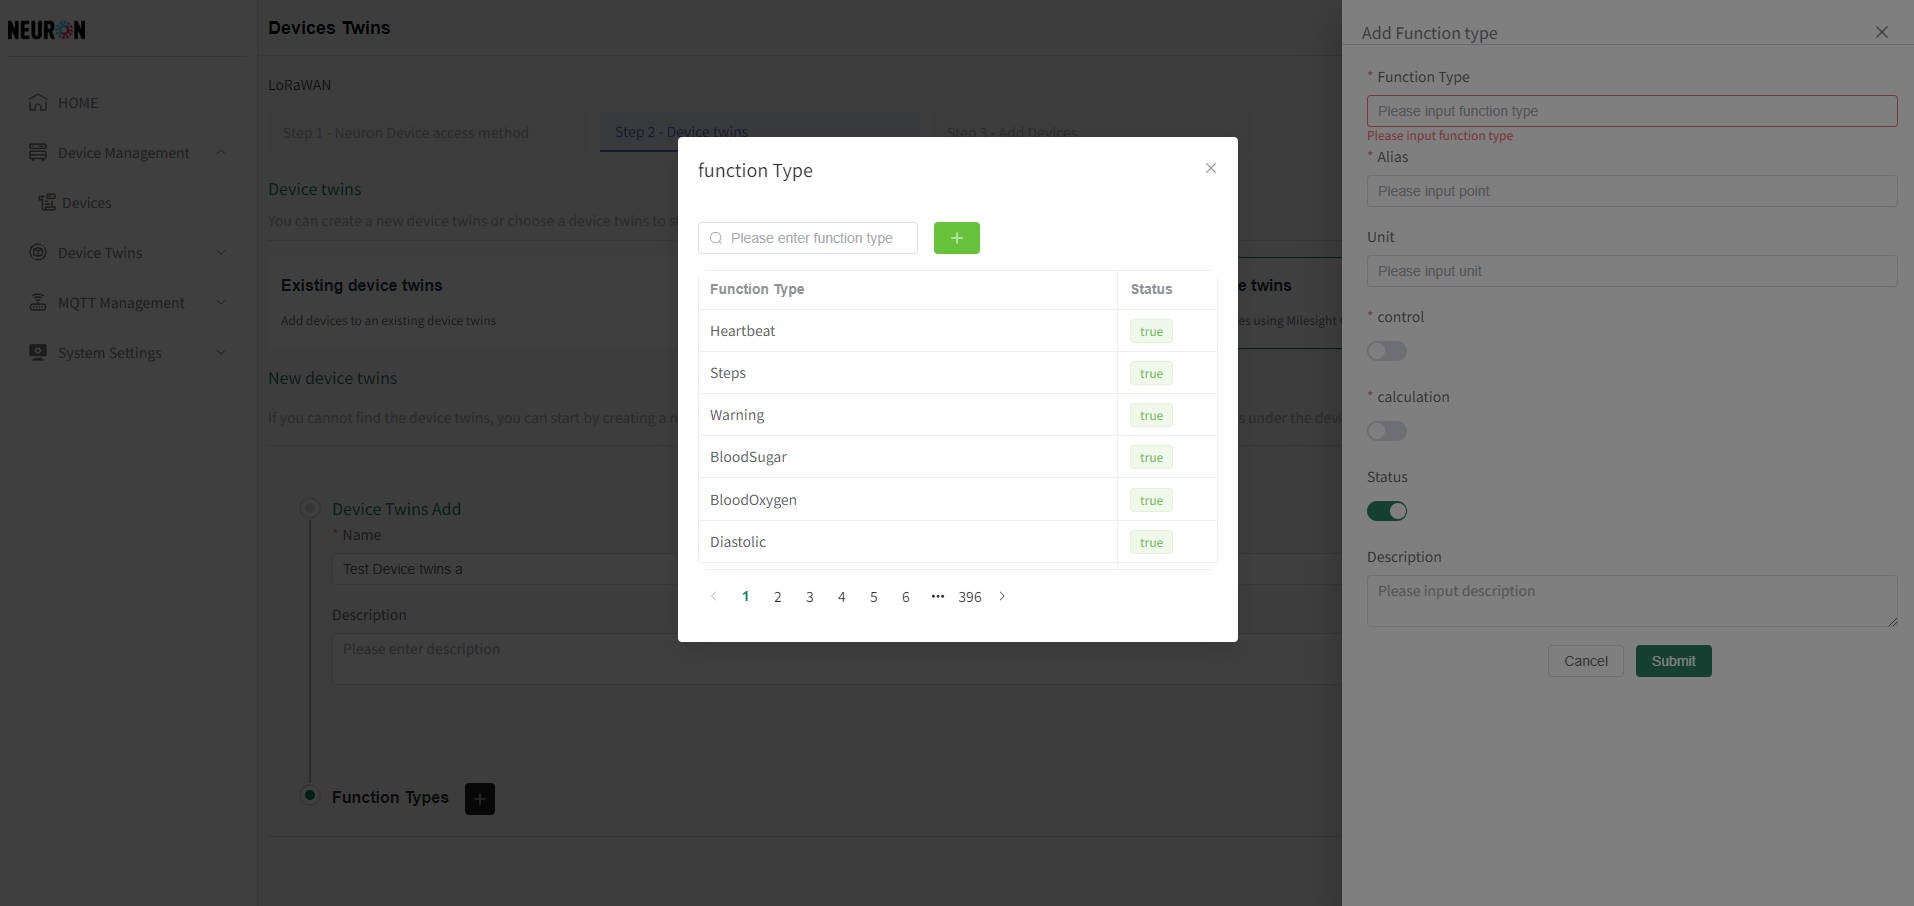
Click the "+" button indicated in the figure to enter the Function Type addition page.
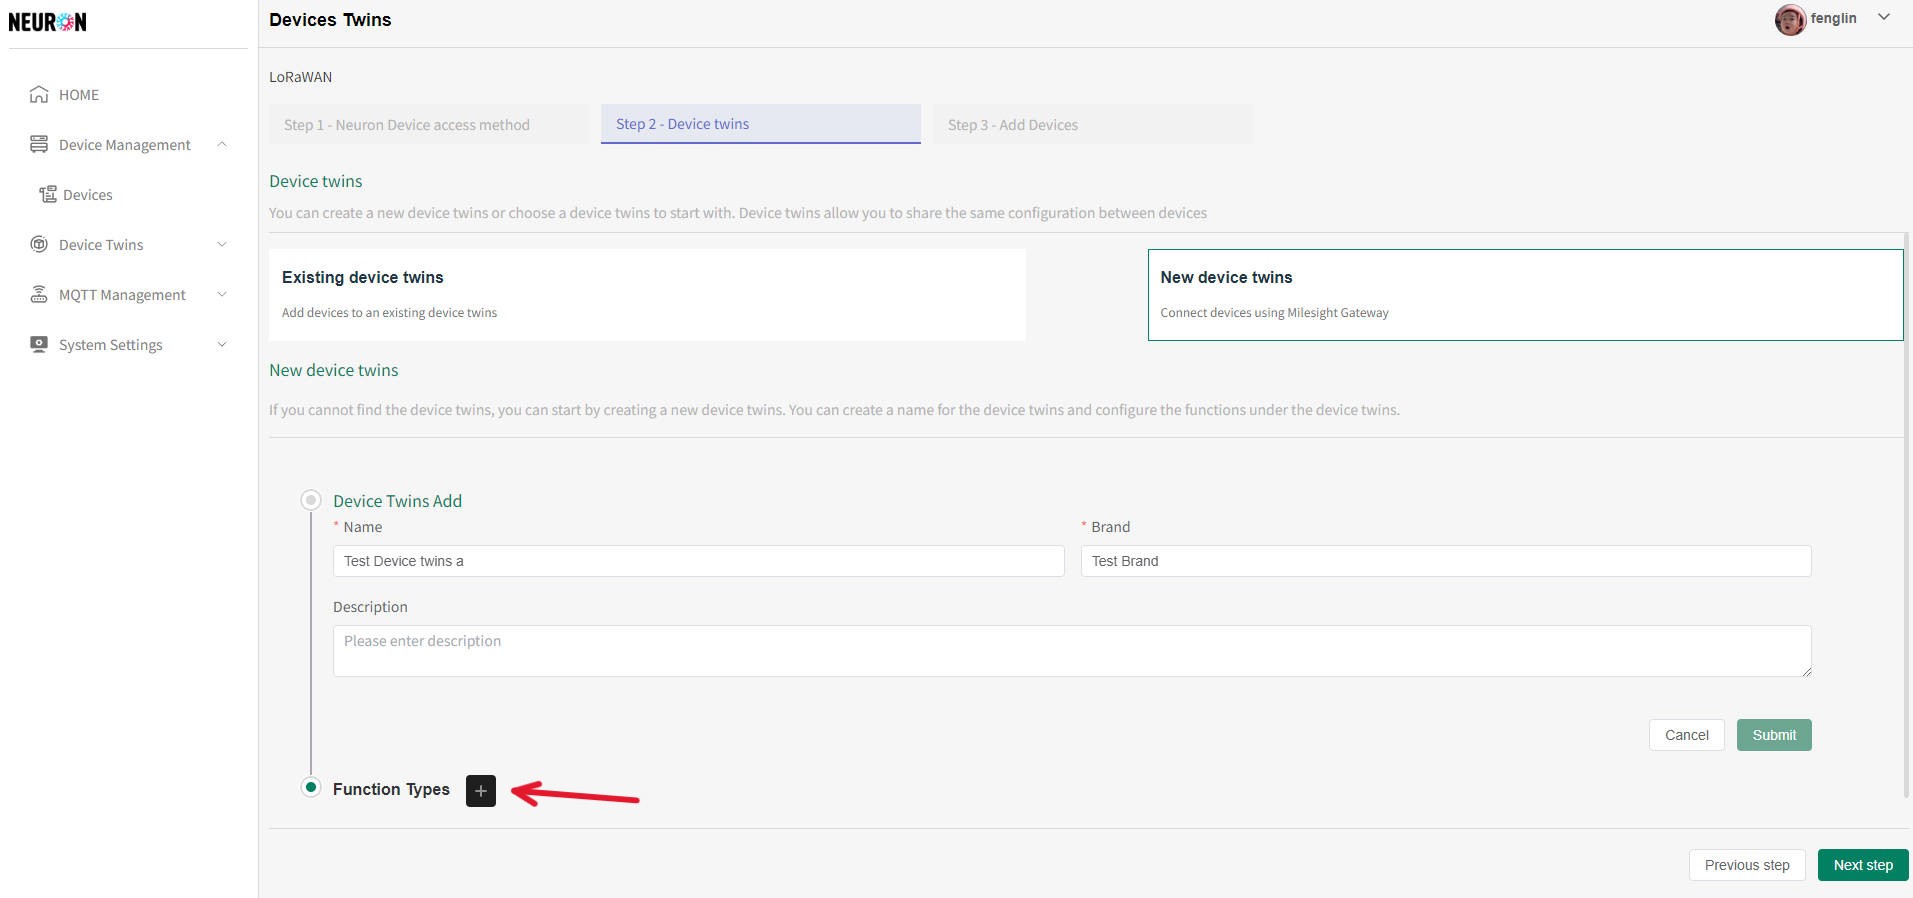
Click the Function type input box to Select/Add a Function type. For other configuration descriptions, see 【Device Twins Management】.
If the device twins has multiple Function Types, repeat the steps above to add multiple Function Types. After configuration is complete, click Next to proceed to the device registration page.
Select Topic
The Neuron platform will subscribe to device data based on the MQTT Server and Topic you configure. Therefore, you need to first correctly configure the MQTT Server and Topic to be used.
Select Existing Topic
Supports quick search by name.
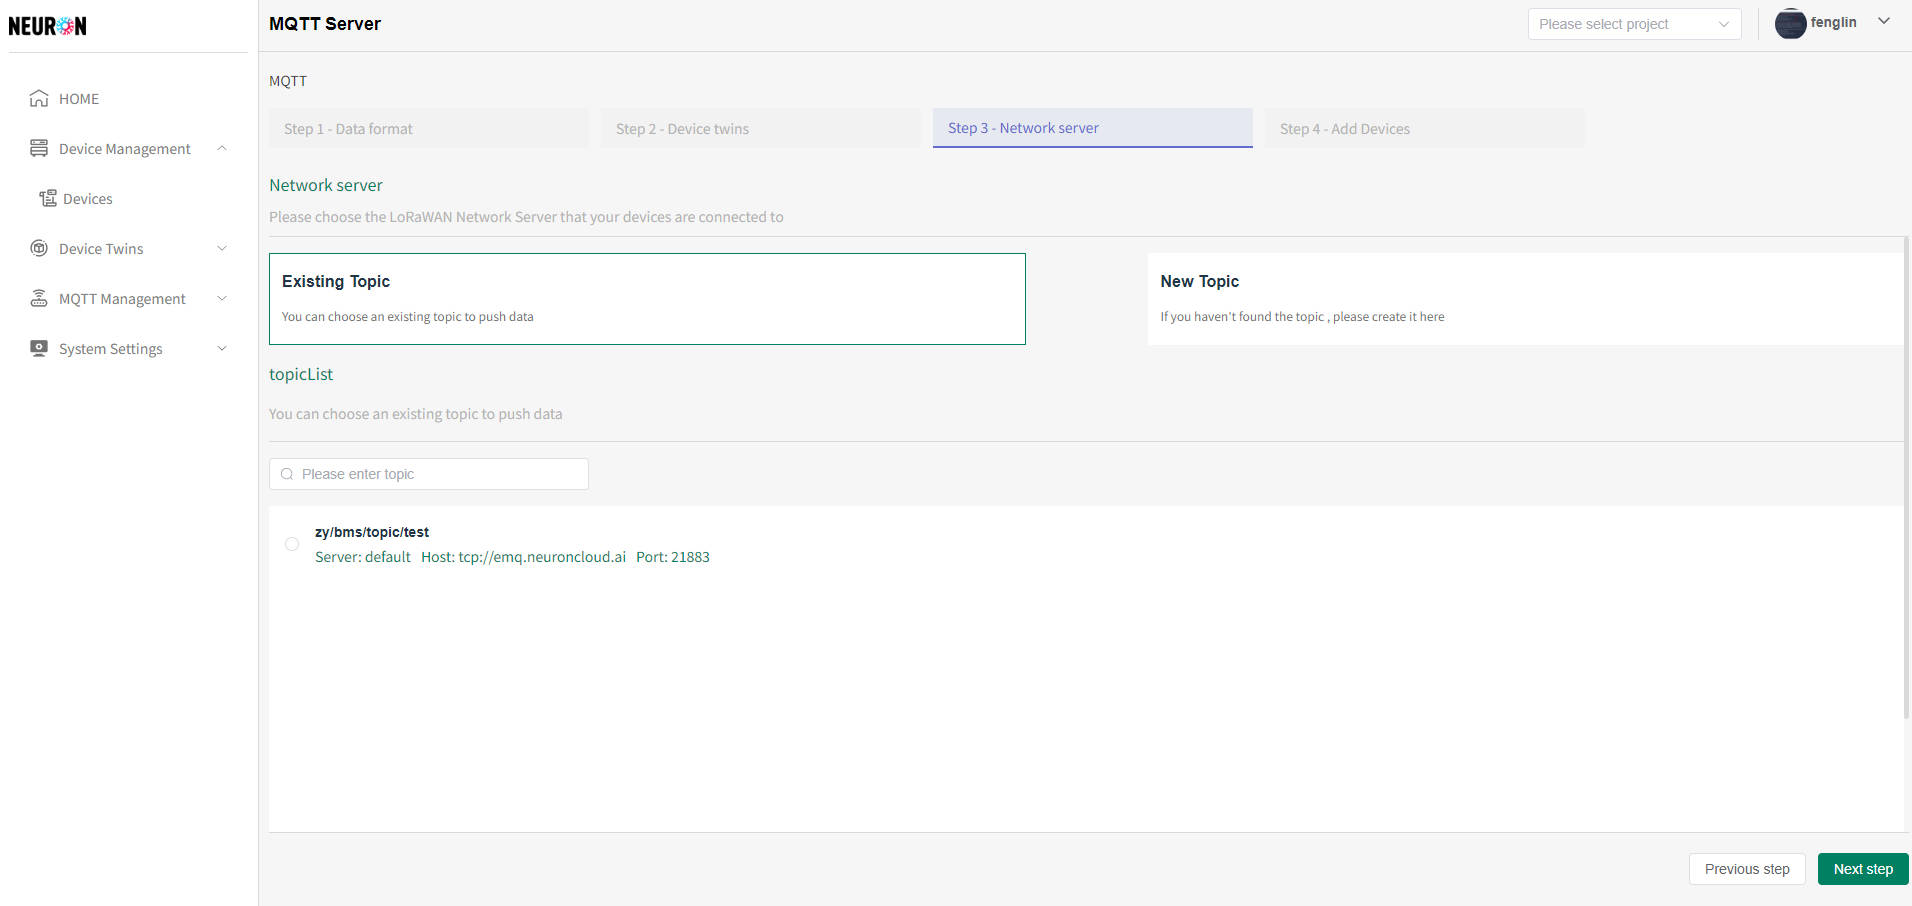
Add New Topic
Fill in the Topic information:
- Topic Name: Must be completely consistent with the topic format used when the device reports data for successful subscription (MQTT access only supports exact match format, allows topic level separator
/and normal UTF-8 characters, cannot contain+and#); - Interval: No need to change;
- MQTT Server: Required. Select the MQTT Server to use. If none exists, add one first (Configure MQTT Server);
- Category: Devices accessed via MQTT must select Other;
- ETL Type: No need to change, will be automatically populated from the format selected in the first step. Check the JSON format below to see if it matches the data format reported by your device. The system will subscribe and parse this JSON according to the MQTT server information. If the format does not match, device access will fail, and you need to Select/Add an ETL Converter;
- ETL Converter Type: If the default JSON format does not match your device, you need to configure an ETL Converter for data conversion (Currently, only ETL Converter is supported; JS Converter feature is not yet available);
- ETL Converter: If Converter was selected in the first step, it will be automatically populated. You can also select the desired ETL Converter (For the Add ETL Converter process, see above);
- Status: Enable.
After configuration is complete, click Next to proceed to the device registration page.
Device Registration
Supports two input methods: Online Editing or Download Excel for Batch Entry.
Bind Device to Platform Project
Before registering the device, please select the project to which the device belongs. Click the Project dropdown to select an existing project. If no project has been created yet, please create one first. For operations, see 【Create Project】.
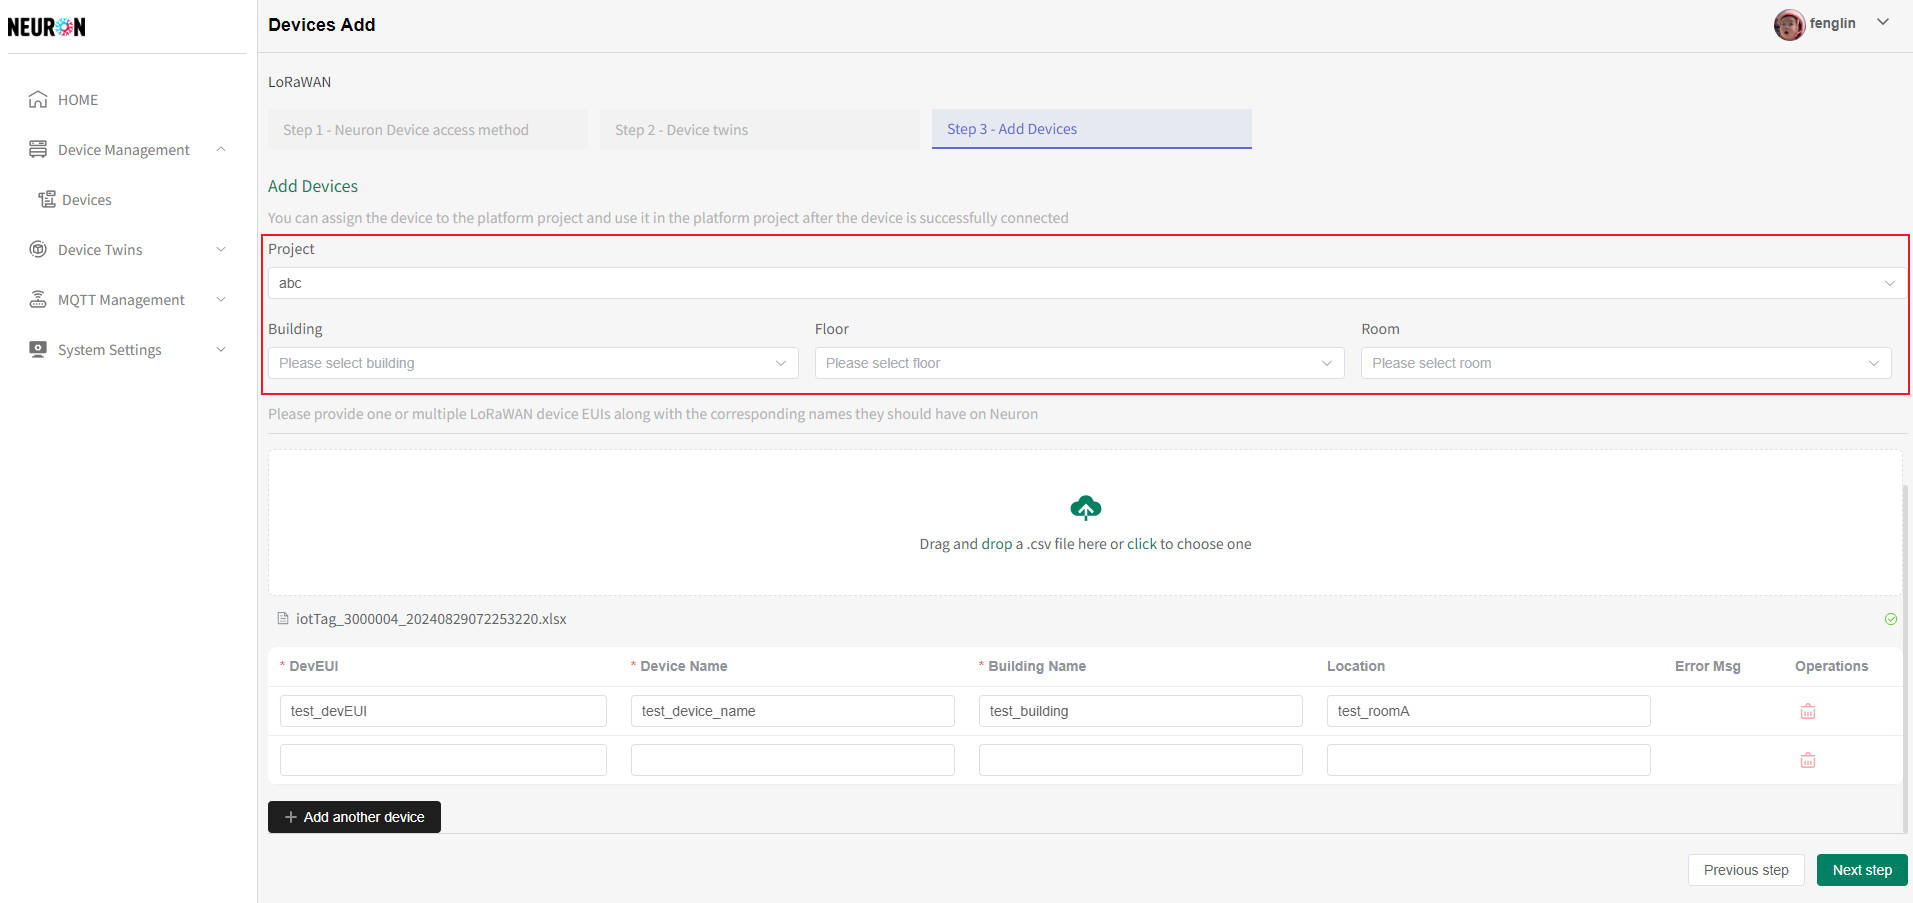
Batch Excel
Operation steps: Download Template -> Fill Excel -> Upload Excel -> If there are errors, perform online editing -> Click Next to complete device registration.
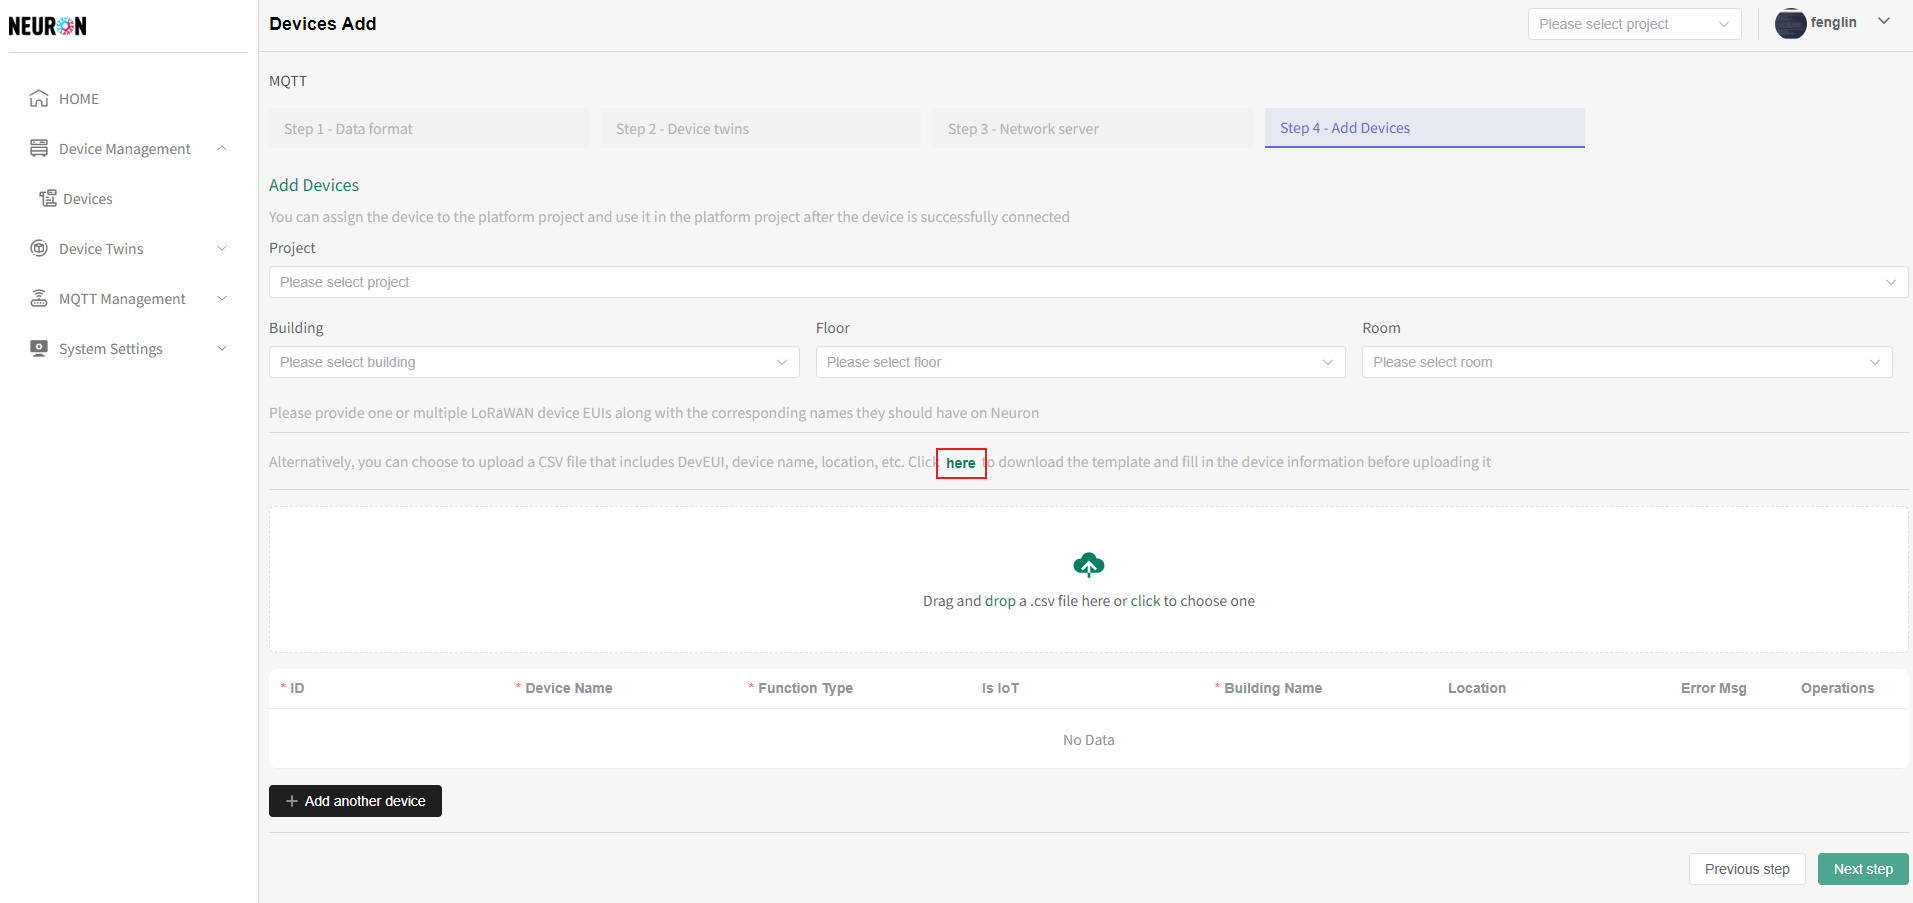
Download Template
On the device registration page, click the area in the red box in the figure below to download the template file.
Fill Excel
Fill the device information that needs to be entered into the Excel template. The MQTT template is divided into two types: IoT devices and non-IoT devices.
IoT Device Template
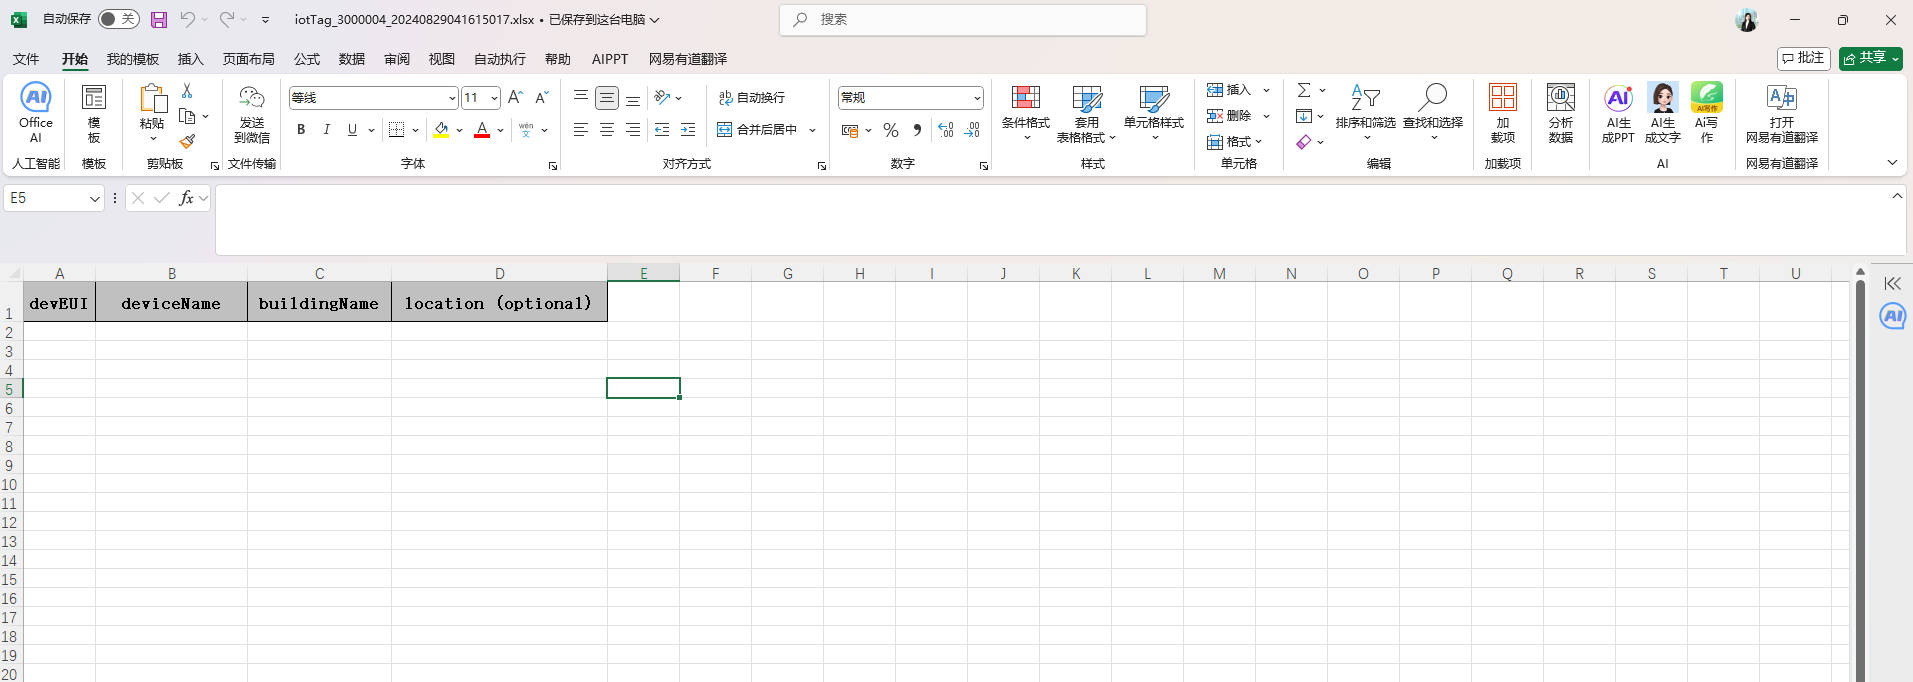
- DevEUI: The unique identifier for the IoT device. Usually, fill in the DevEUI on the device. Required;
- deviceName: Device name, must be unique. Required;
- buildingName: Building location information. Required;
- location: Device location. Optional.
Non-IoT Device Template
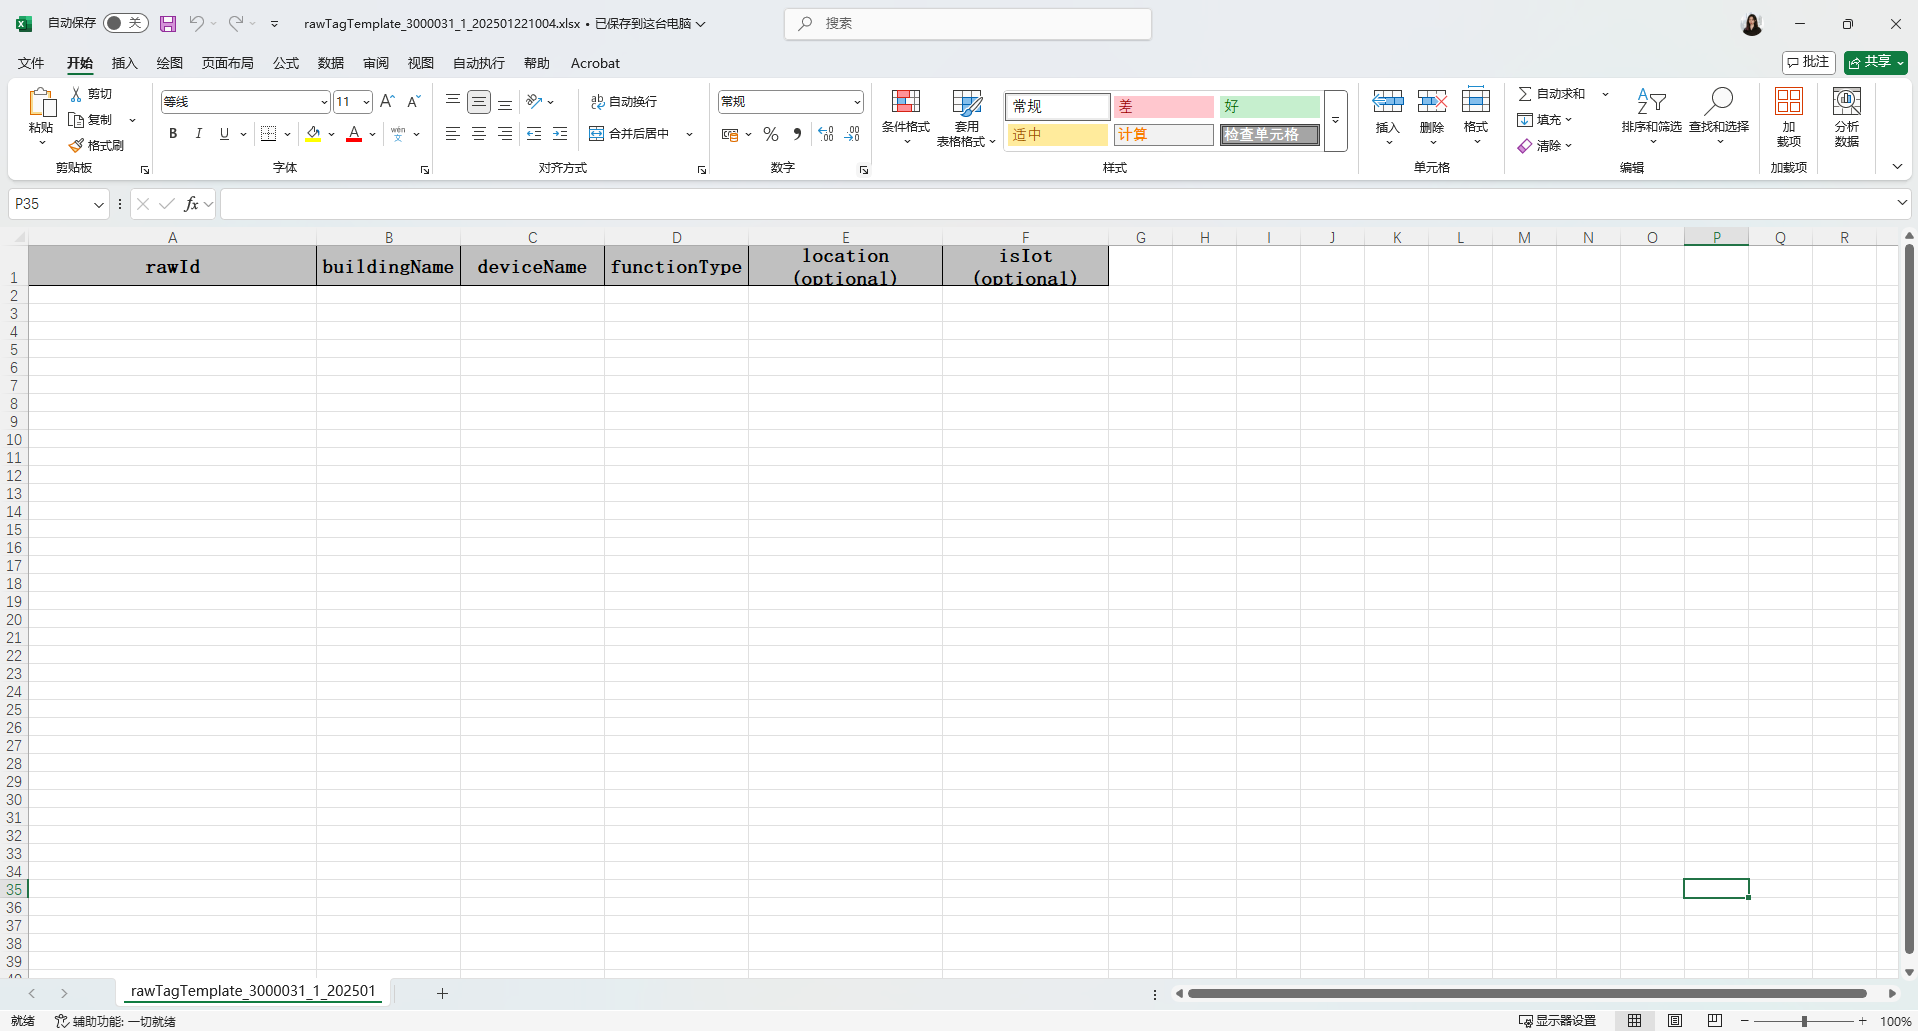
- rawId: The unique identifier for the non-IoT device. Usually, fill in the Id of the device function point. Required;
- buildingName: Building location information. Required;
- deviceName: Device name. Multiple function points can fill in the same device name, and the system will consider these function points to belong to the same device. Required;
- functionType: Device function point, must match the function point under the selected device twins. Required;
- location: Device location. Optional;
- isIot: Identifies whether it is an IoT device. If empty, defaults to non-IoT device. Optional.
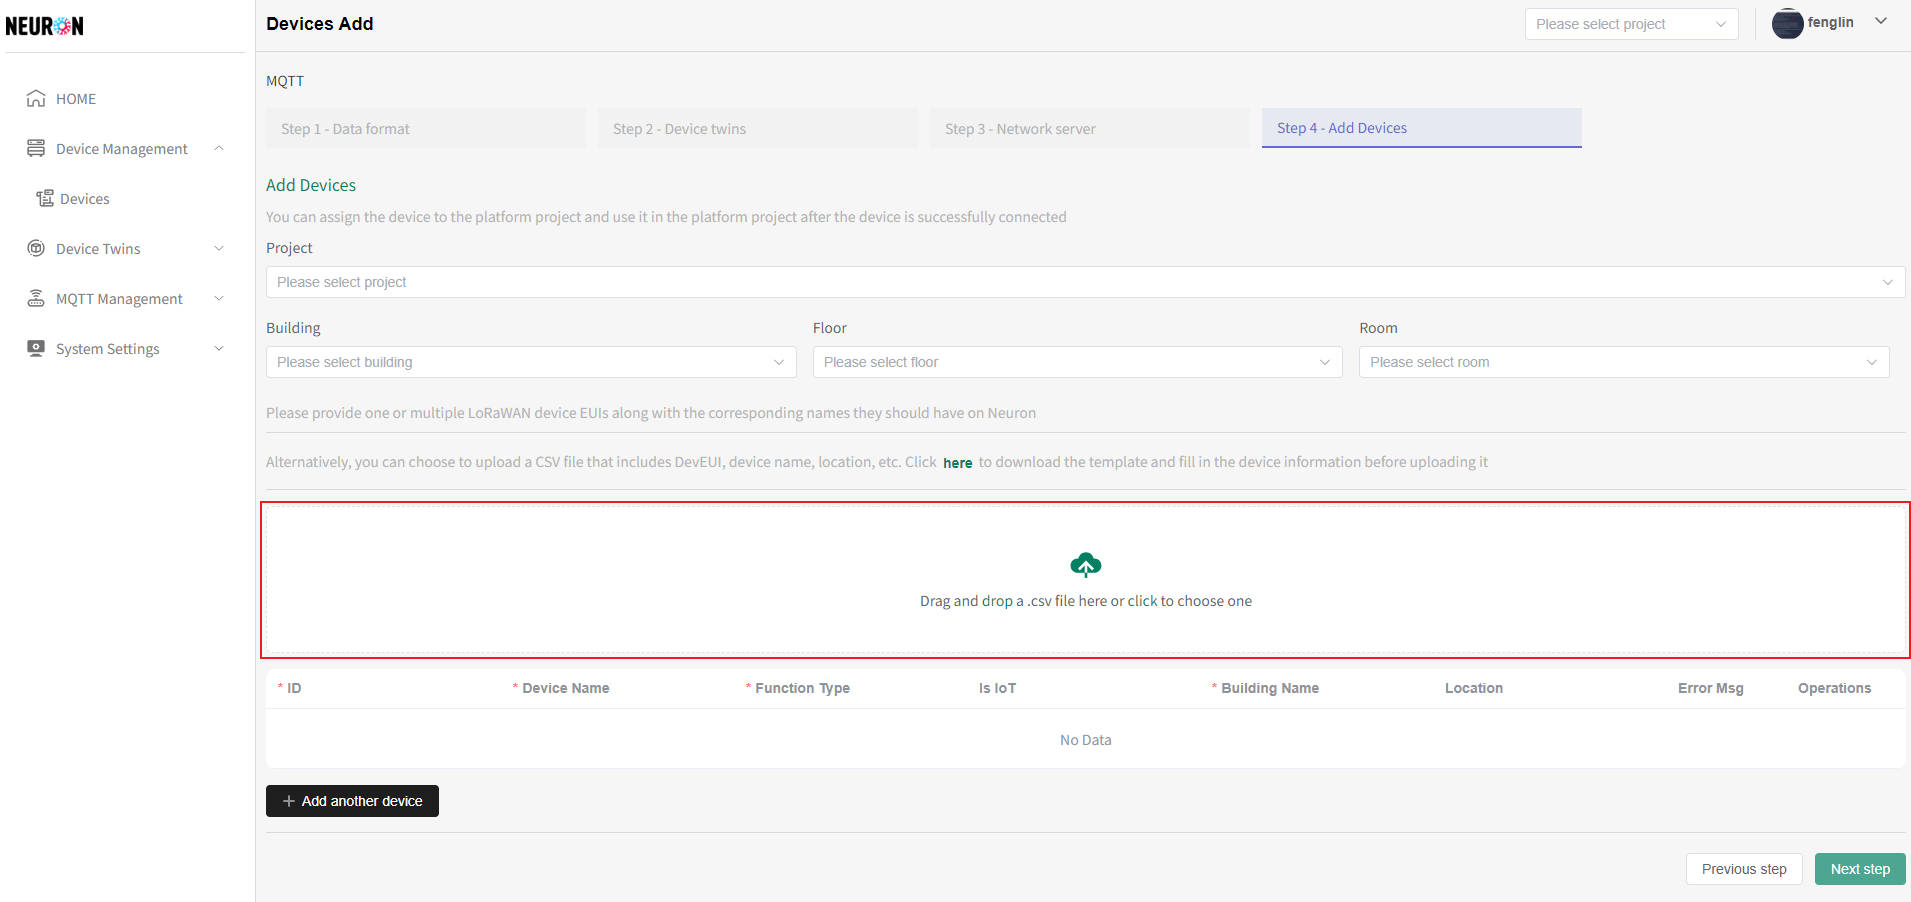
Upload Excel
Click/Drag the area in the red box in the figure below to upload the filled Excel file to the platform. The uploaded device information will be displayed in the online table. If there are errors, you can continue to add, delete, or modify.
Online Editing
Fill in the device information on the page. Click the Add button to add a new row and continue entering device information.
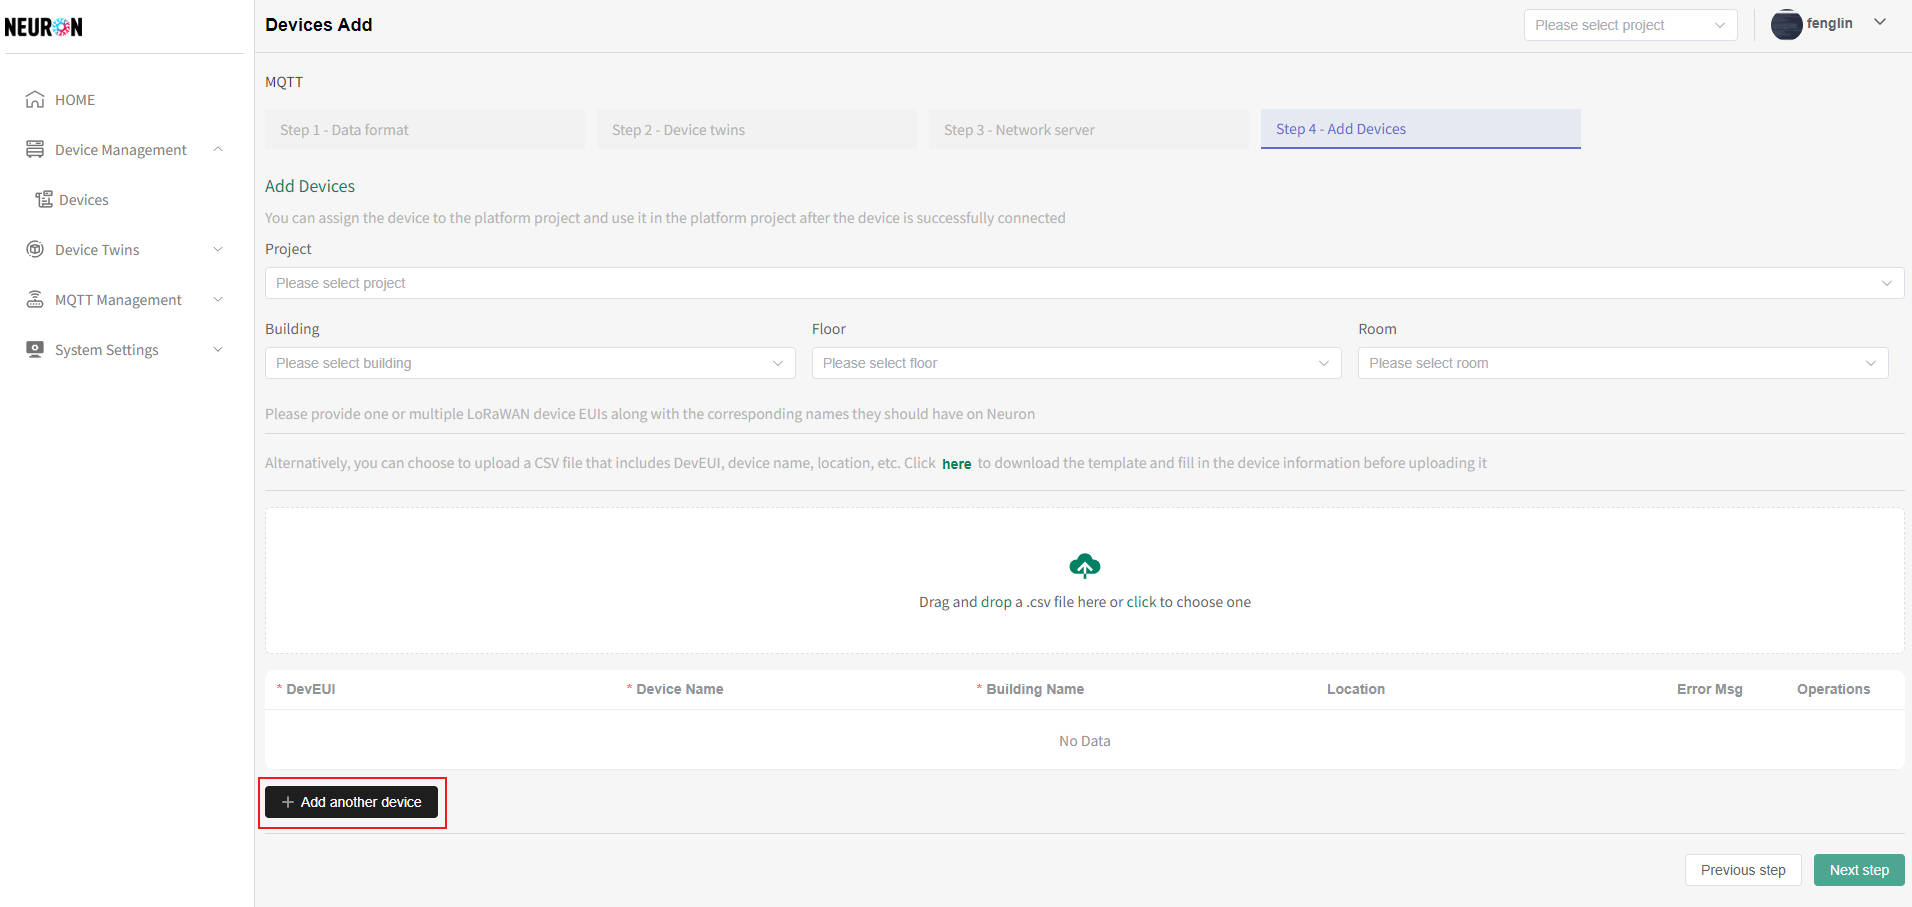
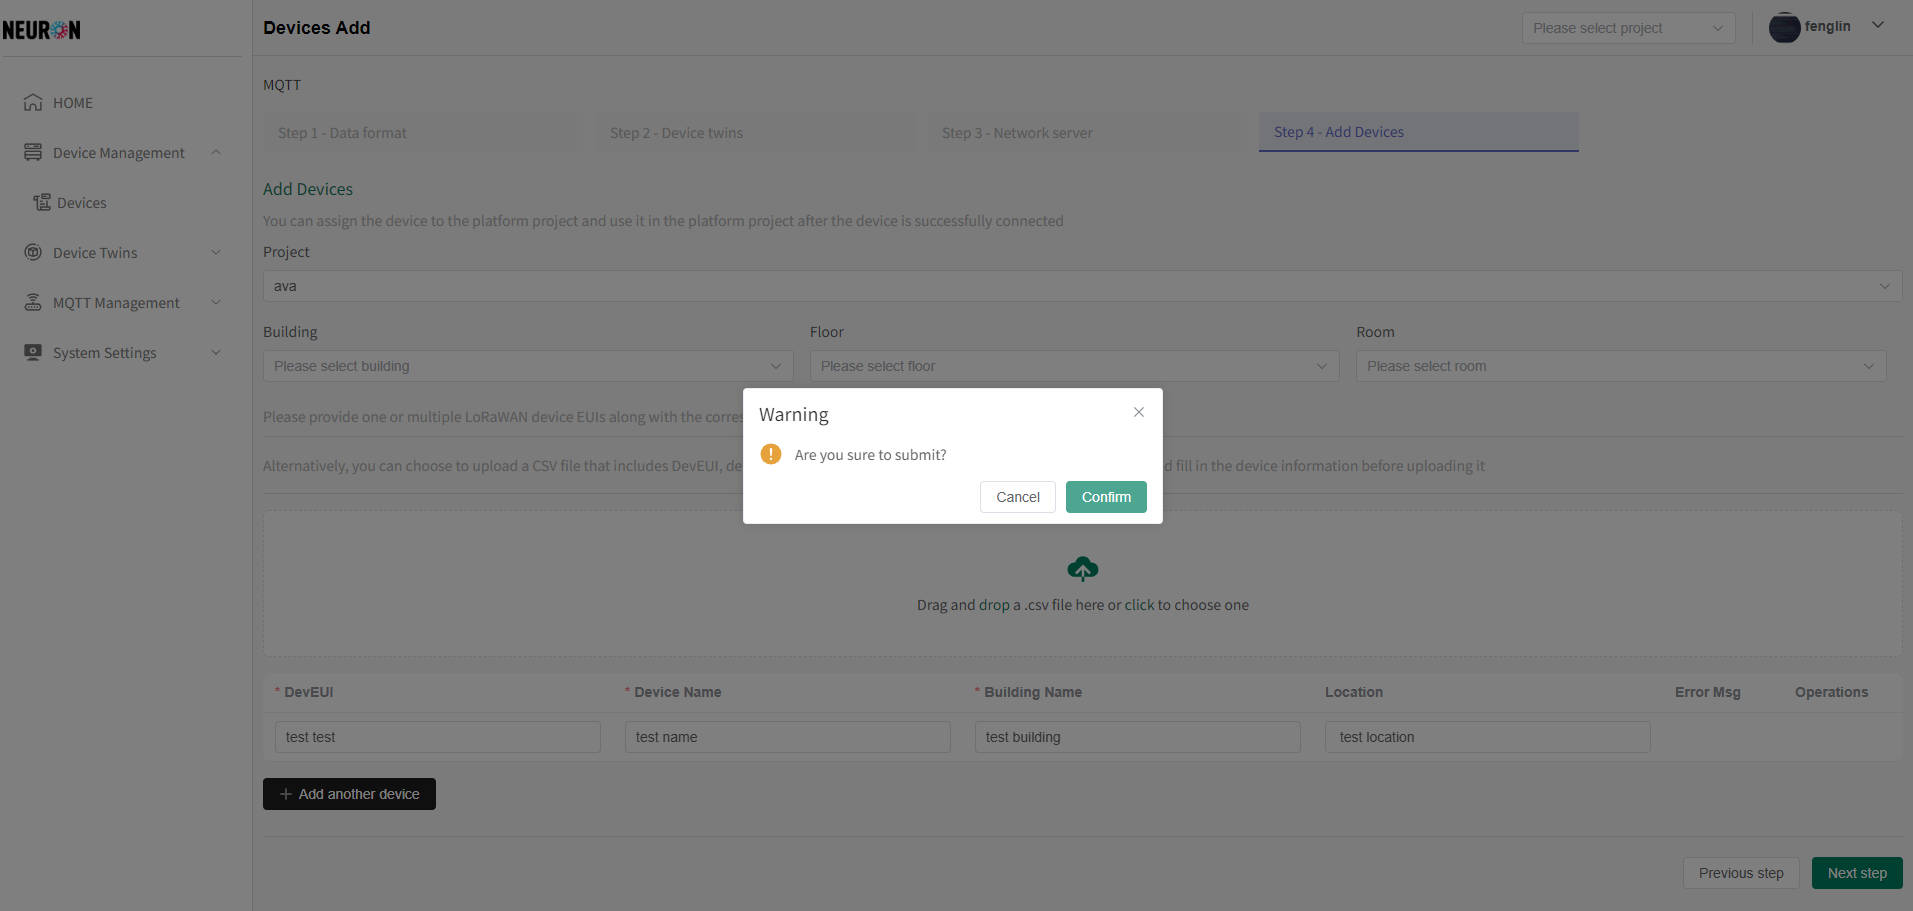
After completing the device information, click the Submit button. A confirmation window will appear. Confirm to complete device registration.
After registration is complete, it will jump to the Device Registration Page (the red box in the figure below shows the newly registered device data). Once the platform subscribes to standardized reported data, the device is successfully accessed. After successful device registration, you can view device information and data in the device management interface. For specific operations, see 【Device Management】.
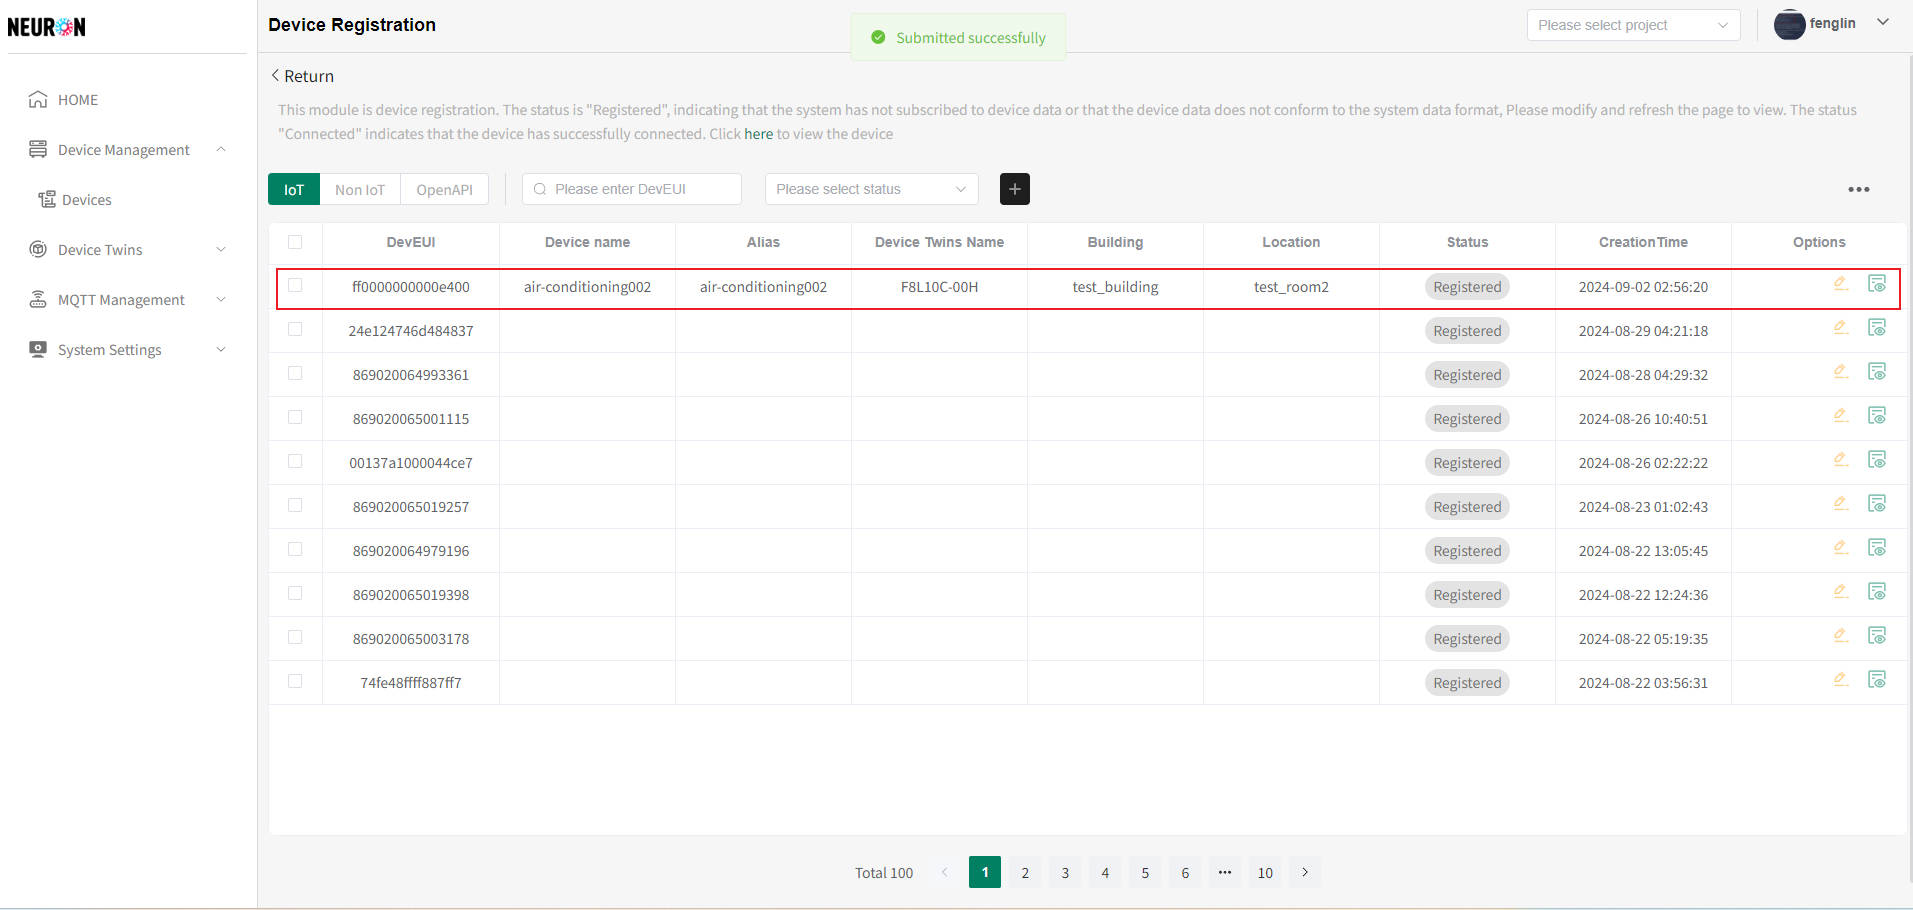
Note: Successful device registration means it has been recorded in the Neuron platform with a status of Registered, but real-time data is not yet connected. After the system subscribes to the reported data based on the configured parameters, cleanses it, and stores it in the database, the device status is updated to Connected and appears in the device list.