Device Management
Overview
The Device Management module is one of the core functional modules of the data platform, providing centralized management and monitoring of connected devices. Users can access this module via the menu bar or the home page quick entry to perform operations such as device query, detail viewing, basic information modification, tag management, and alarm configuration.
The module supports device management for various access methods including LoRaWAN, MQTT, API, and Bluetooth, and provides complete device lifecycle management functions, including device addition, detail viewing, time-series data query, and device deletion, enabling comprehensive operational monitoring of IoT devices.
To ensure the following operational process proceeds normally, please confirm that you have Project Administrator permissions.
Access Method
In the Tenant Edition, there are two ways to enter:
- Via the Menu Bar
- Via the Home Page
- Via the Menu Bar
After logging into the system, click the 'Device Management' menu, select 'Devices' to enter the Device Management module, as shown below.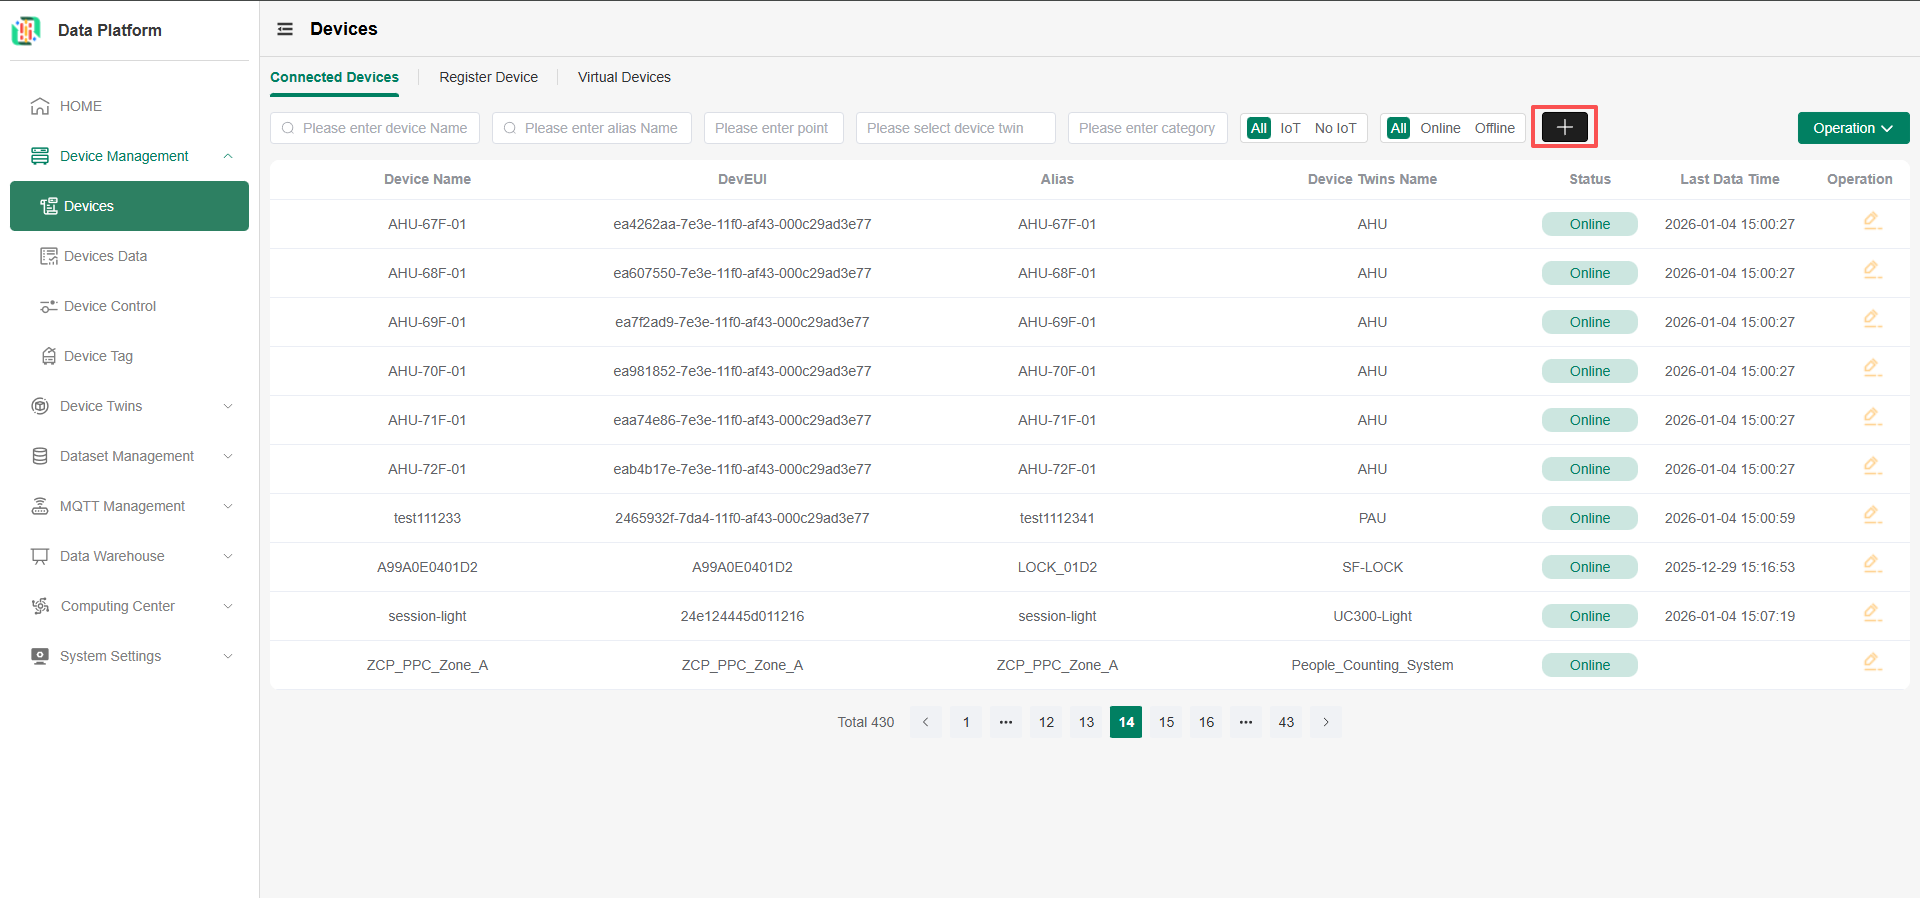
- Via the Home Page
On the Tenant Edition home page, click the "Total Device" module to enter the Device Management module, as shown below.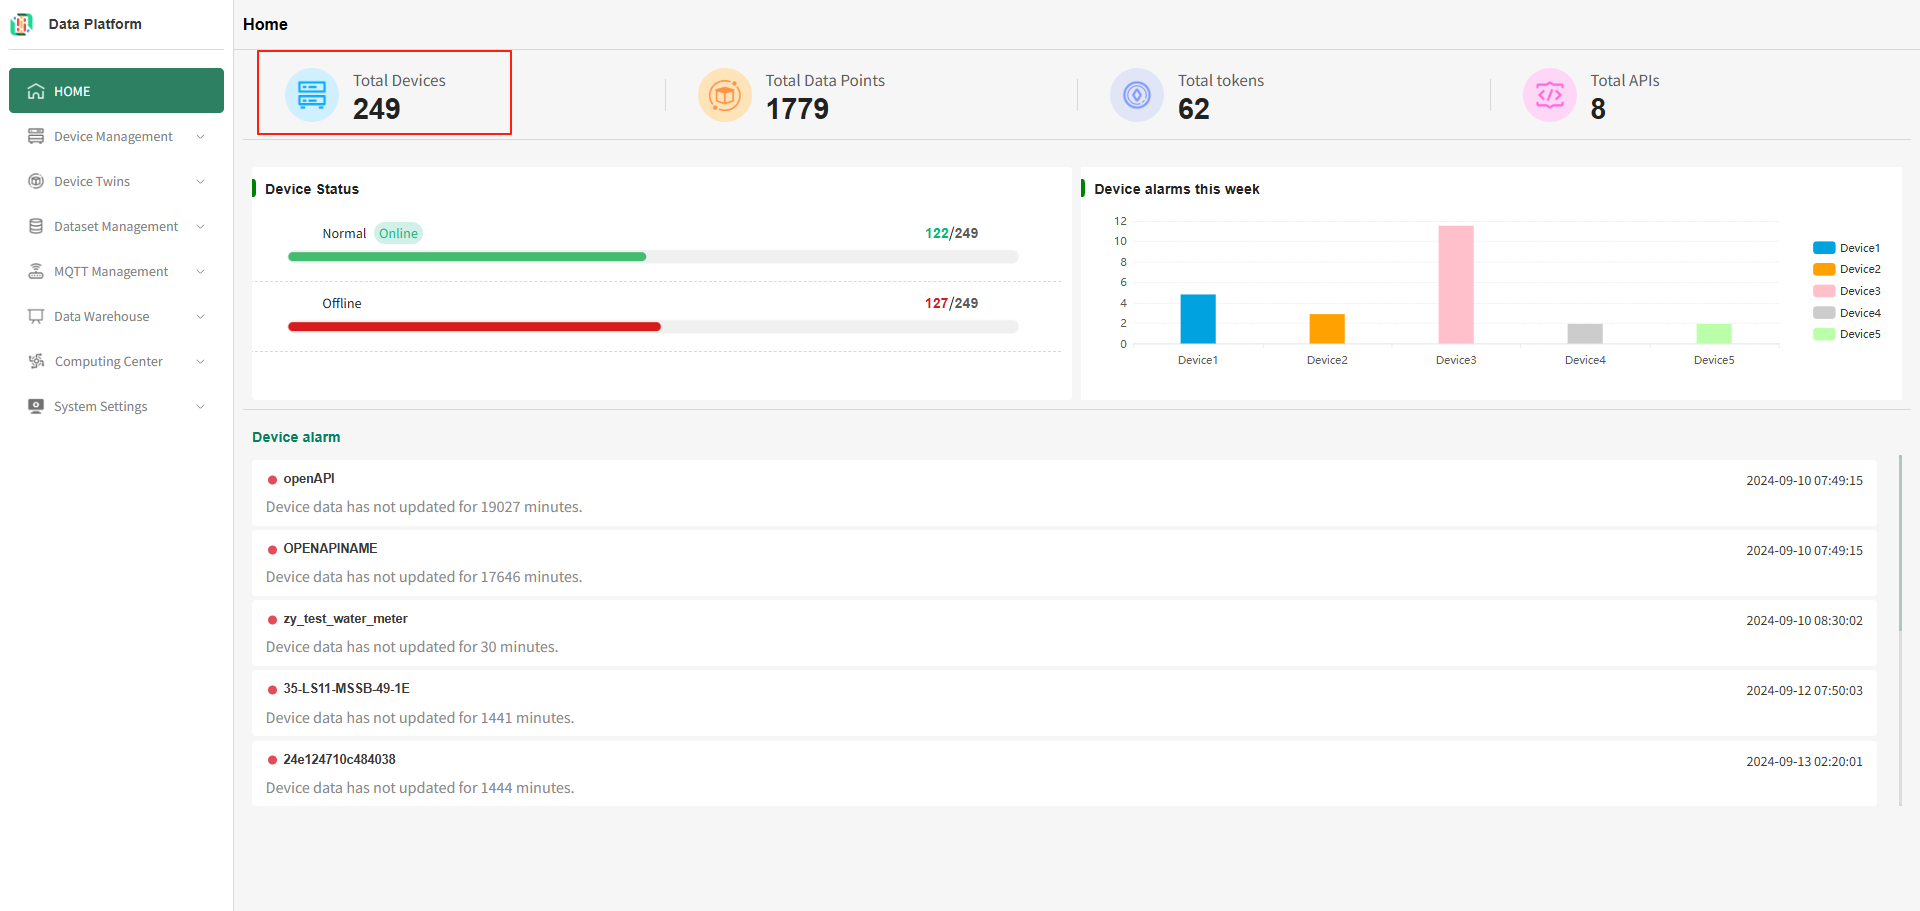
Device List
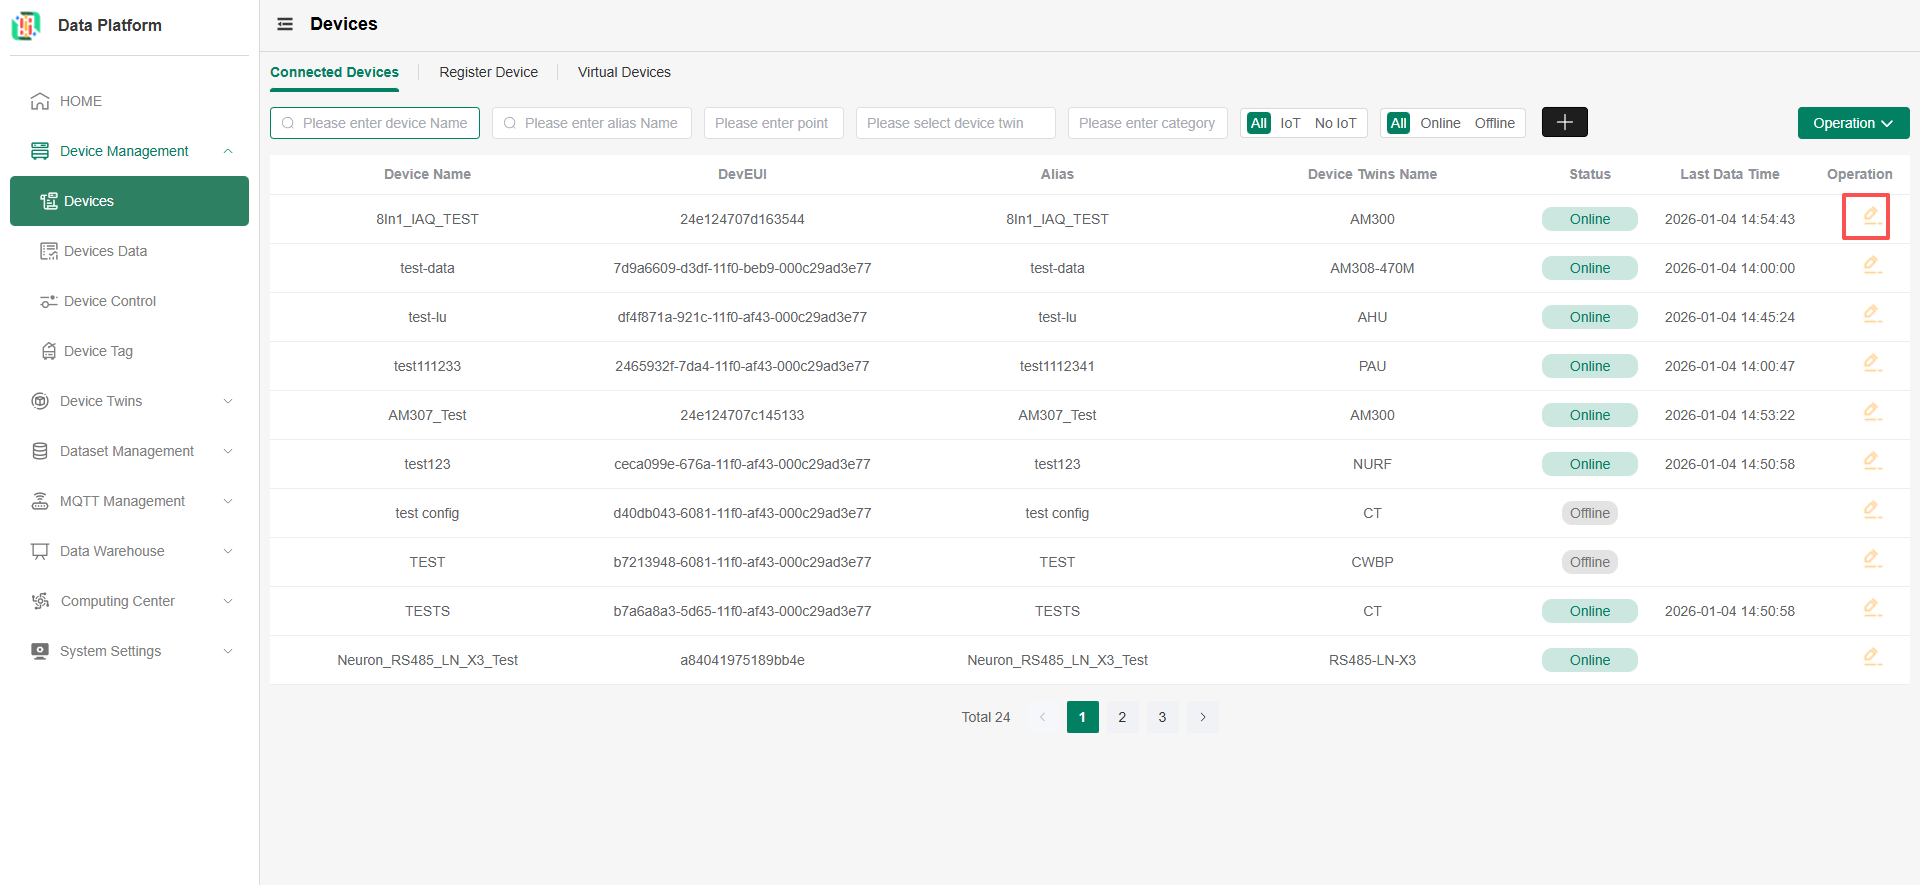
Devices displayed in the device list are all successfully connected devices and are all devices viewable by the currently logged-in account.
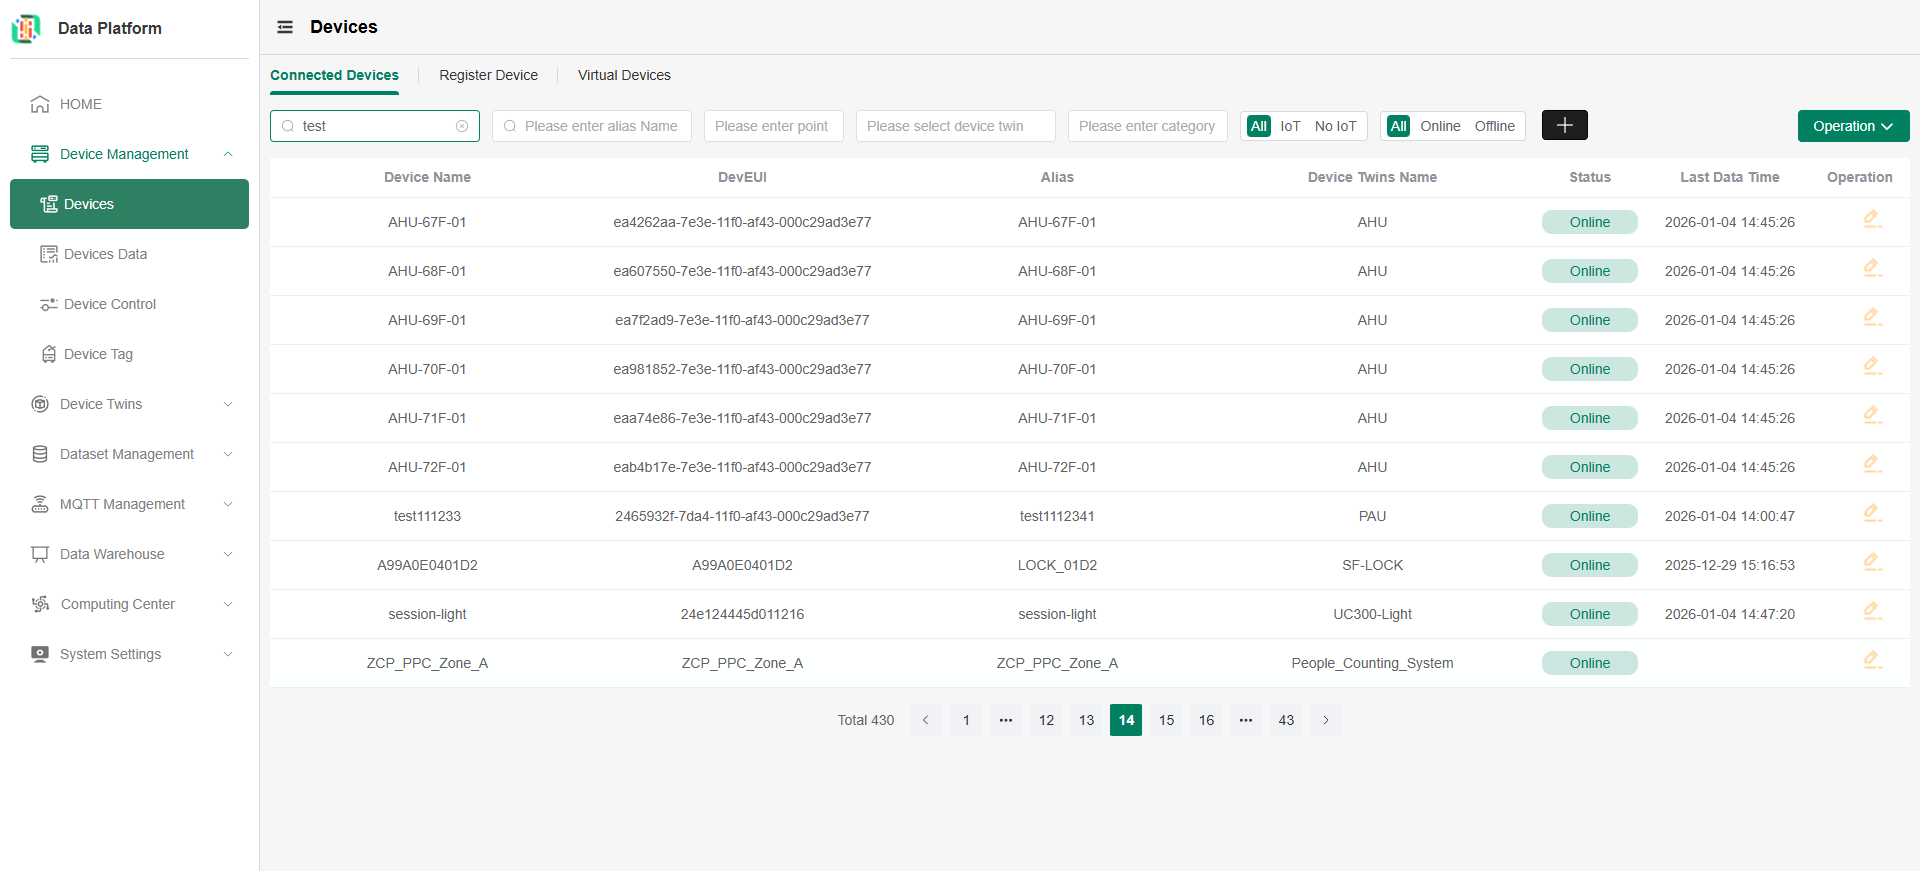
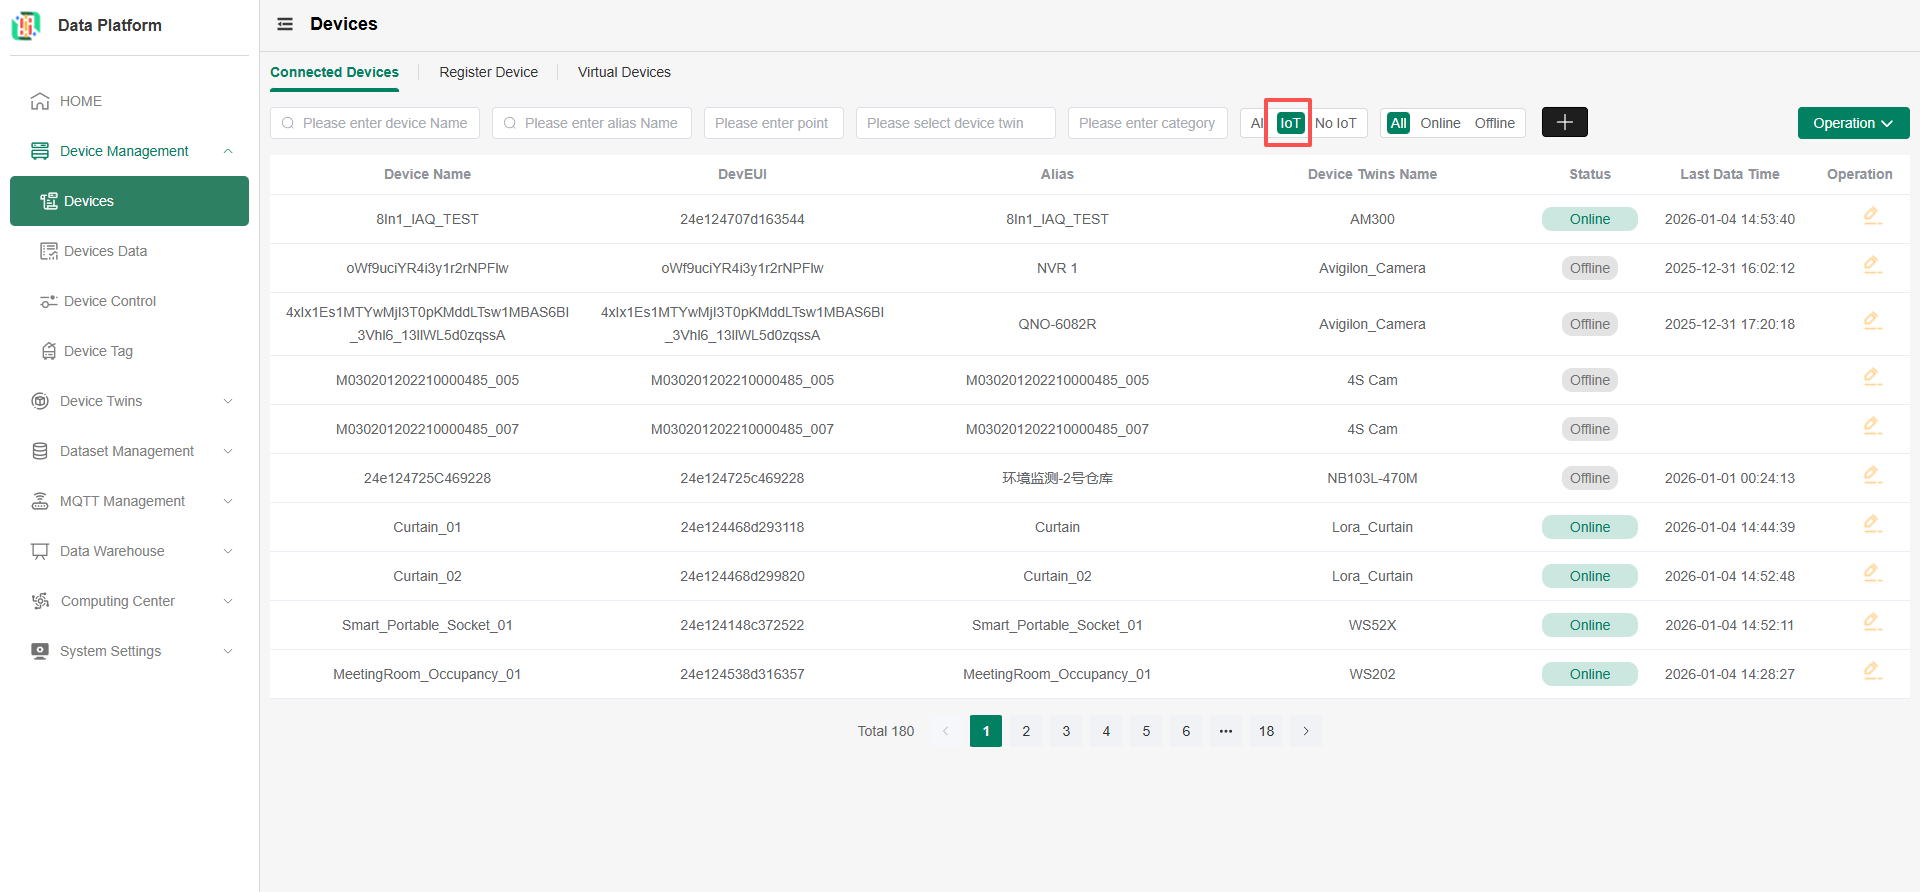
The system supports fuzzy matching by device name and alias, and device queries by device twins and function type dimensions.
As shown below, enter information in the input box and press Enter to refresh the device list.
 As shown below, select IoT devices. After selection is complete, the device list will be refreshed.
Add Device
For specific operations on adding devices, see Device Access Process.
Device Details
On the device list page, select the device you need to modify, click the "Modify" button on the right side of the device row to enter the device details page, as shown below.
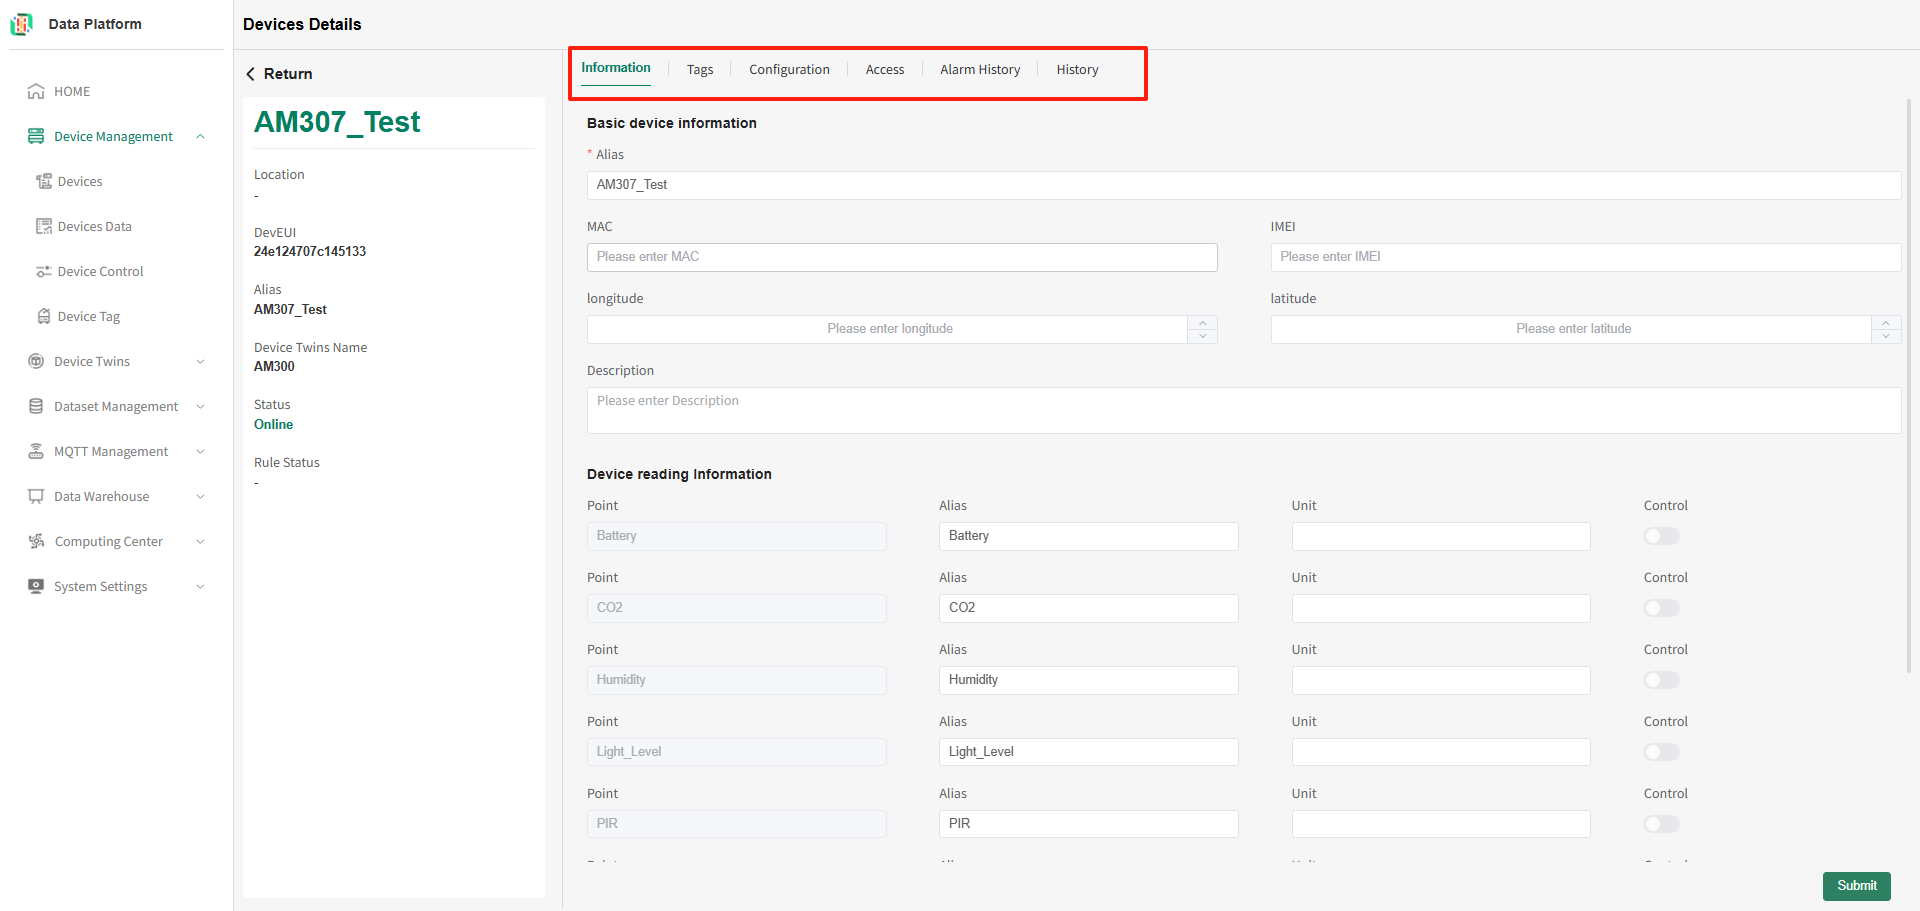
 The device details page allows you to modify basic device information, add system and platform project tags, configure device alarm information, display device access information, query alarm history data and time-series history data, etc., as shown below.
Modify Basic Device Information
Enter the device details page; it defaults to displaying basic device information as shown below:
On the basic device information page, you can modify the device alias, function point aliases under the device, etc.
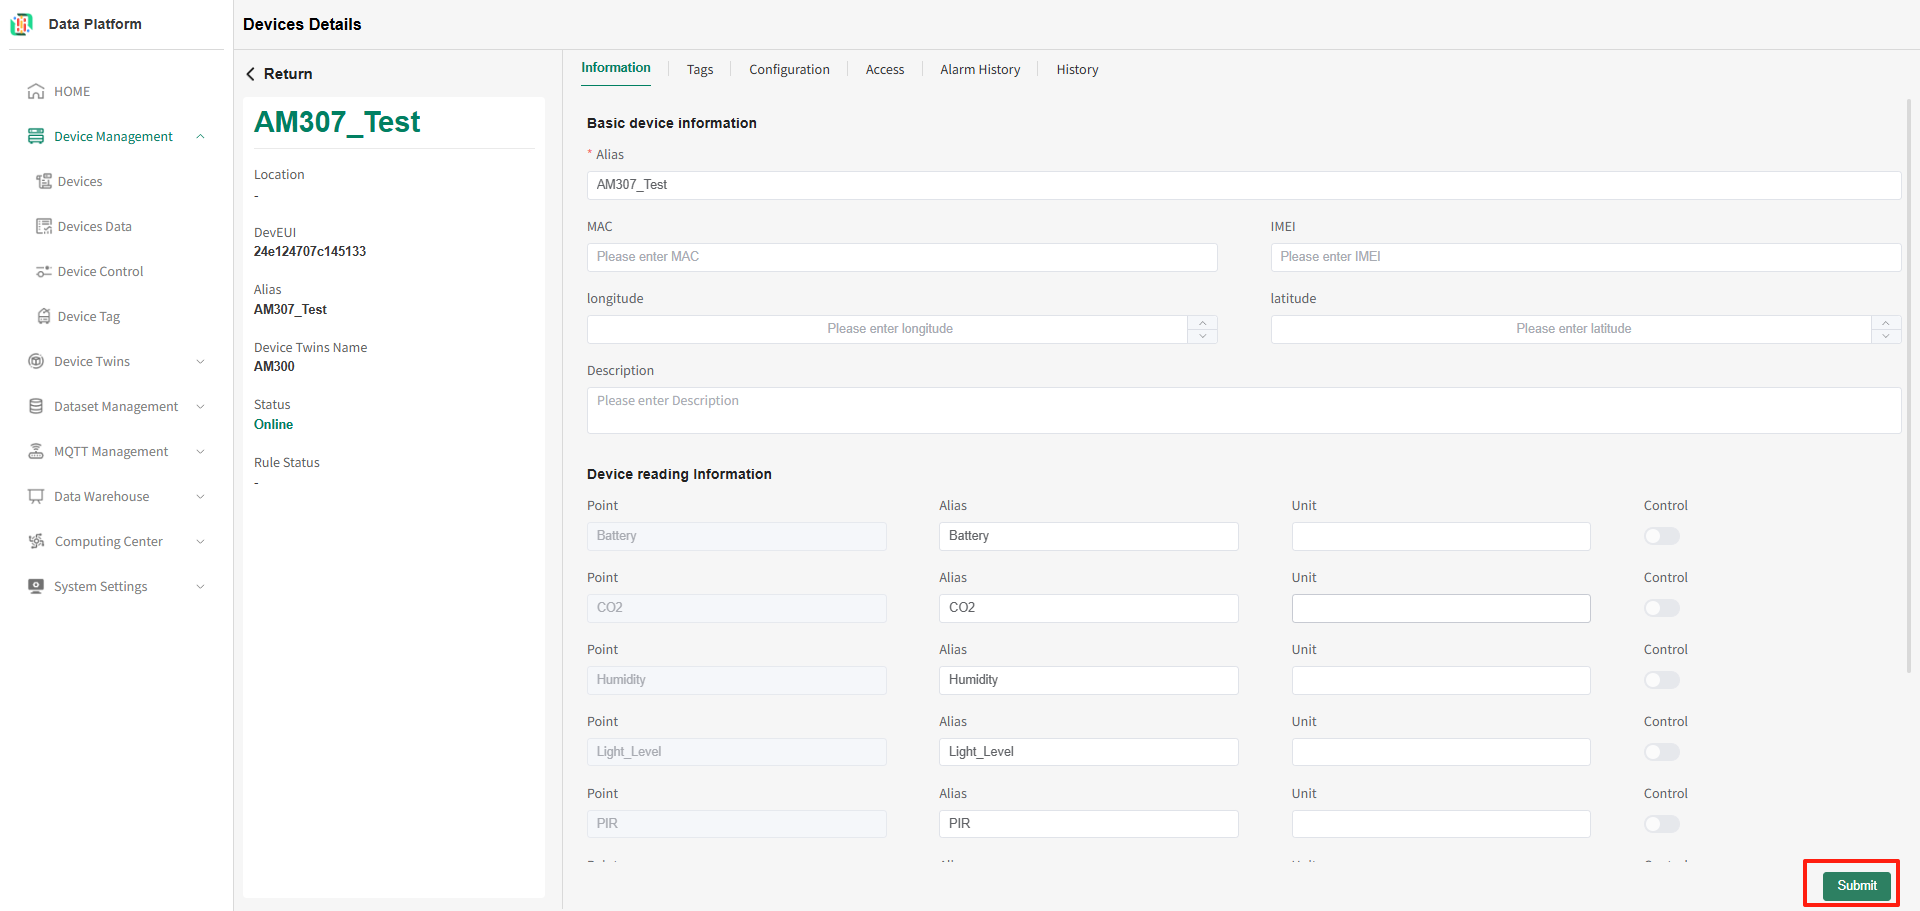 As shown above, enter the information to be modified, and click submit at the bottom of the page to complete the modification of basic device information.
Tags on Device Details Page
- Bind Device to Platform Project
On the device details page, click the "Tags" menu to enter the device tags page, as shown below.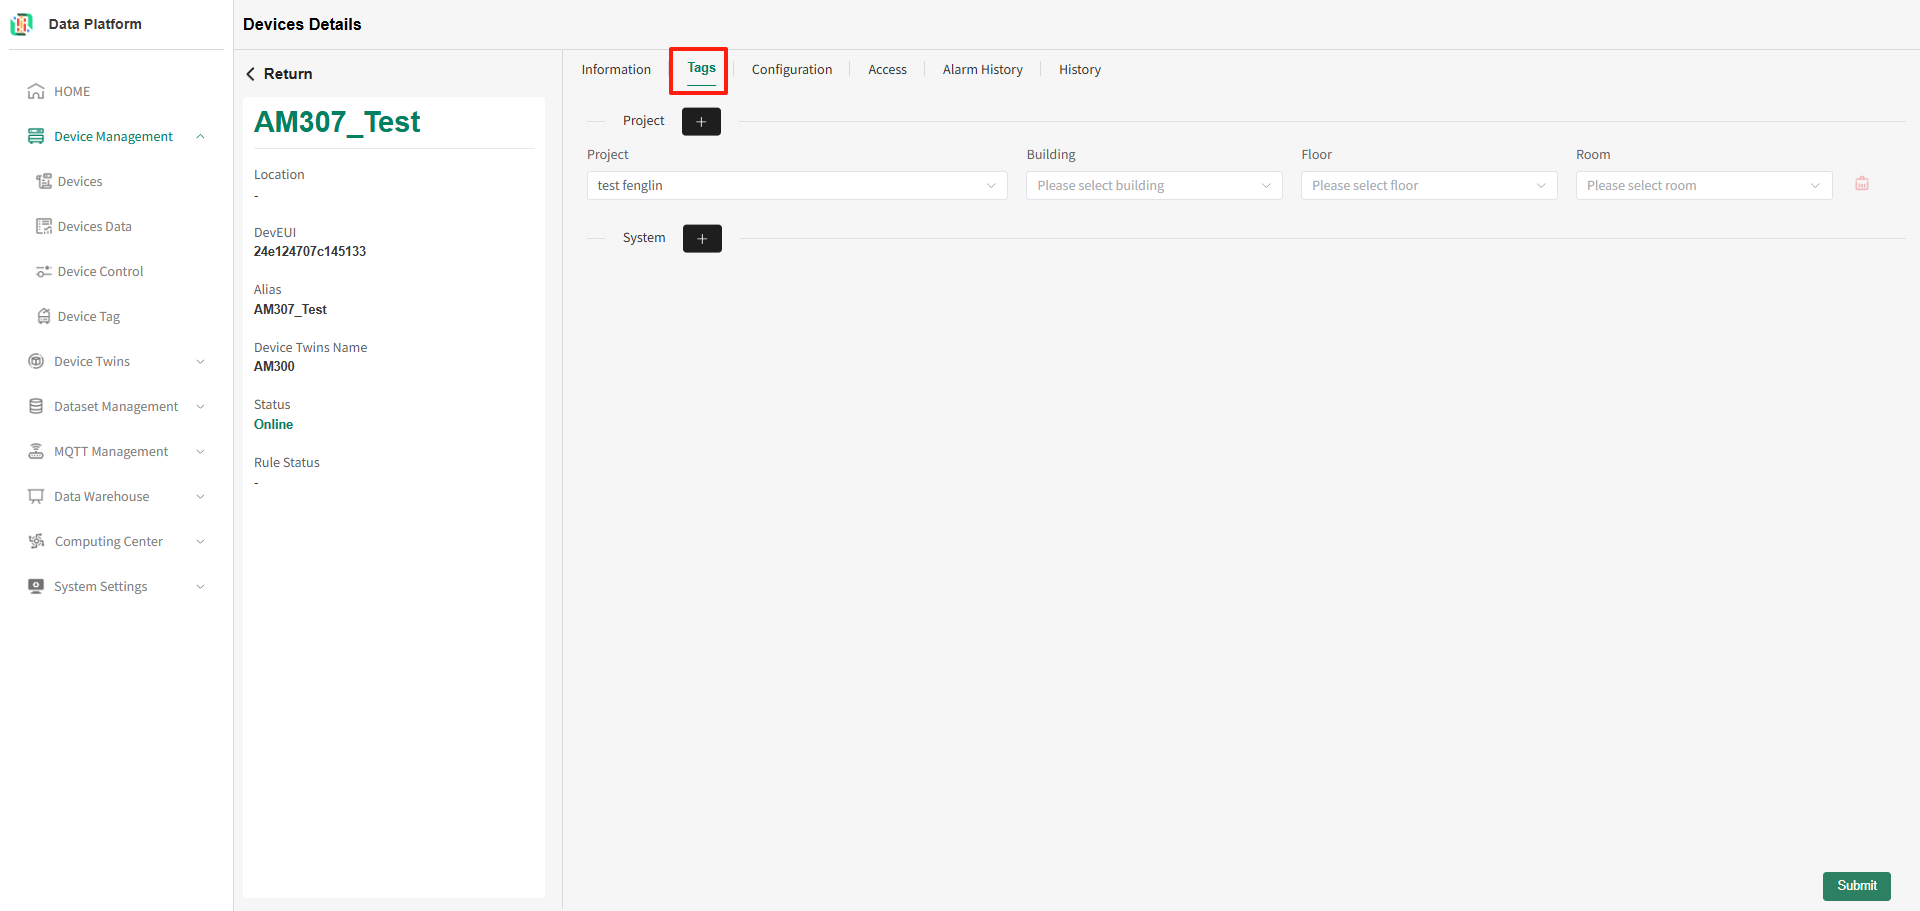
- Bind Device to Platform Project
As shown above, click the "+" button next to the project. The system will add a platform project operation row. Select the project and location information to bind, and click submit in the lower right corner to complete the binding of the device to the platform project, as shown below.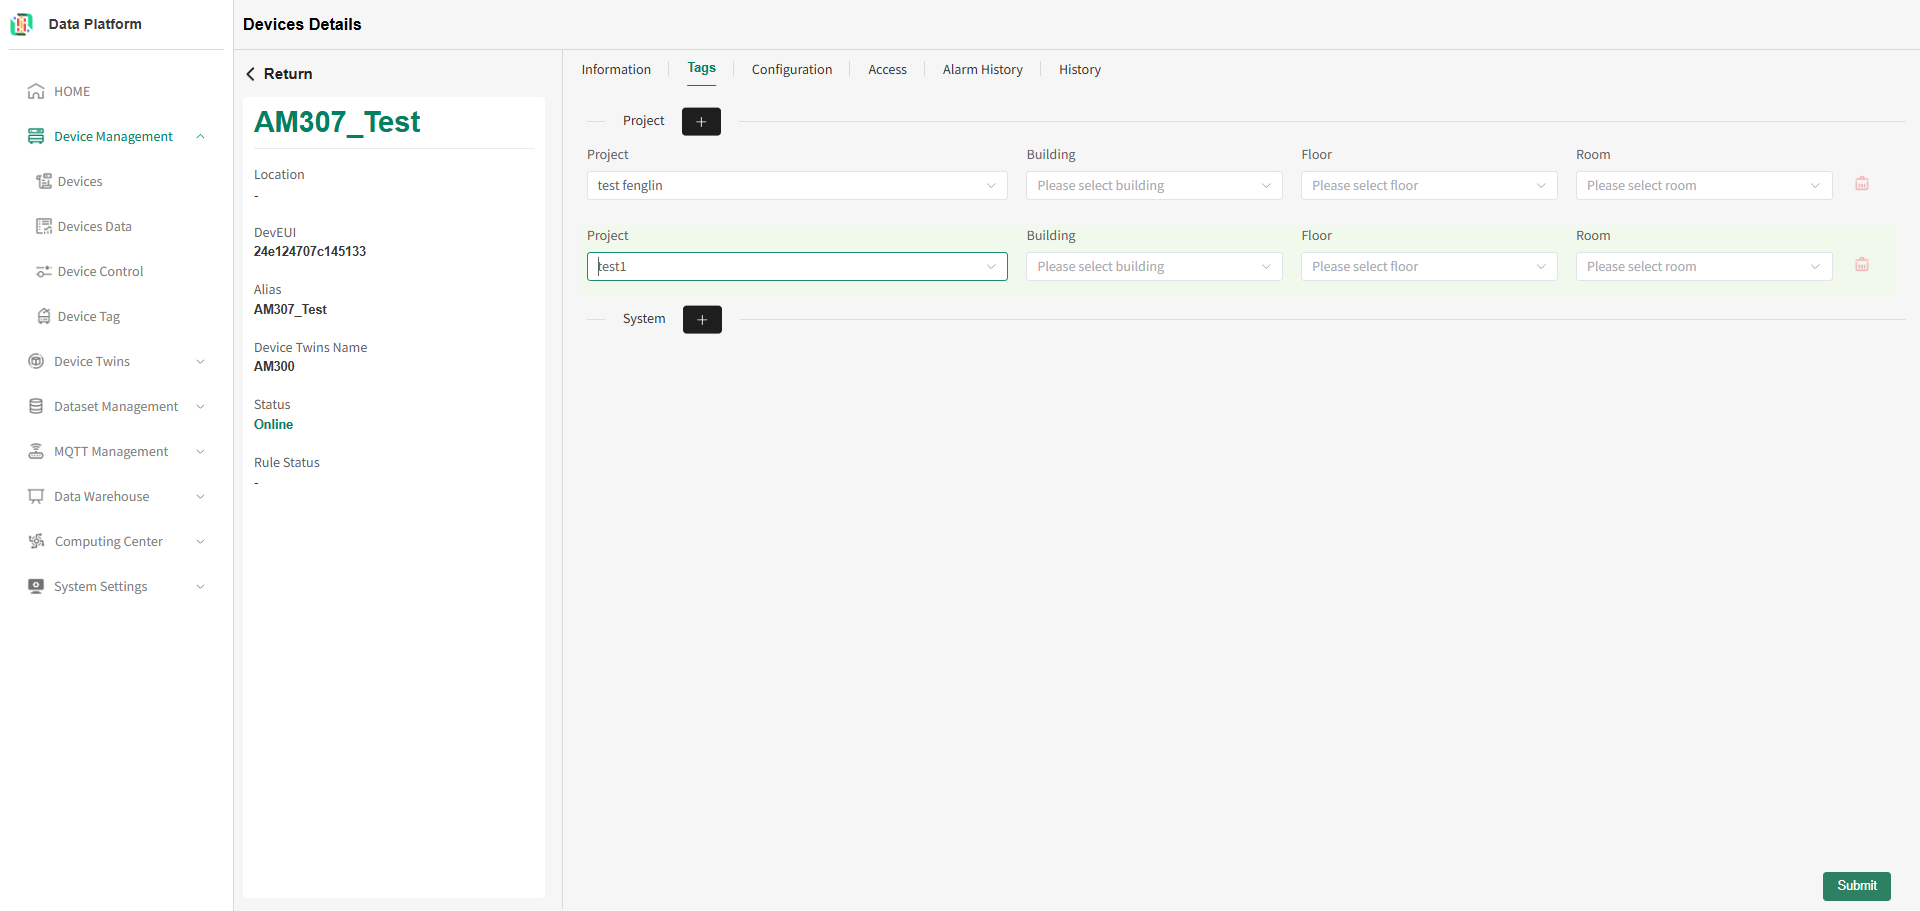
- Unbind Device from Platform Project
On the device details tags page, click the "Delete" button at the end of the platform project row. After user confirmation, the binding between the device and the current platform project can be removed, as shown below.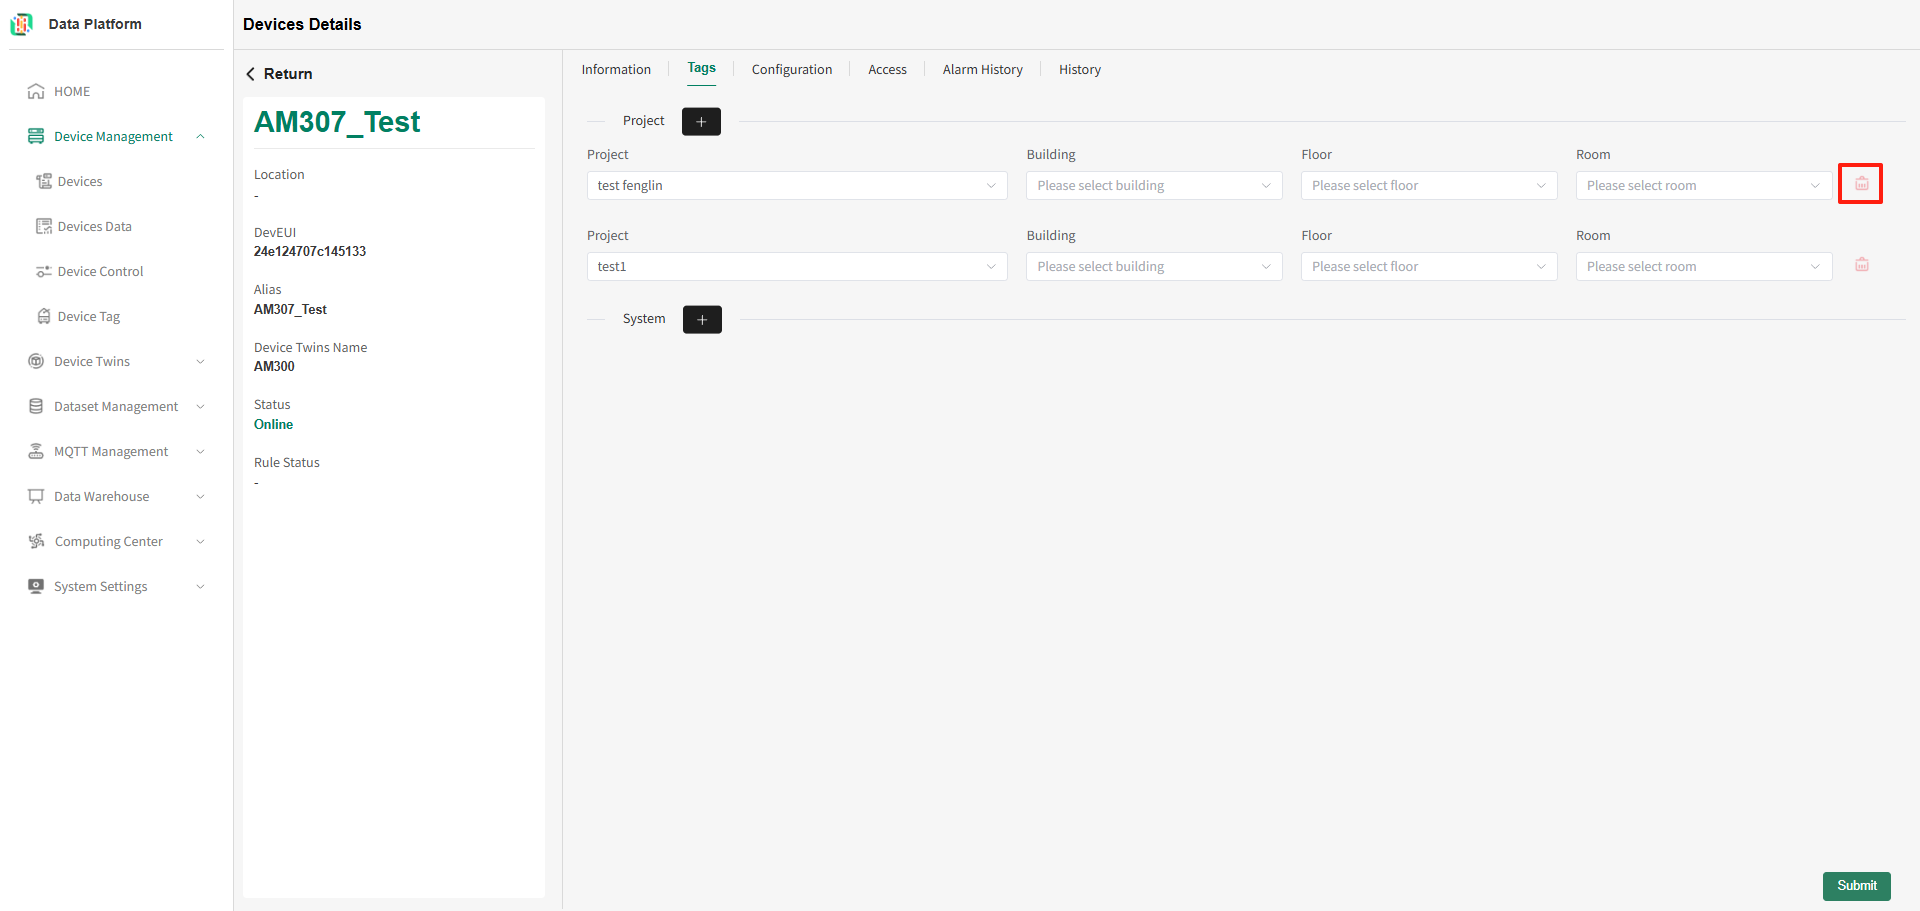
- Bind Device to Platform Project
Device Offline Alarm
Device offline alarm allows configuration of basic alarm settings, alarm notification methods (such as email, SMS), and alarm recipients. Once configured, the corresponding personnel will receive device alarm messages when the device alarms.
On the device details page, click the "Alarm Configuration" menu to enter the device offline alarm configuration page, as shown below.
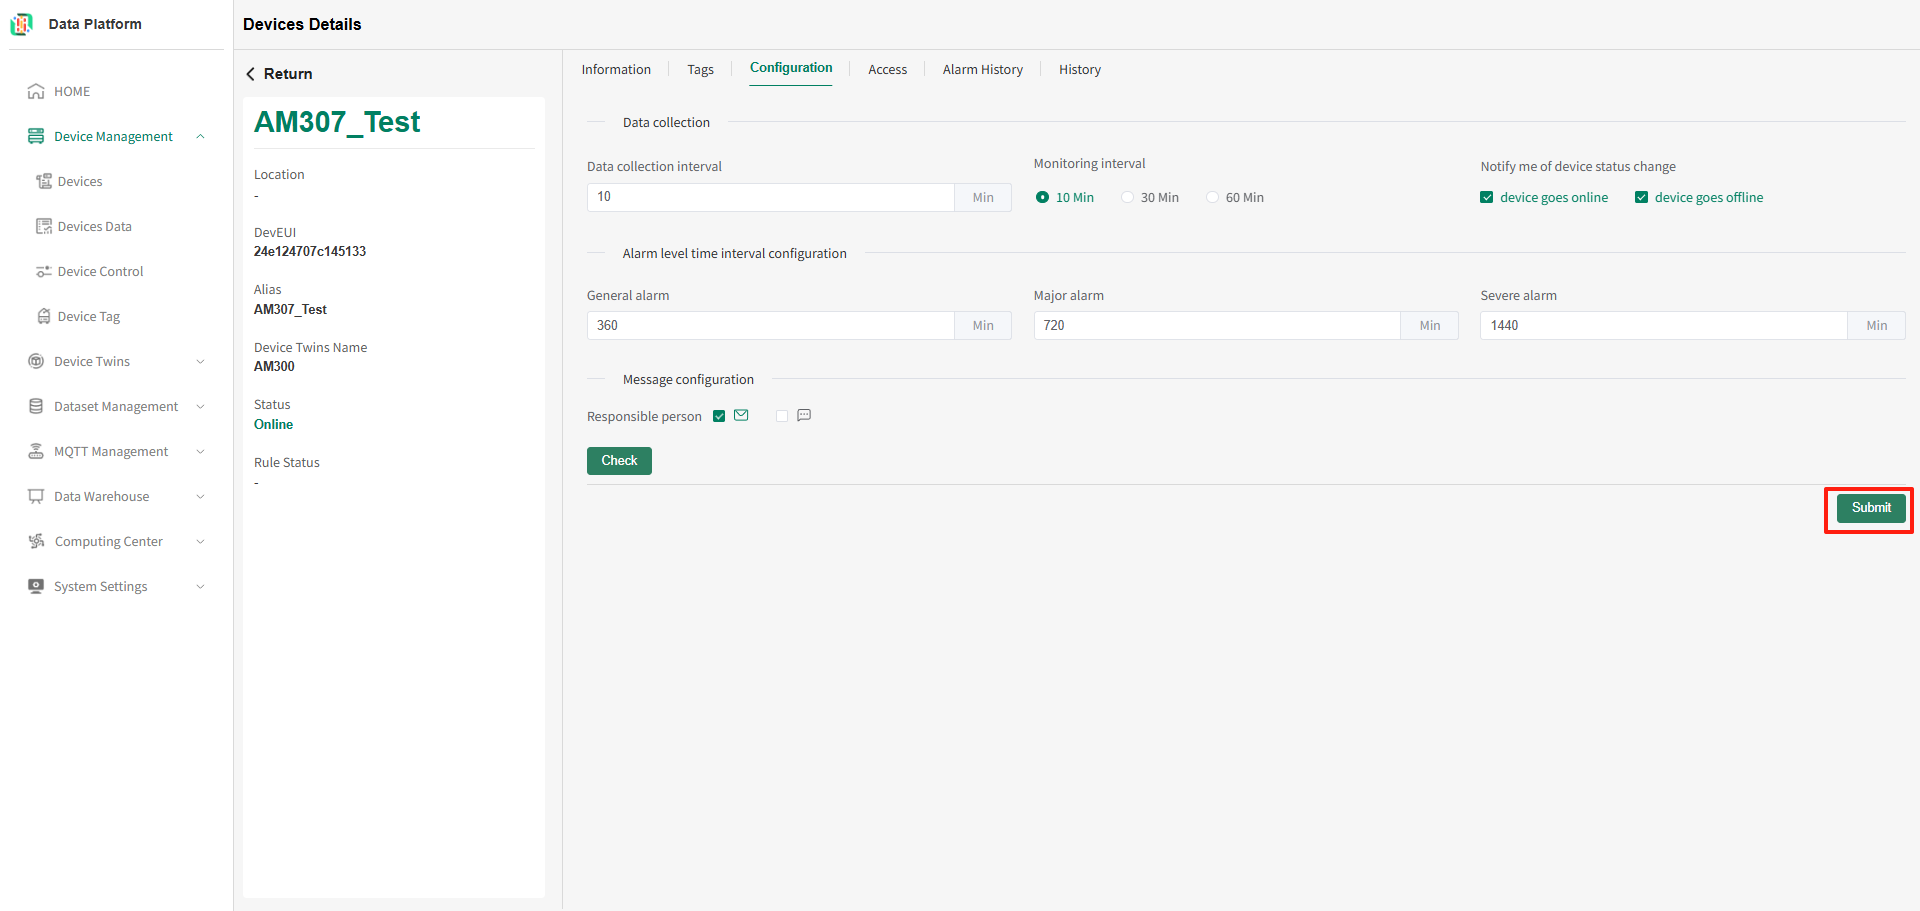
- Configure Alarm Notification Method
On the alarm page, check the required notification methods (one or both can be selected), as shown below.tipThe default device offline alarm notification method is email. You can check both email and mobile phone methods. Current device alarm messages will be notified to the configured personnel via both email and mobile phone.
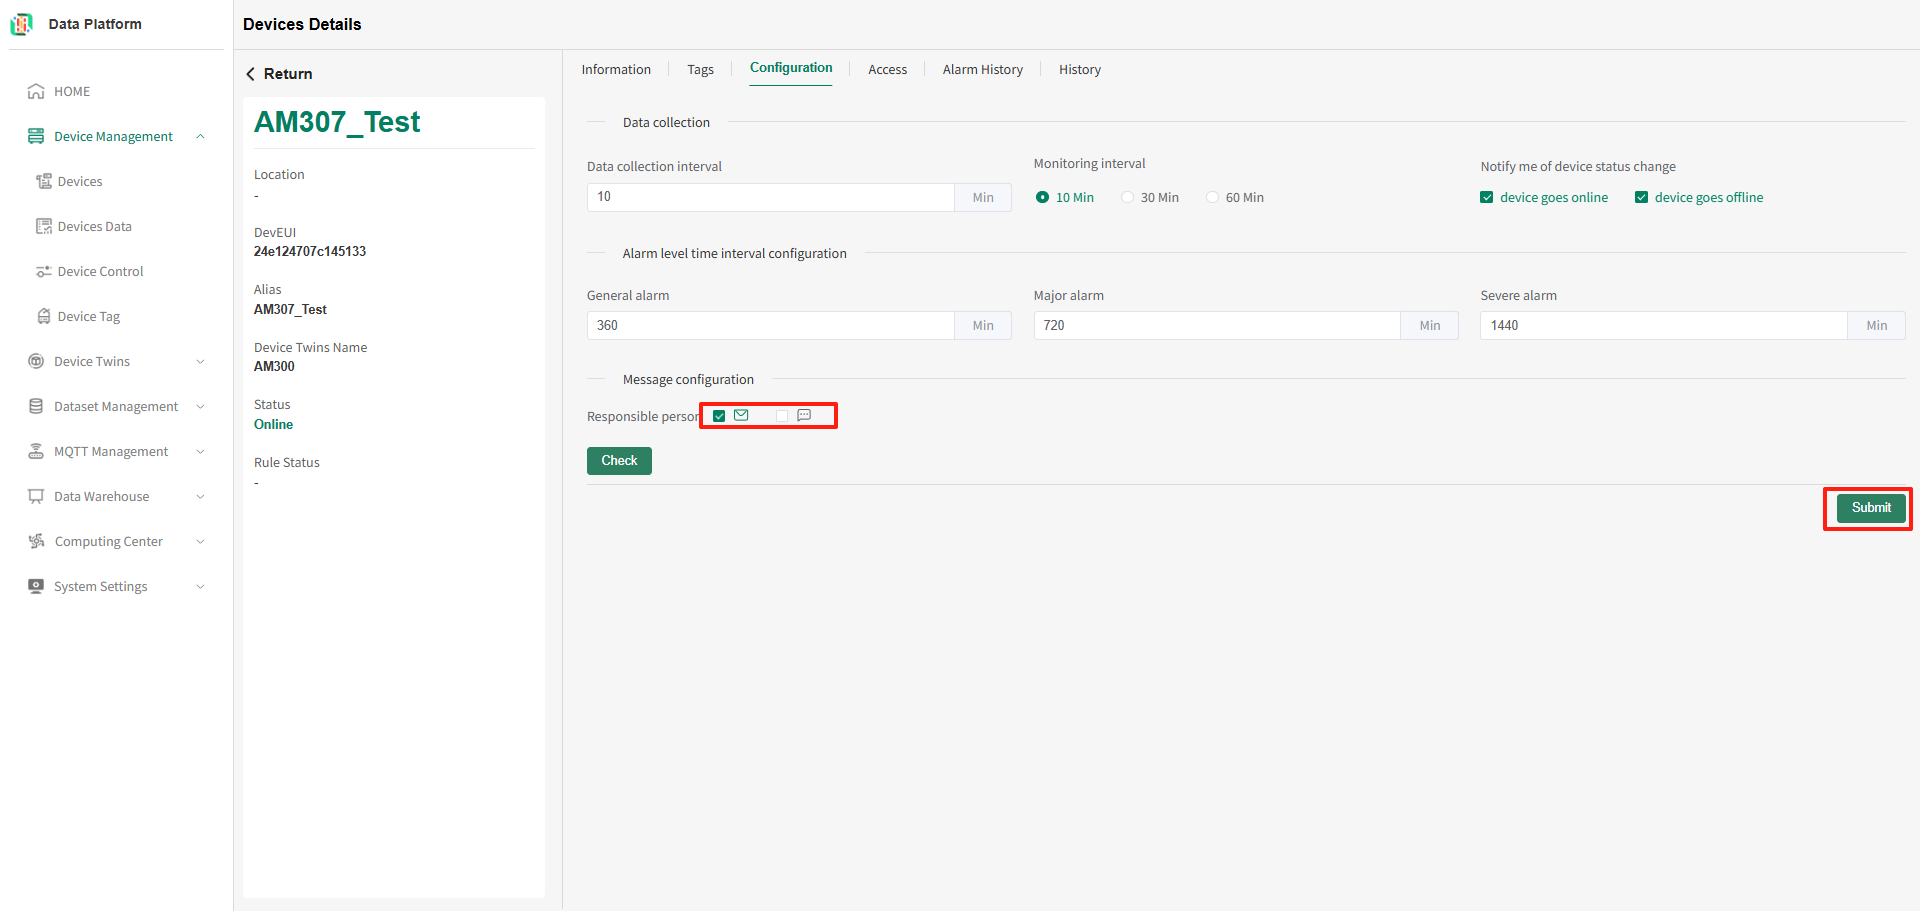
- Configure Alarm Recipients
On the alarm page, click the "Check" button to open the personnel list page, as shown below:tipDevice offline alarm recipients are registered accounts in the system. One device can be configured to send alarm messages to one or more personnel.
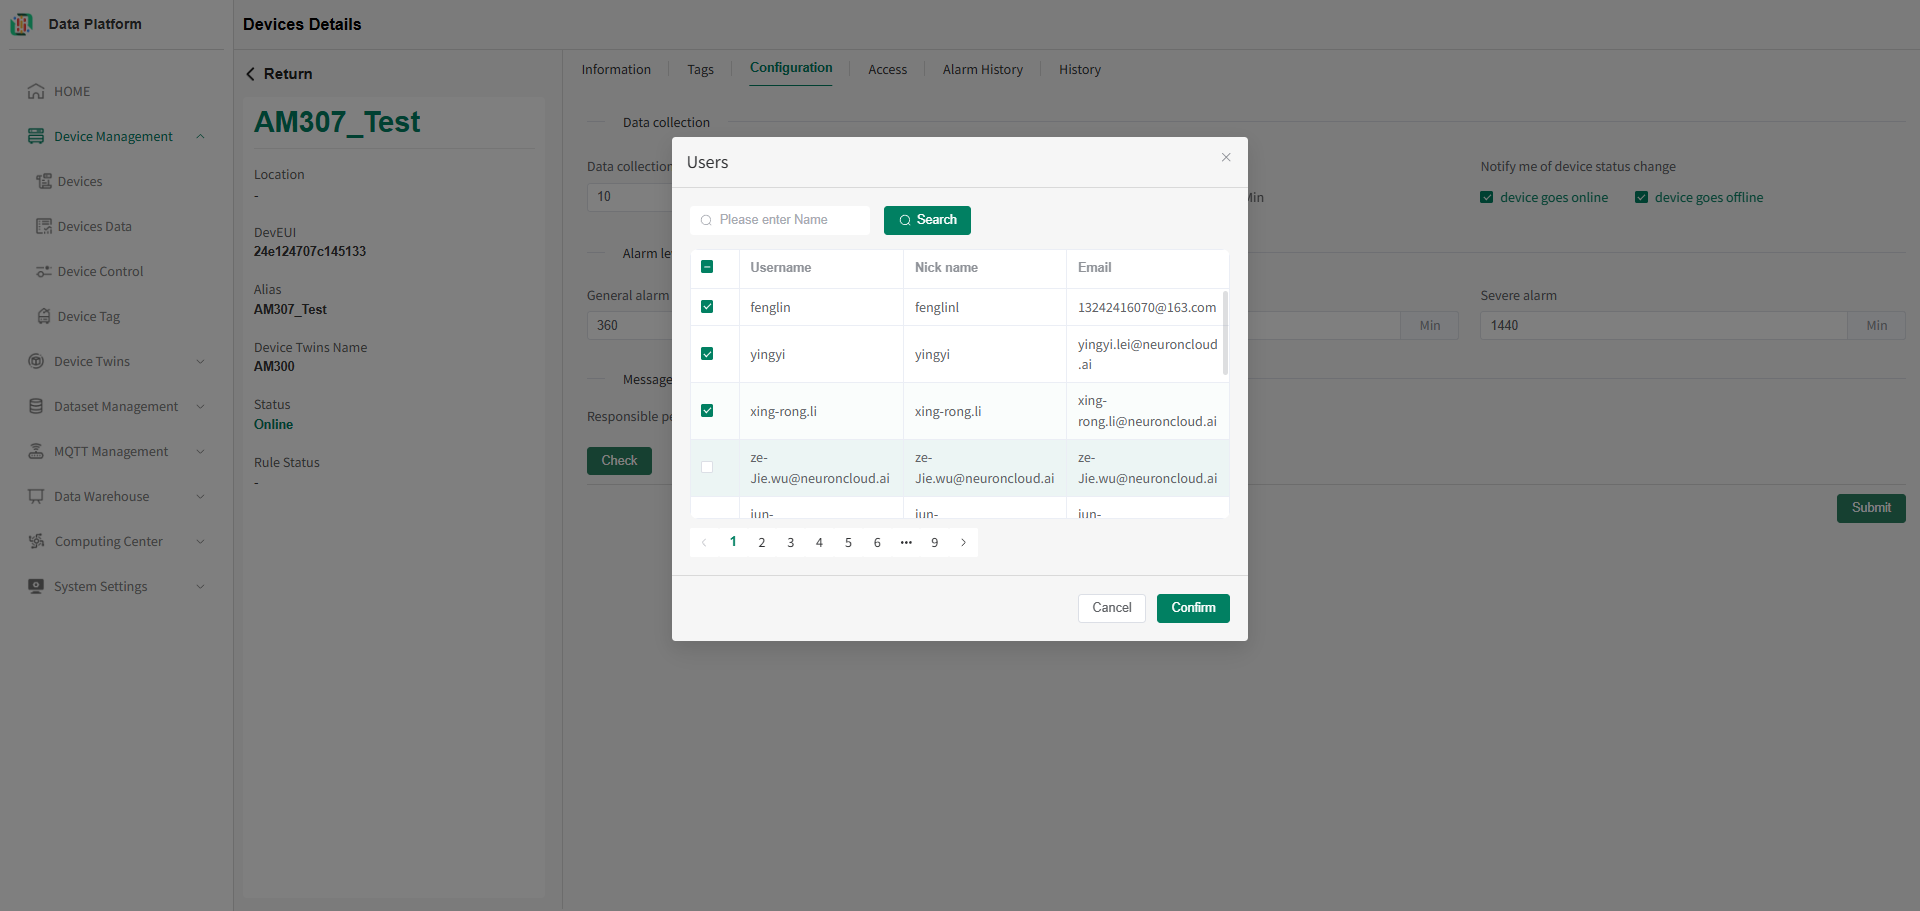
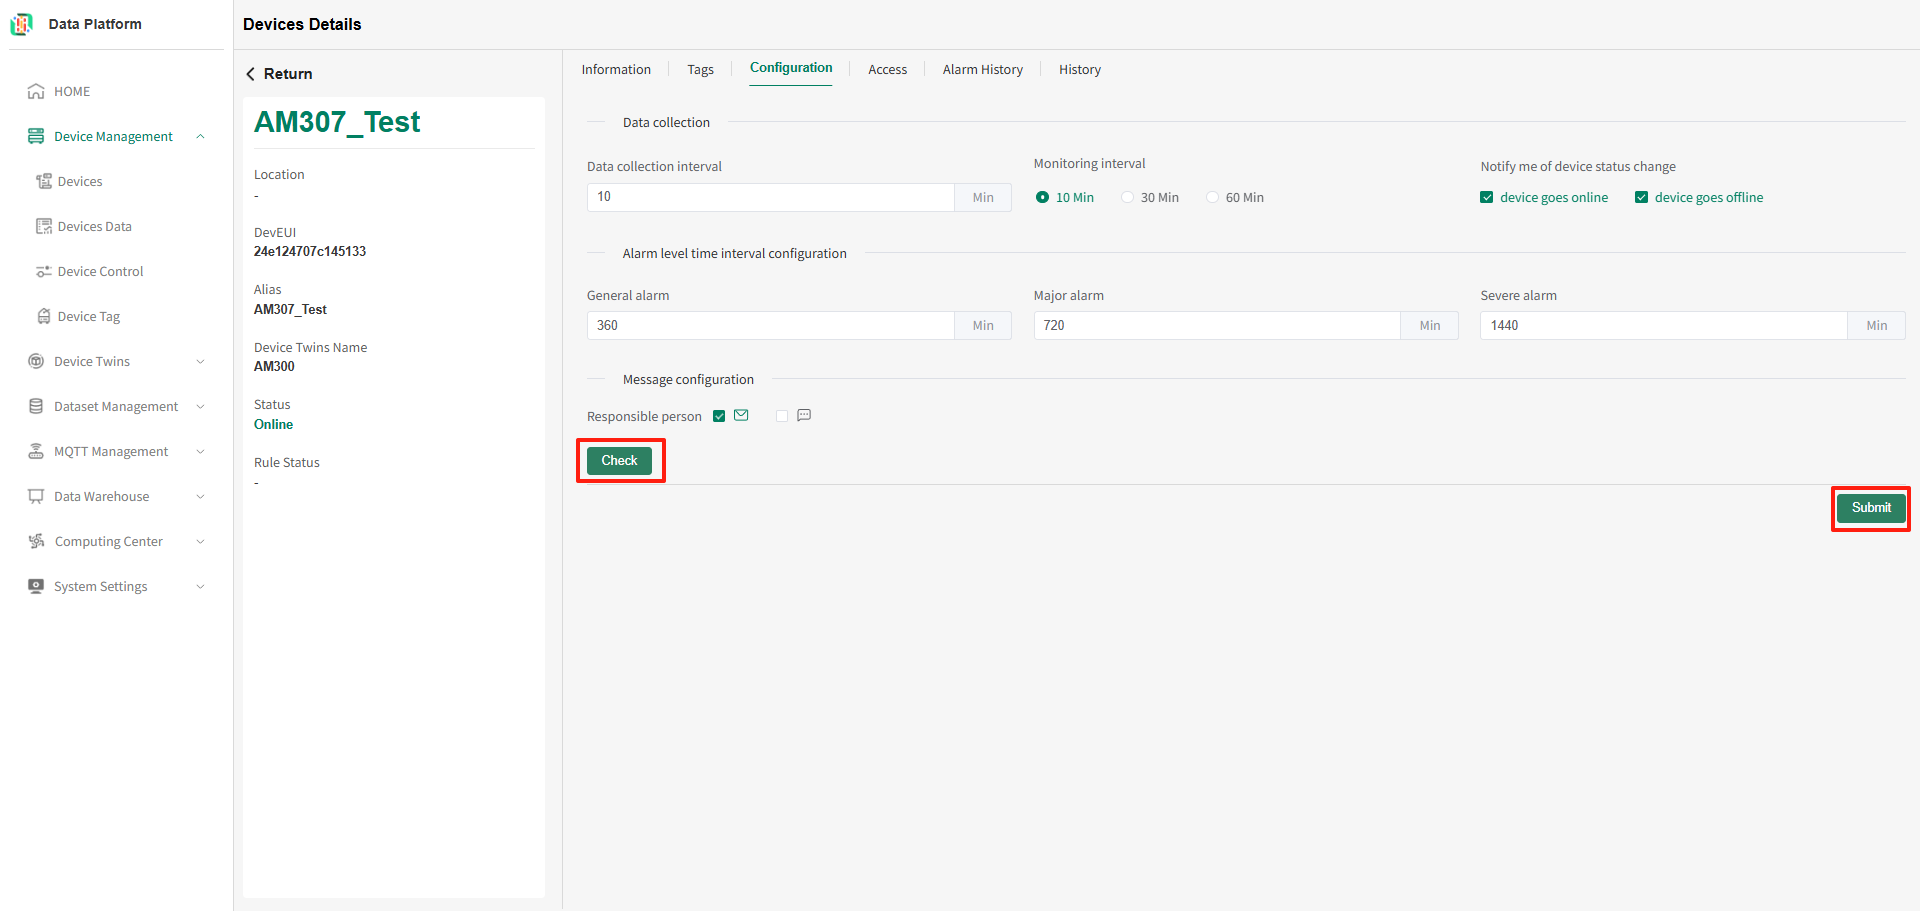 On the personnel list page, check the required personnel, click the "Confirm" button to complete the personnel configuration, as shown below:
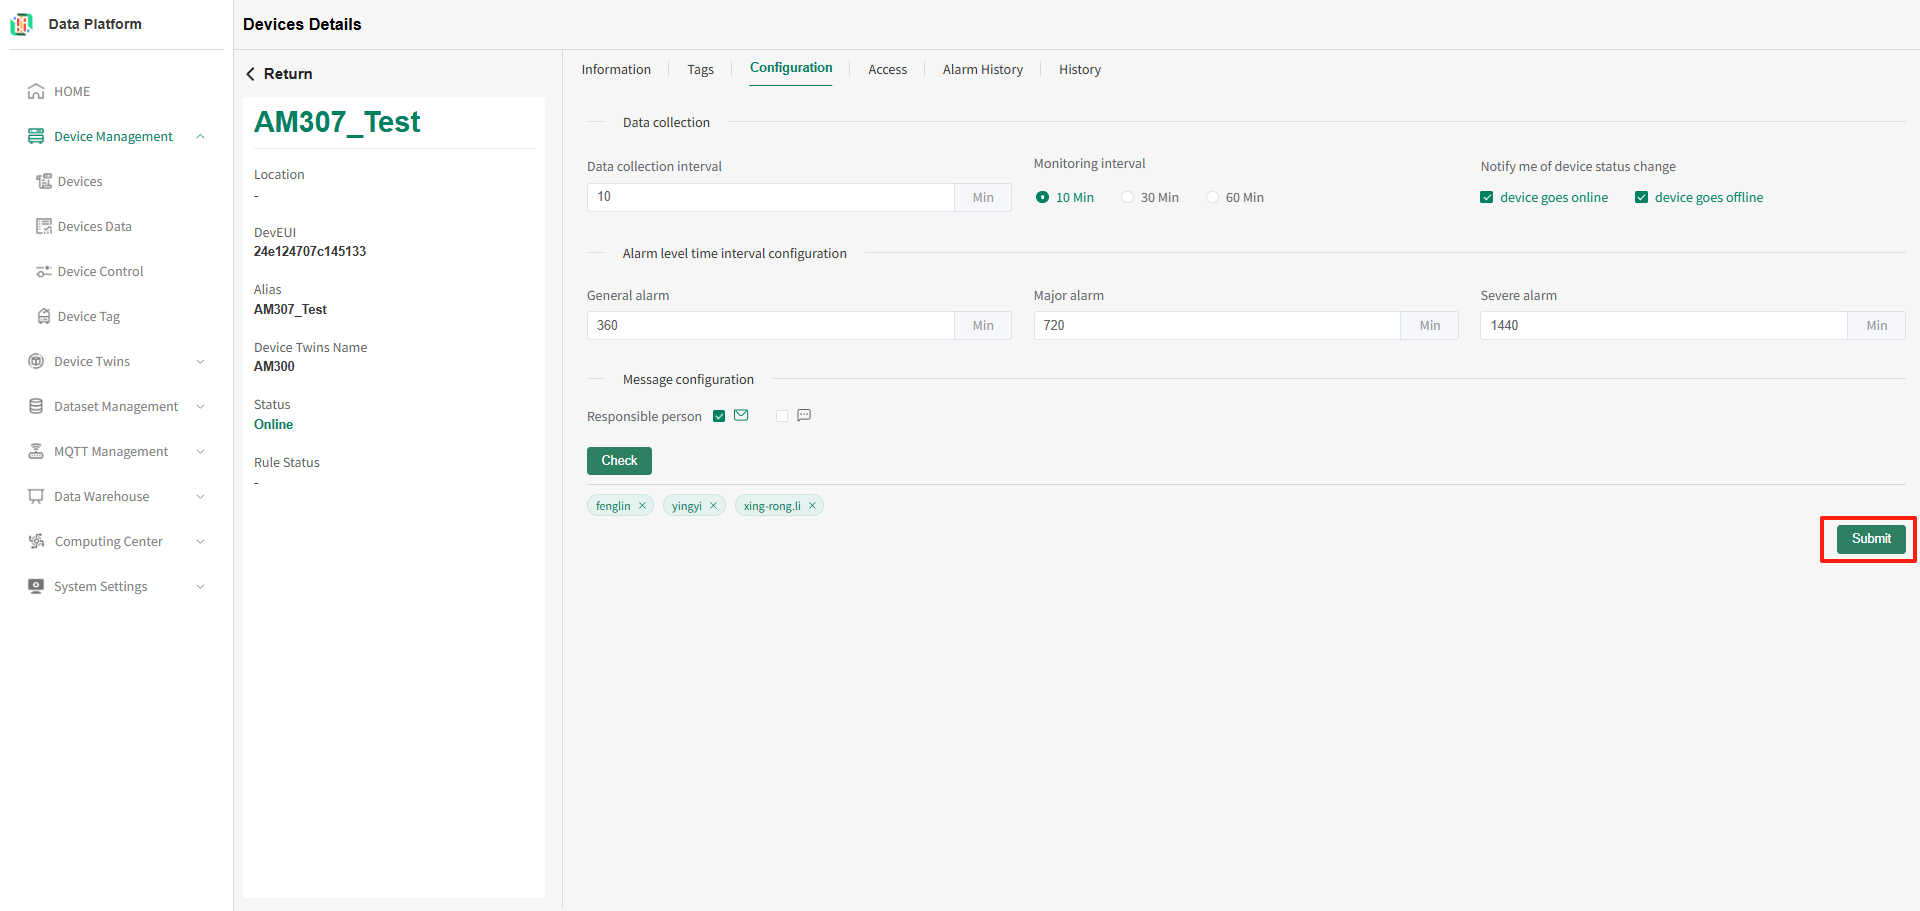
 Click submit on the interface to complete the device alarm configuration, as shown below:
Device Access
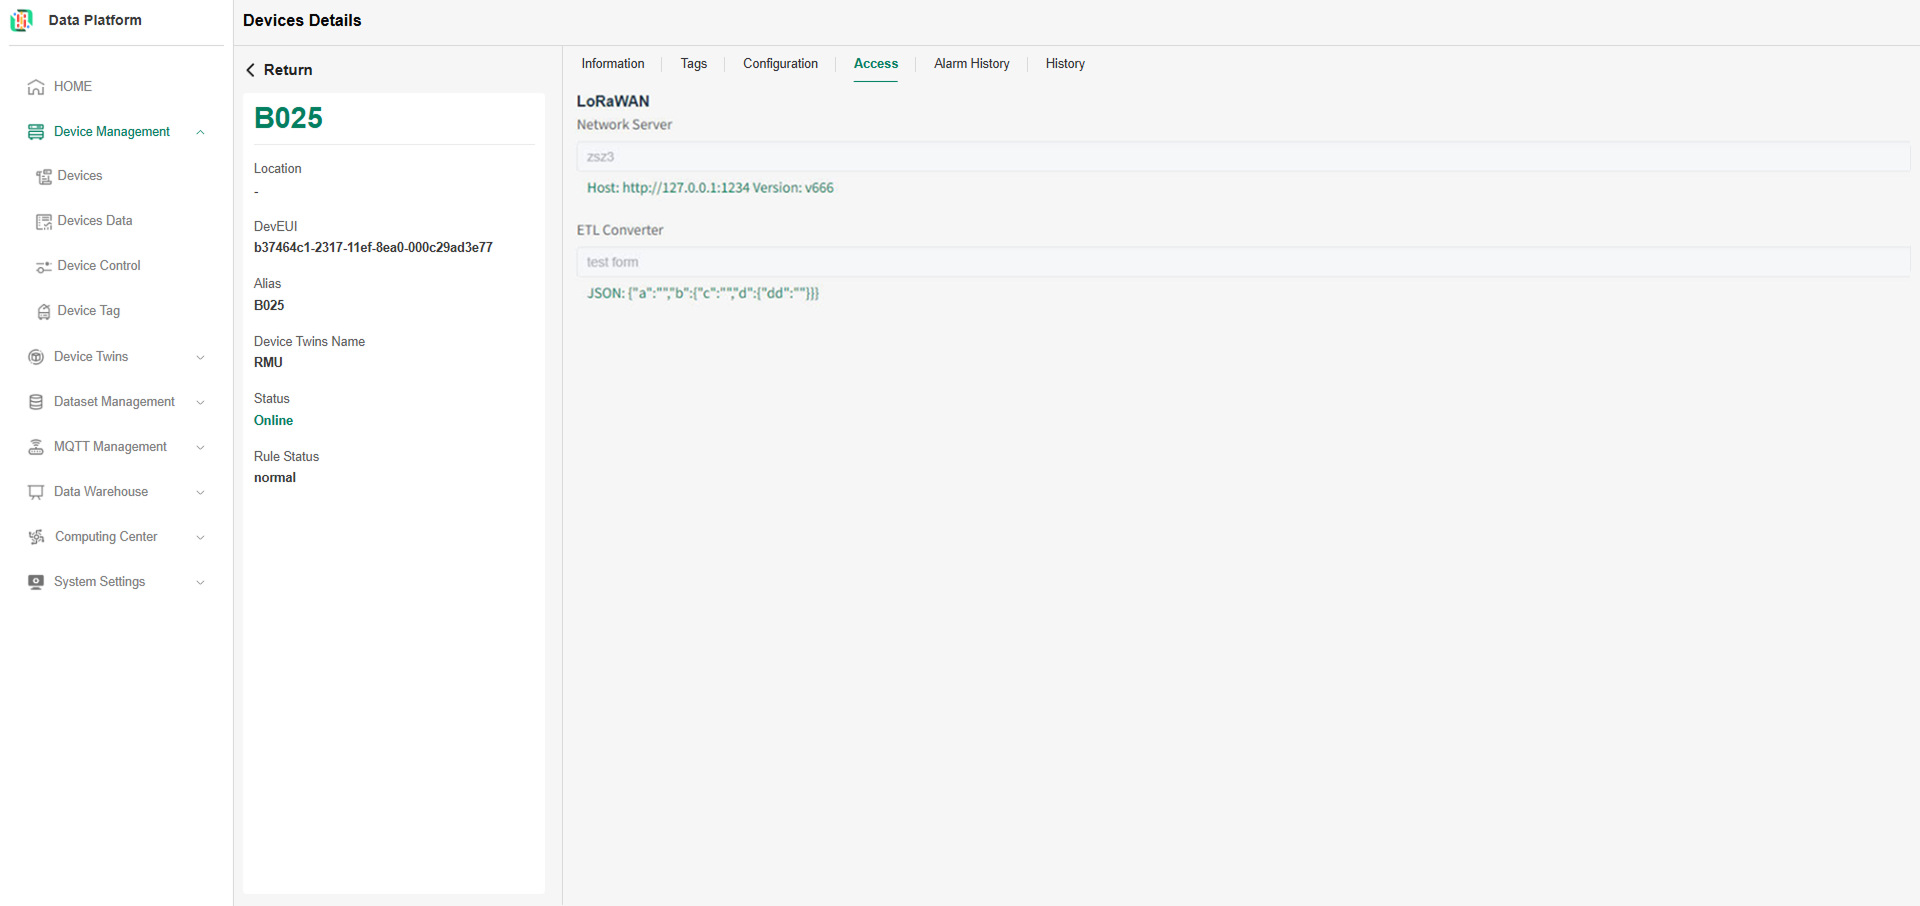
Device access information shows the method by which the current device accesses the system (the system supports three methods: LoRaWAN, MQTT, OpenAPI). This can be used for troubleshooting device issues in case of abnormalities.
On the device details page, click the "Access" menu to enter the device access page, as shown below.
- LoRaWAN Access Information
tipLoRaWAN is a common access method for IoT devices. The system supports standard ChirpStackV3 or V4 formats, as well as custom data formats. On this page, you can view which MQTT server, which topic, and which data format this device uses for pushing data, etc.

- MQTT Access Information
tipThe MQTT method can access both IoT and non-IoT devices. On this page, you can view which MQTT server, which topic, and which data format this device uses for pushing data, etc.
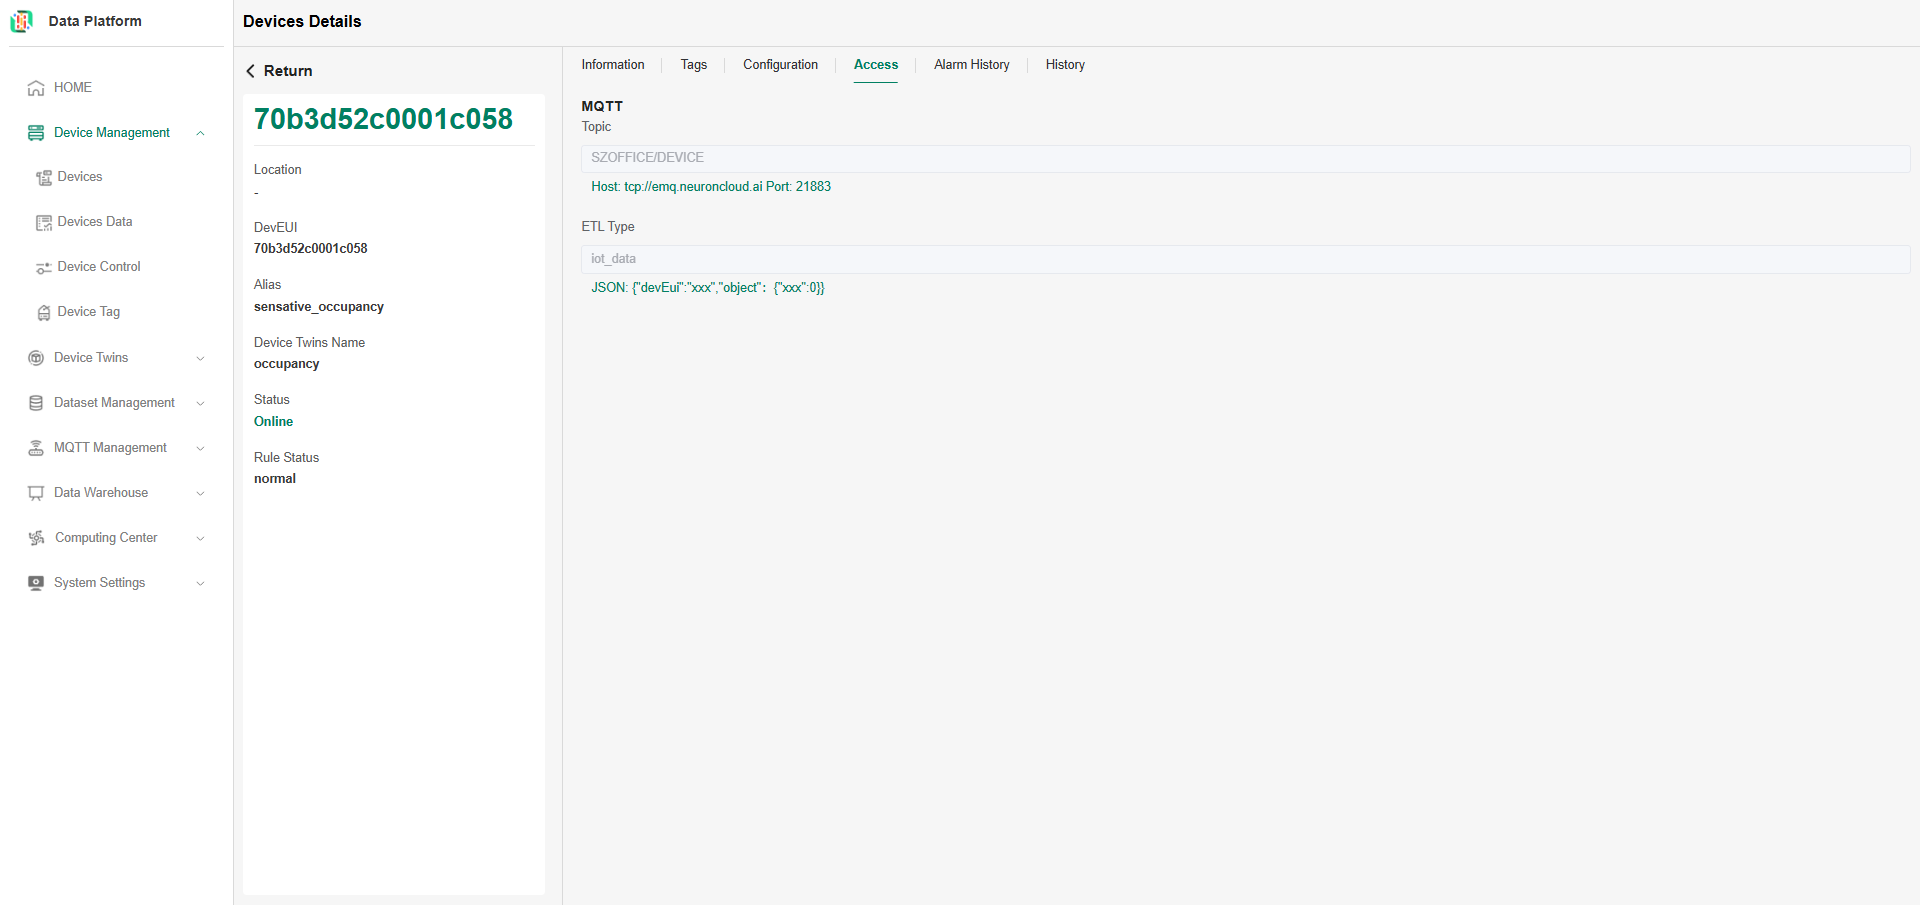
- OpenAPI Access Information
tipThe OpenAPI method can access both IoT and non-IoT devices. On this page, you can view which token this device uses for pushing device data, etc.
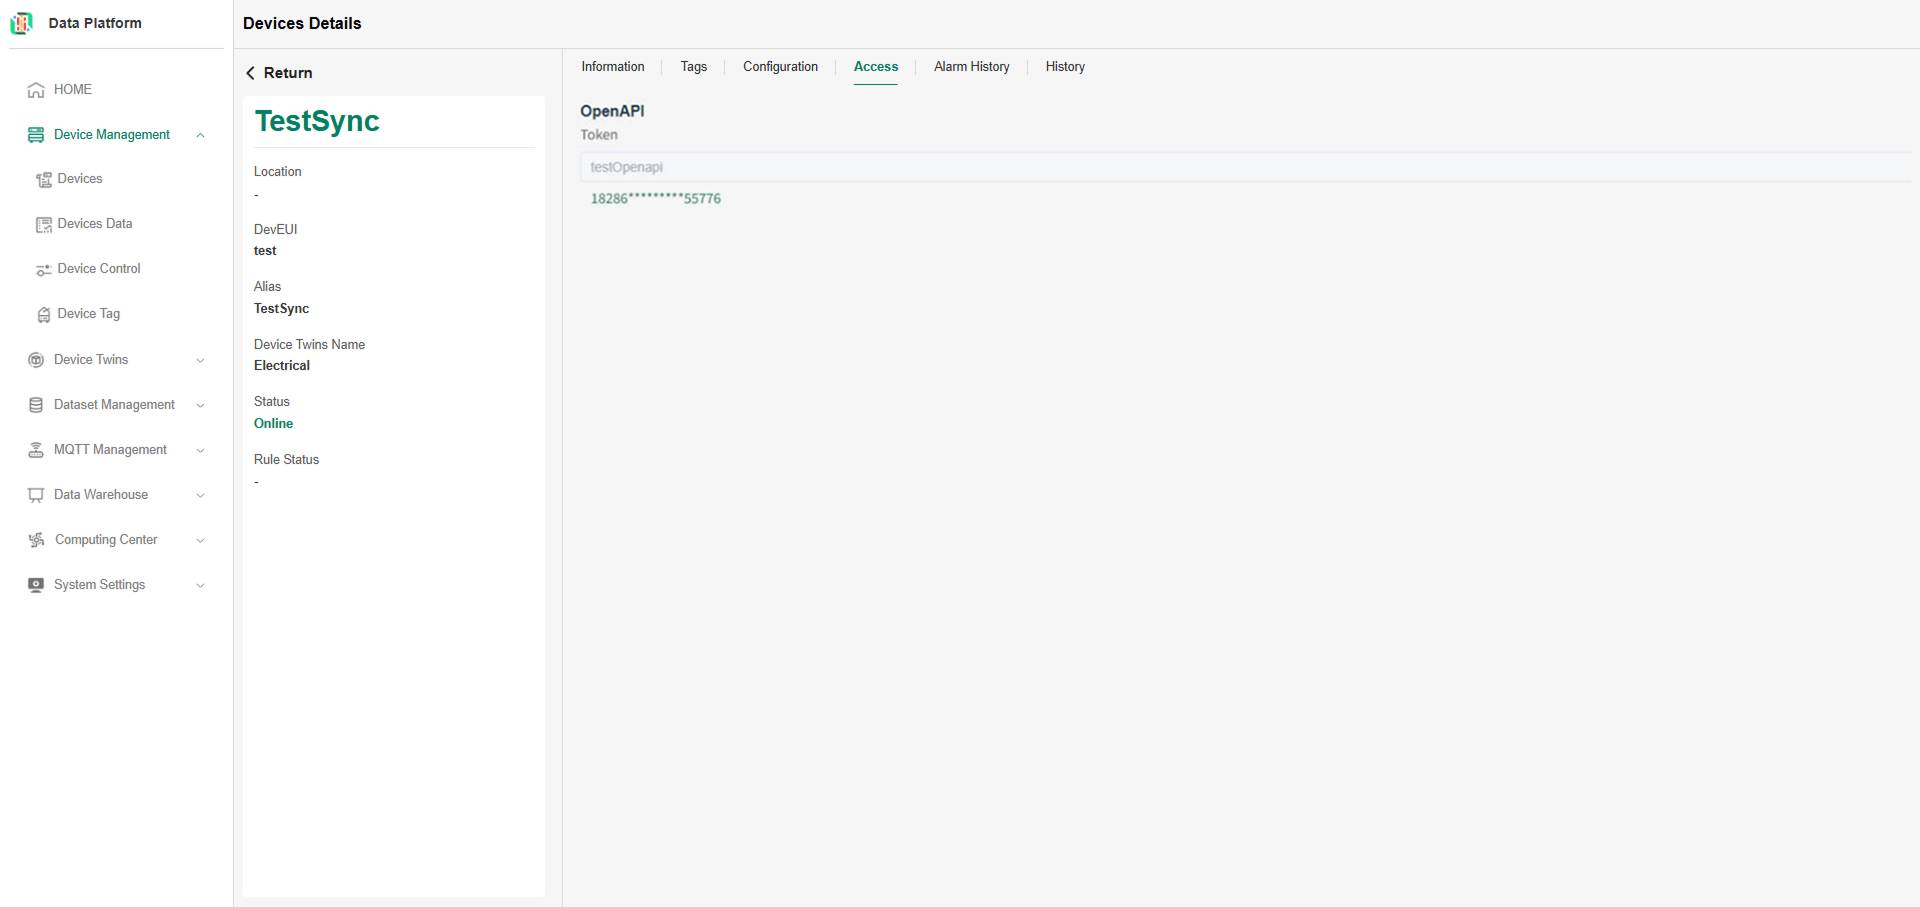
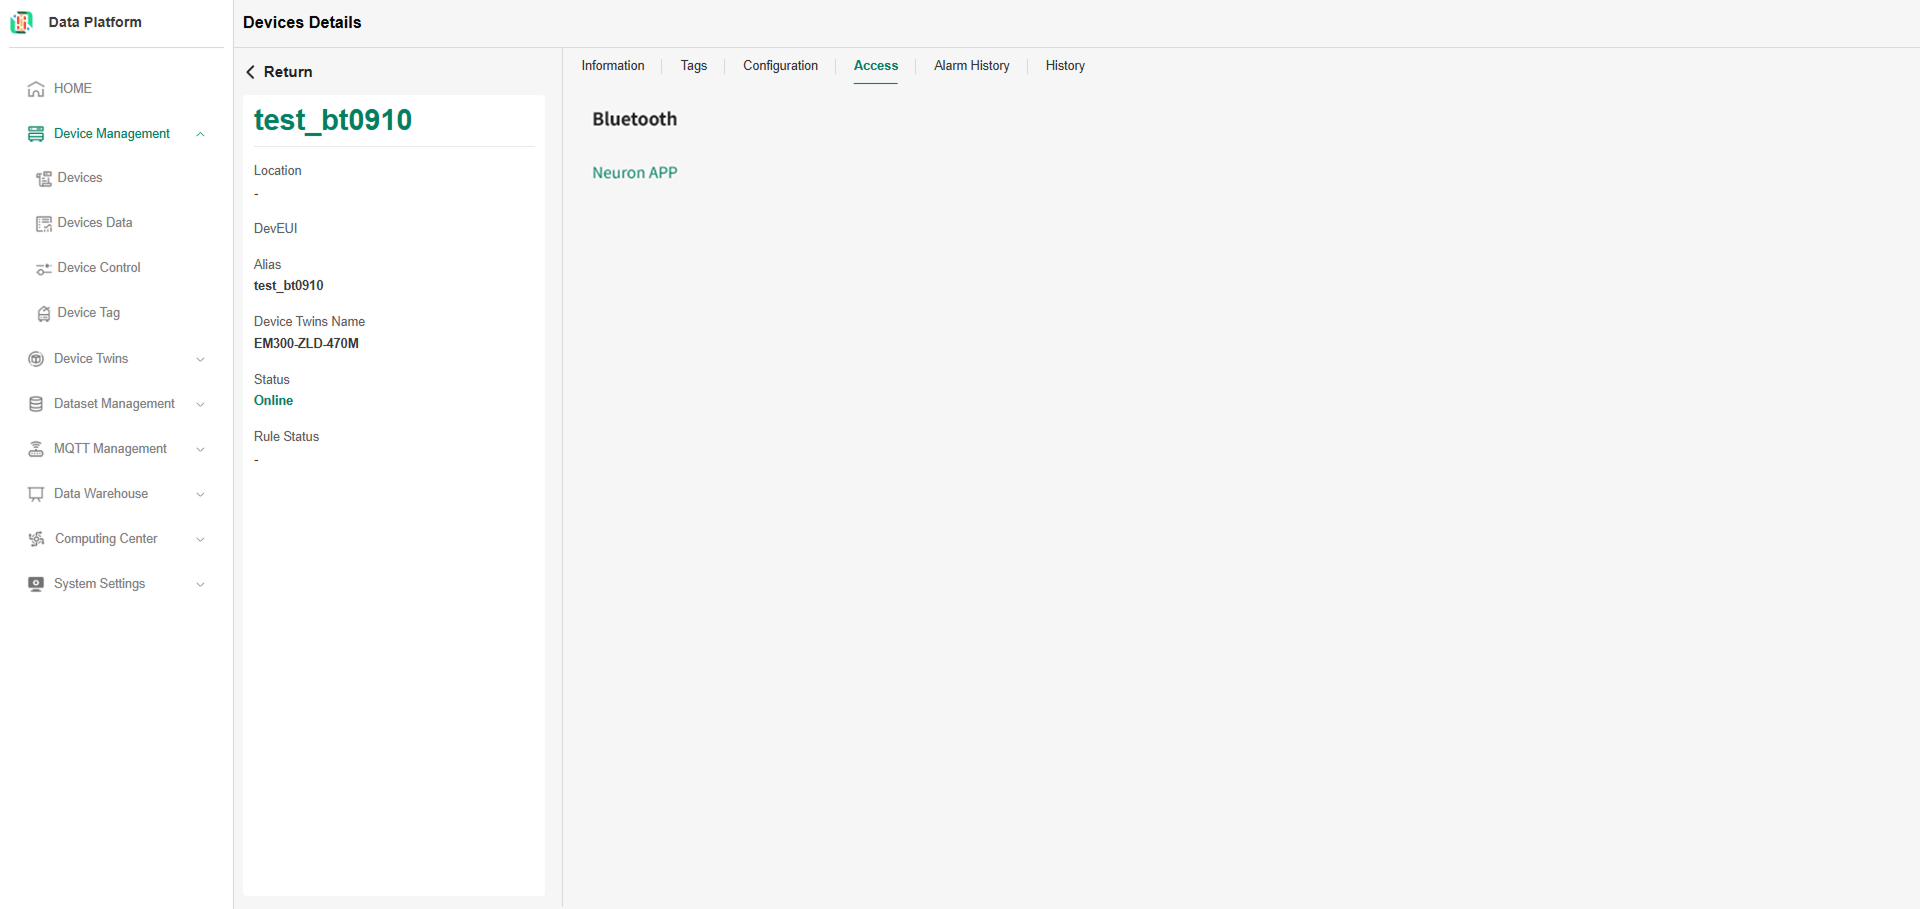
- Bluetooth Access Information
tipThe Bluetooth method can access all devices supporting Bluetooth connection. On this page, you can view which App pushes data for this device.
Device Alarm History
Device alarm history allows you to view all alarm messages for this device, as well as message sending status, etc.
- View Message List
On the device details page, click the "Alarm History" menu in the menu bar to enter the device alarm history page, as shown below.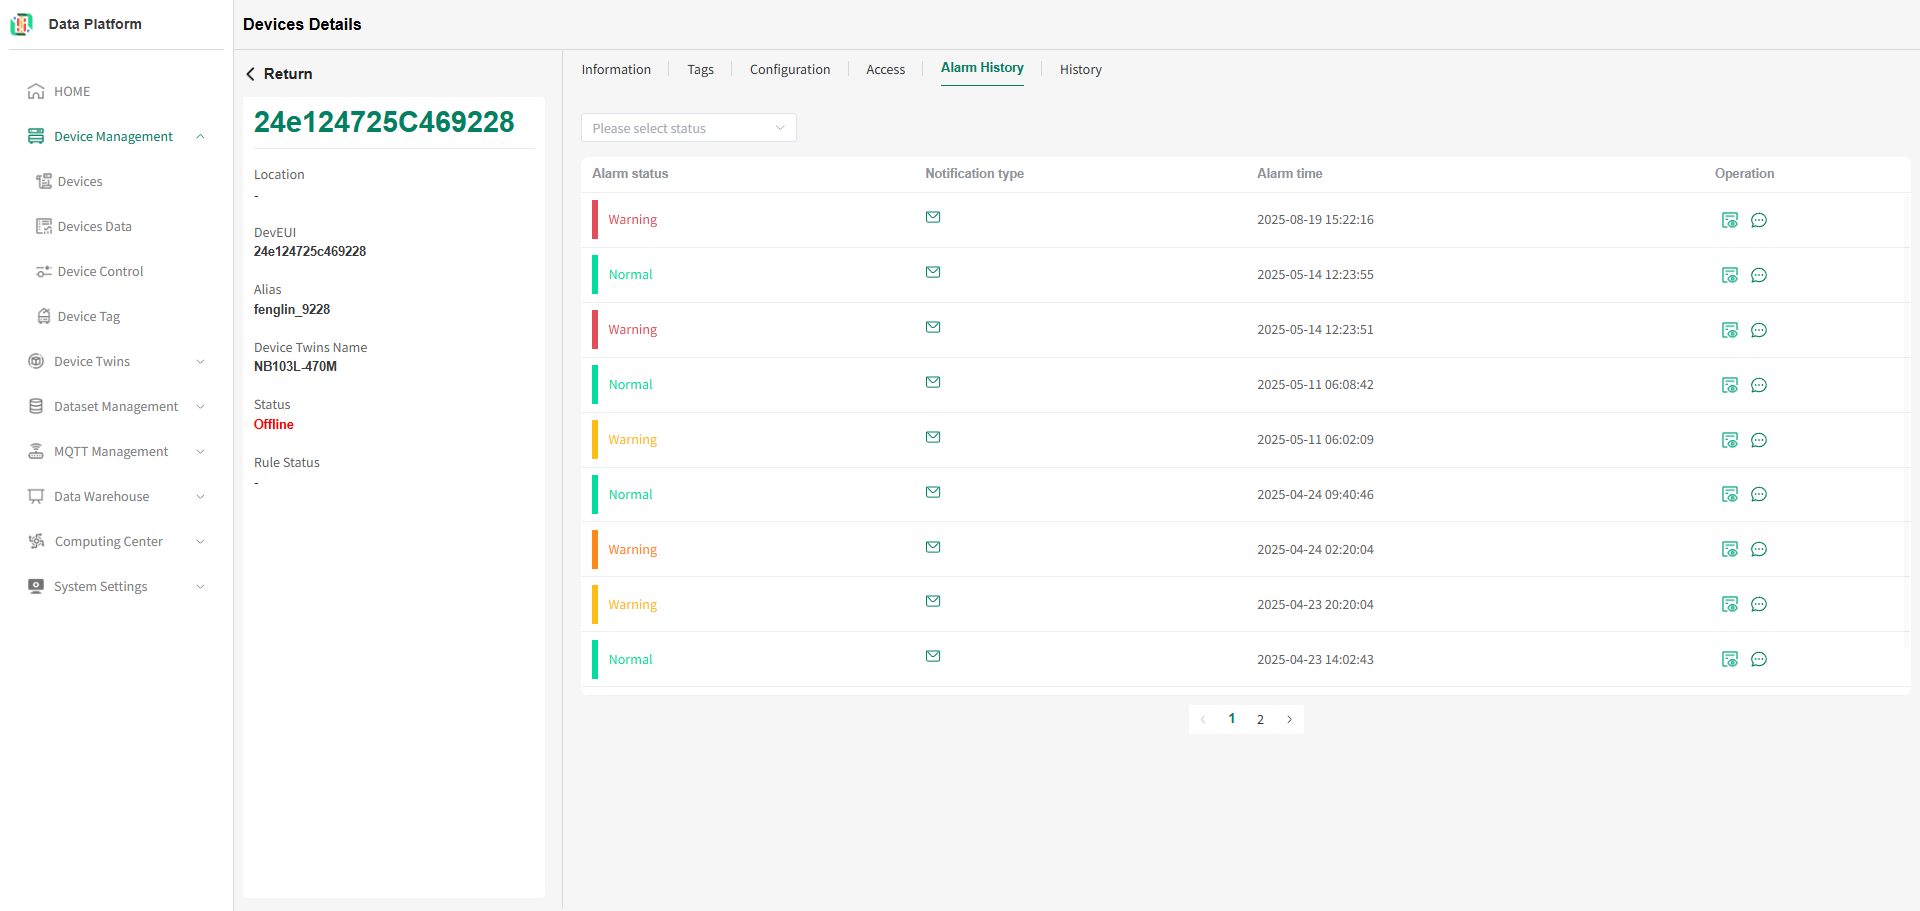
- View Message Sending Details
On the device details alarm history page, click the "Details" button on the right side of the alarm row you want to view, as shown below.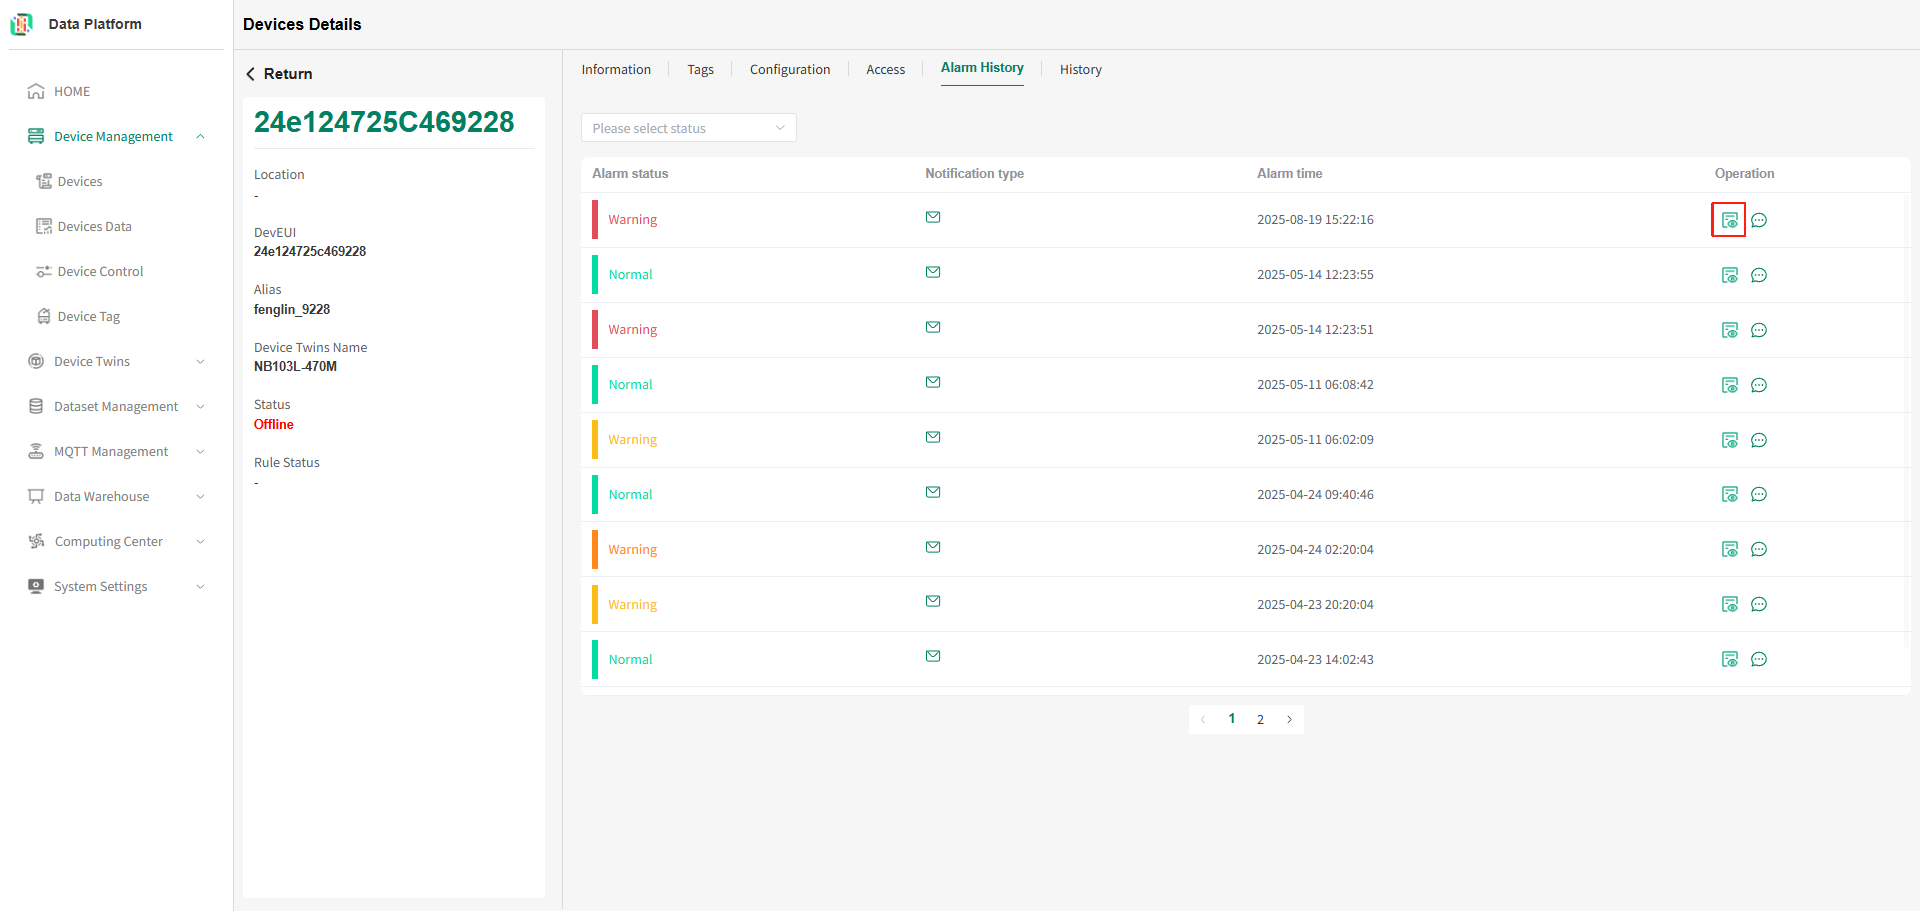 On the device details alarm history page, hover the mouse over the message icon to view the current alarm message content, as shown below.
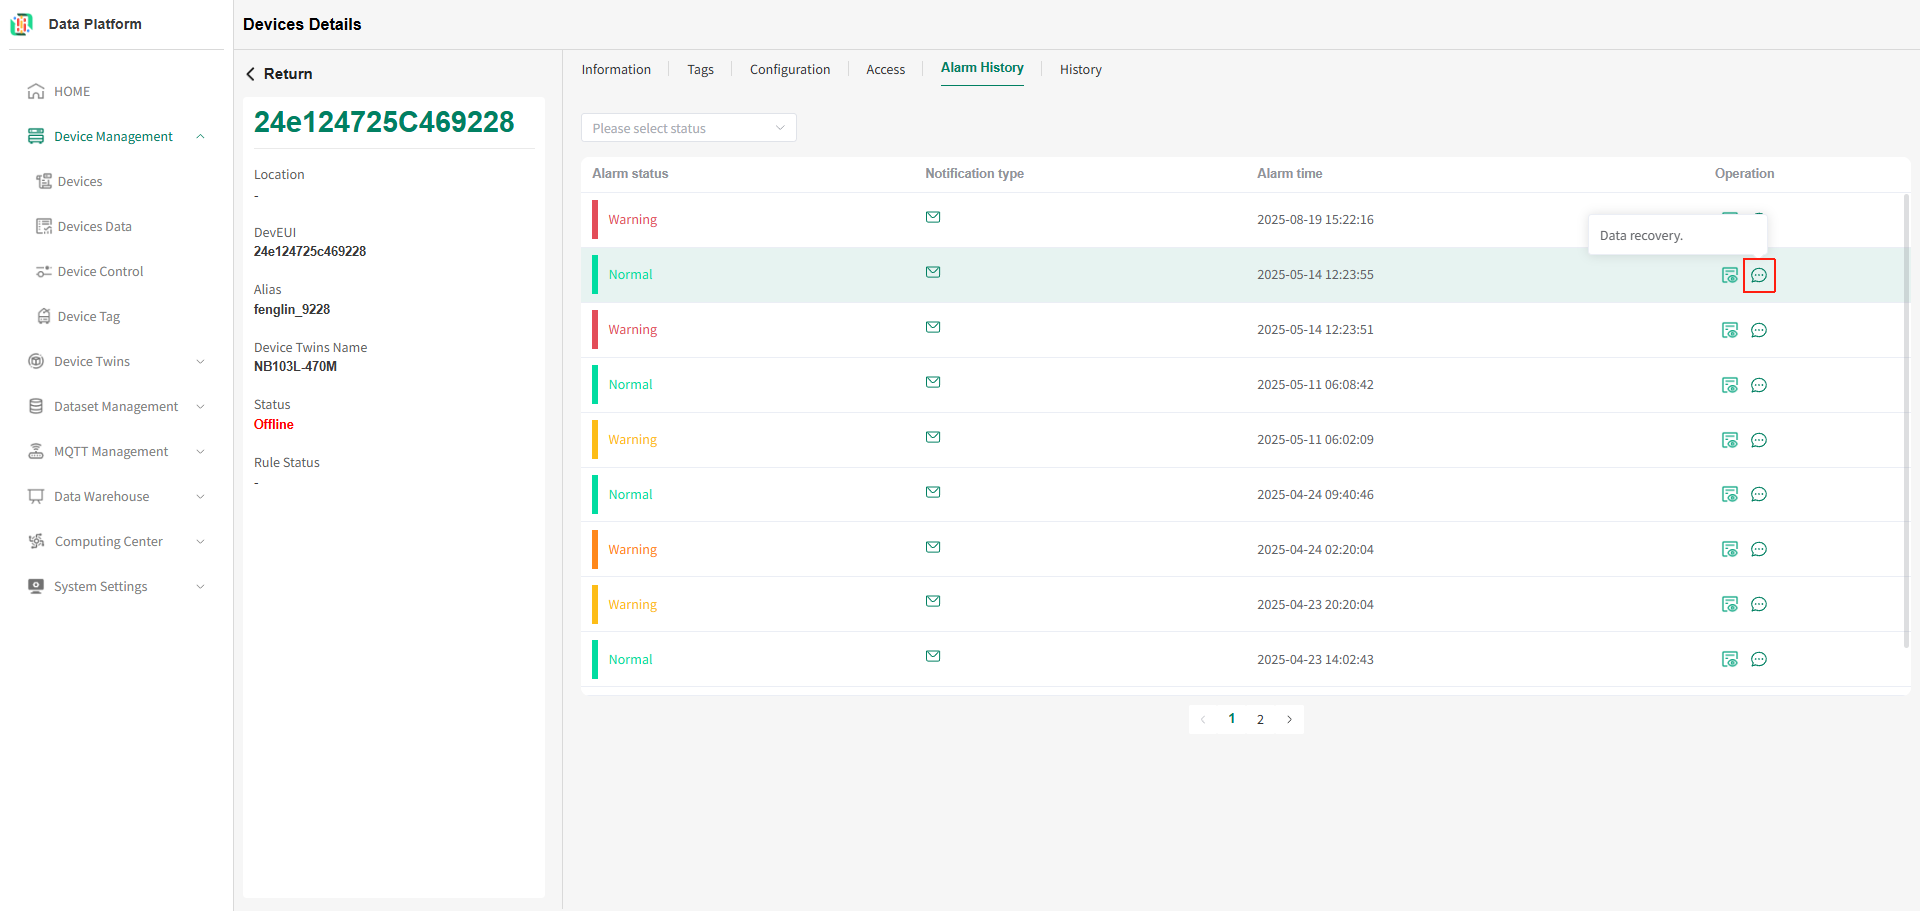 tip
tipDevice alarm history details are divided into email sending details and SMS sending details. The default is email sending details.
- Email Sending List
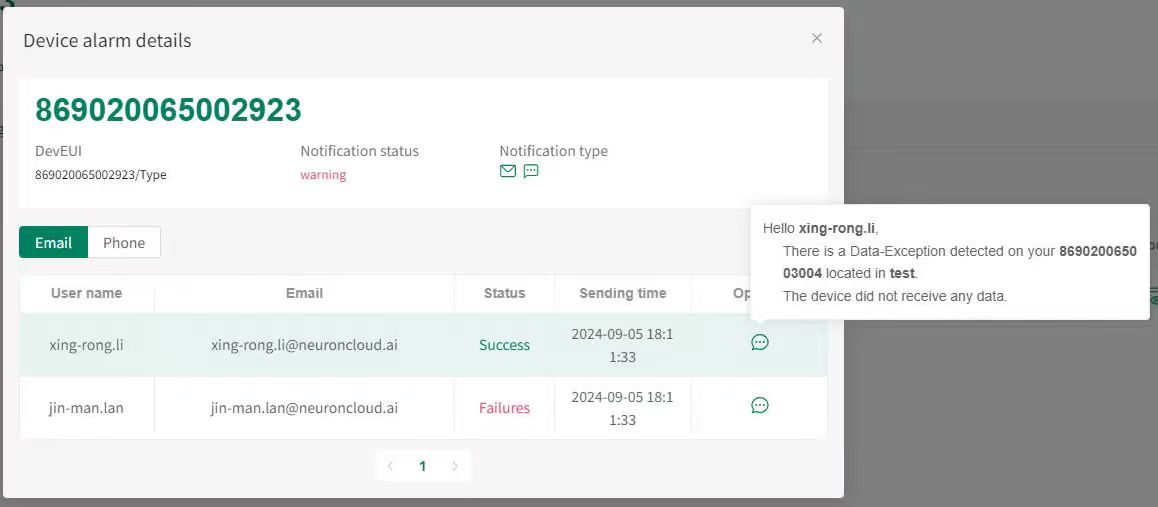
Device alarm history details allow you to view the personnel and time information when the device alarm was sent, as shown below.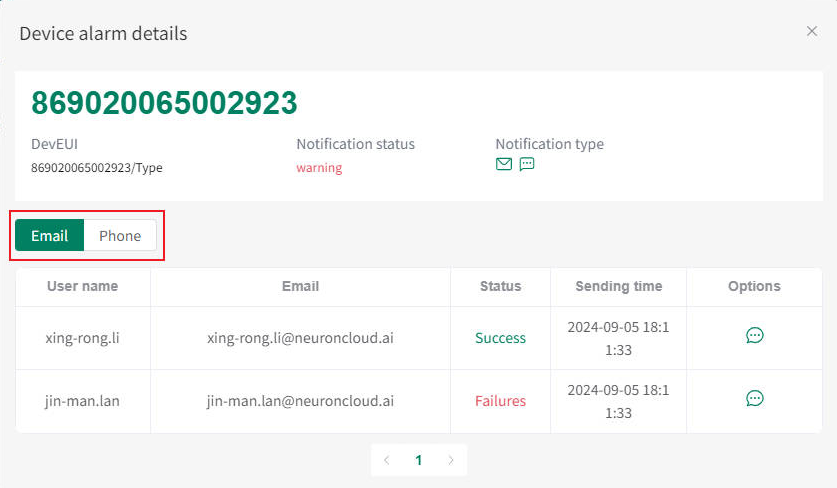 As shown above, hover the mouse over the message icon to view the sent information, as shown below.
- SMS Sending List
On the device alarm history details page, click the phone icon to switch to viewing SMS sending details. Hover the mouse over the message icon to view the sent information, as shown below.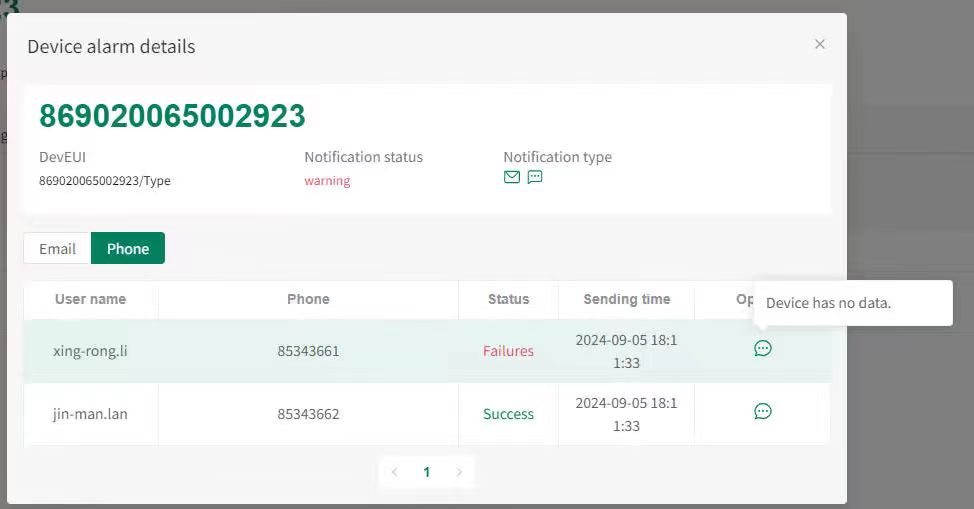
- Email Sending List
Device Time-Series Data
Device time-series data allows you to view all numeric and string type time-series data under this device.
- Numeric Time-Series Data Viewing
On the device details page, click the "History" menu to enter the device time-series data viewing page, as shown below.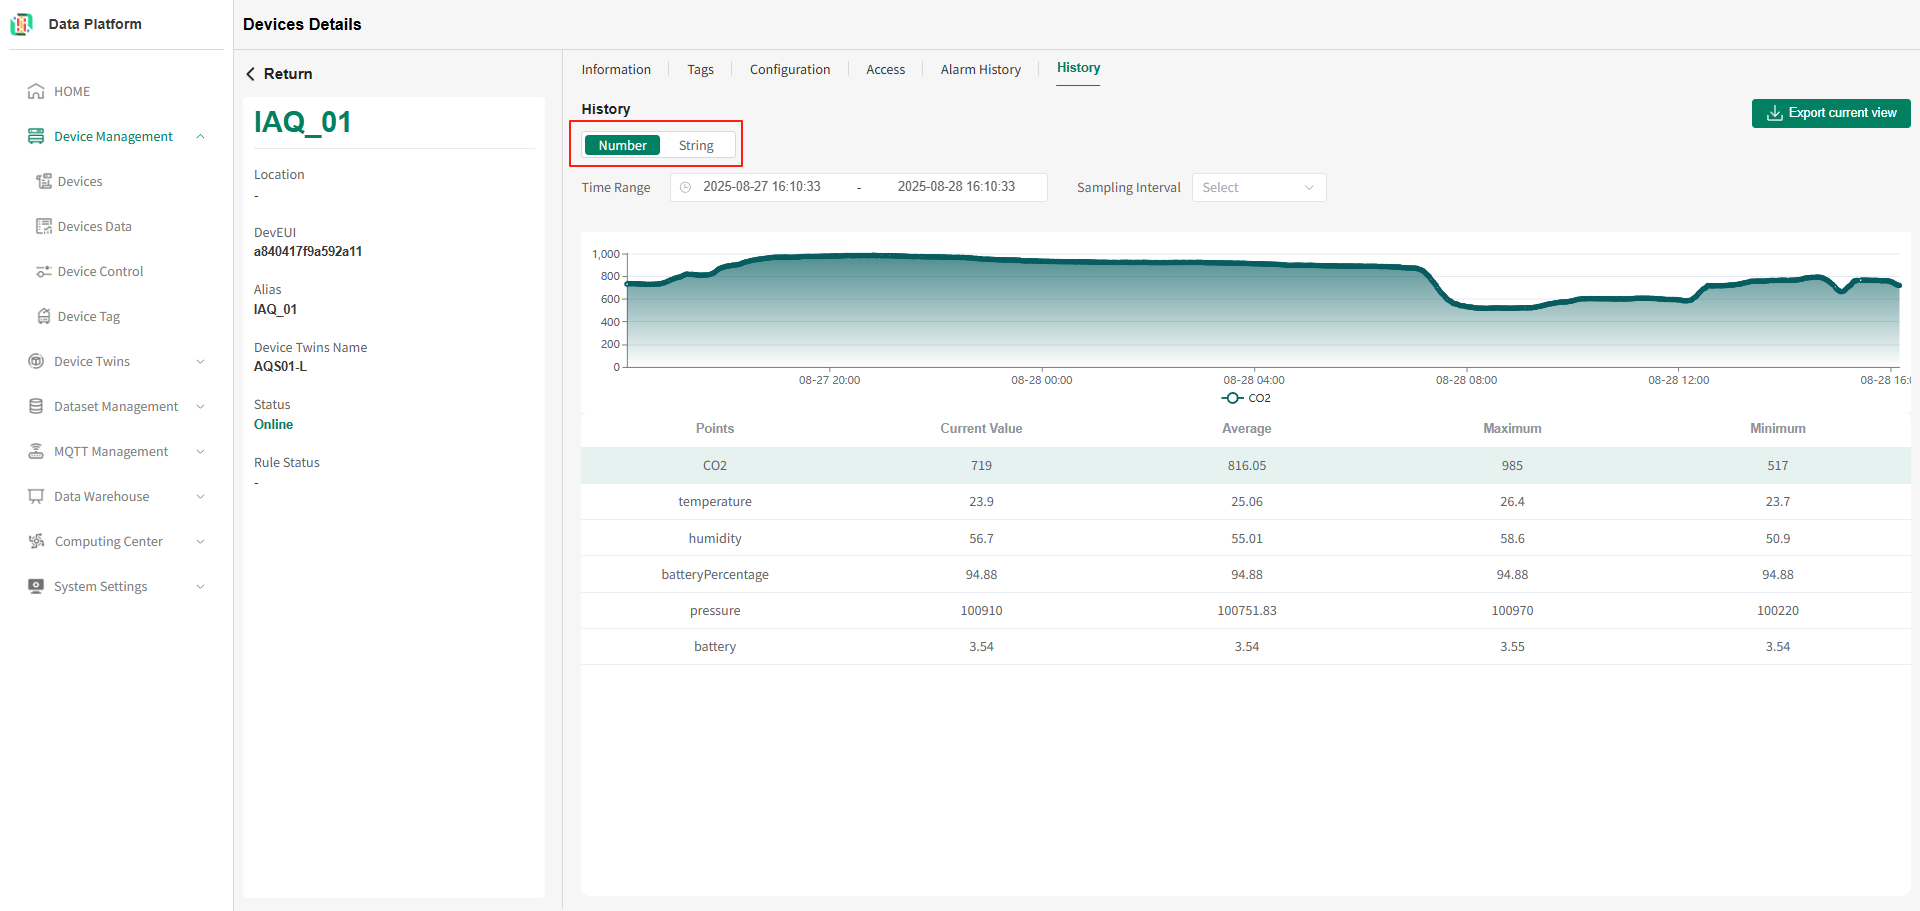 As shown below, click a single row in the device "Function type" table at the bottom, as shown below.tip
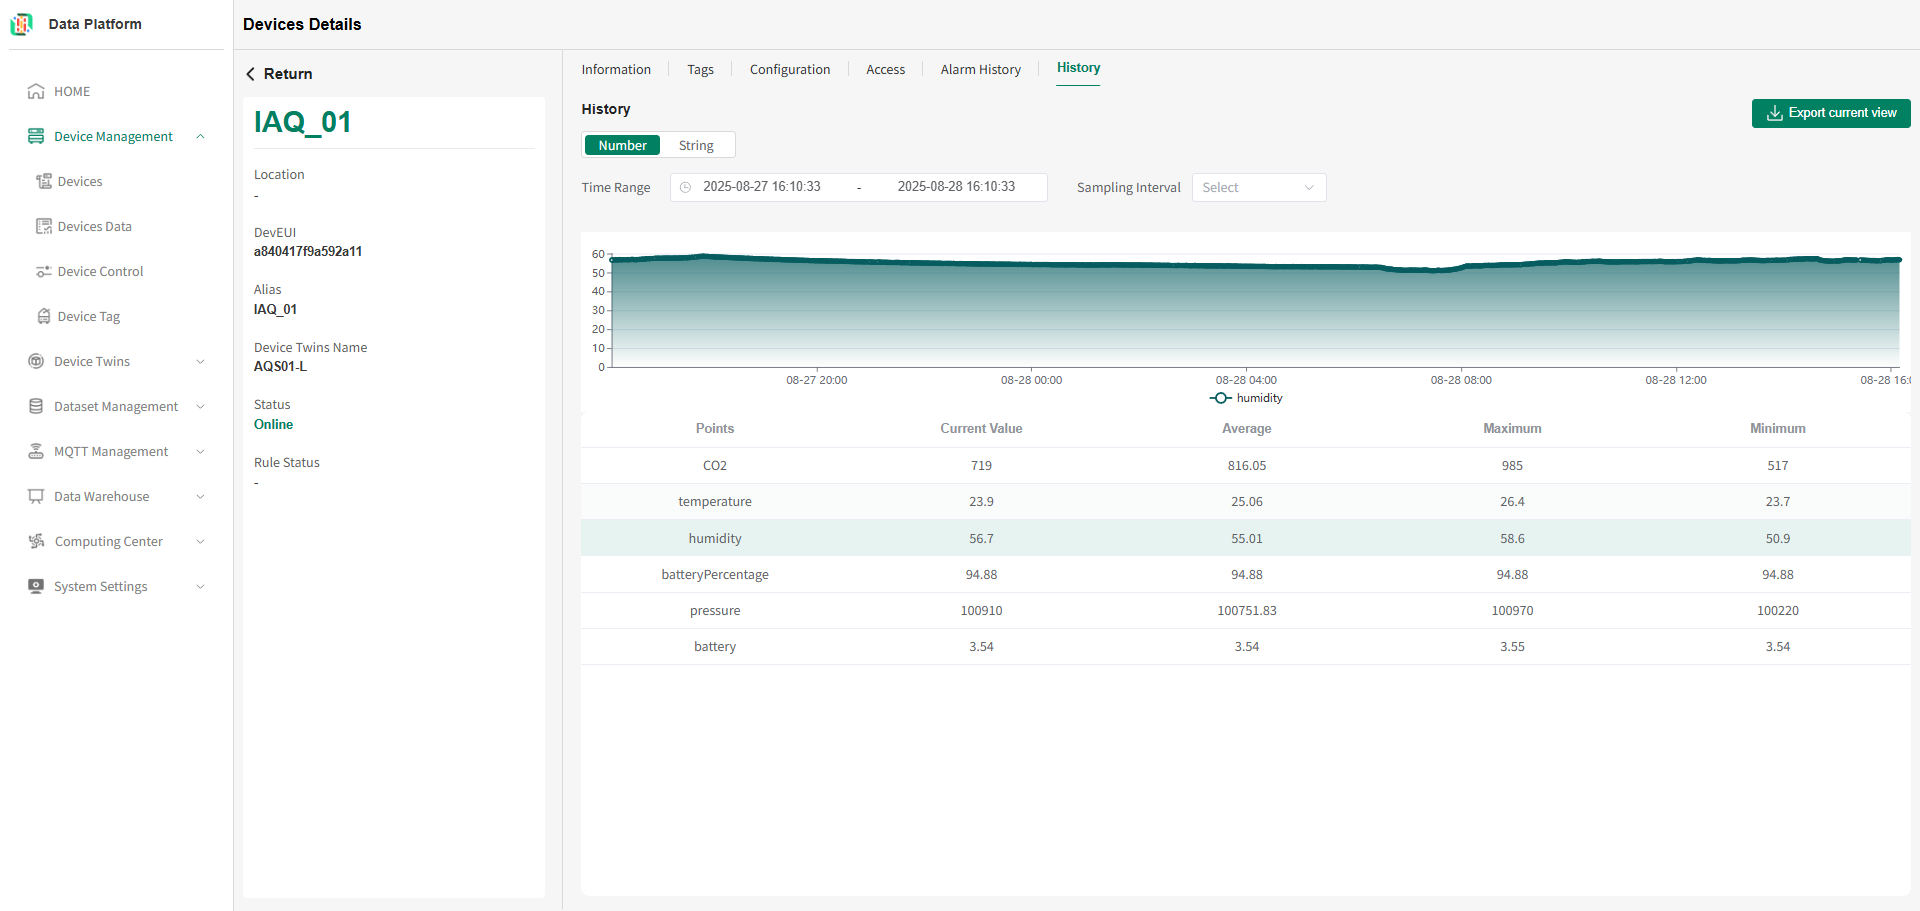
On the device numeric time-series query page, you can query data for a single function point within a time range.
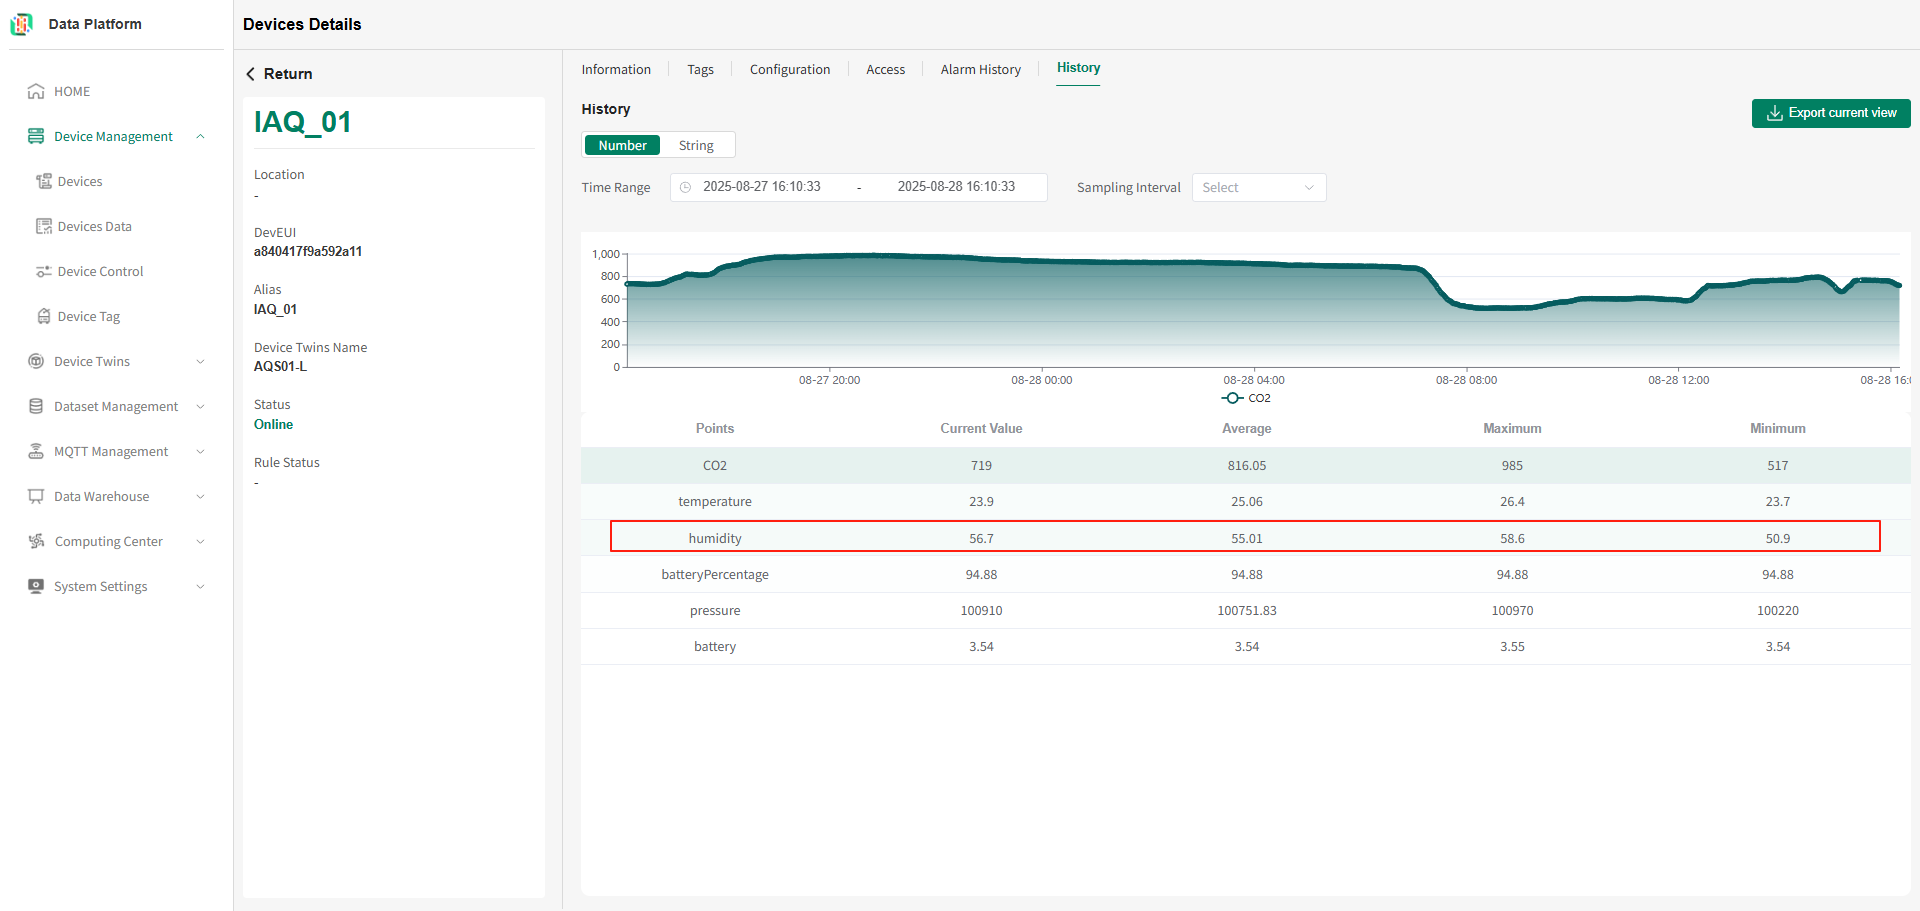 The system will switch to display the data for the corresponding Function type, as shown below.
- String Time-Series Data Viewing
On the device details page, click the "History" menu to enter the device time-series data viewing page, as shown below. As shown above, switch the type to String to query all string time-series data under this device, as shown below.
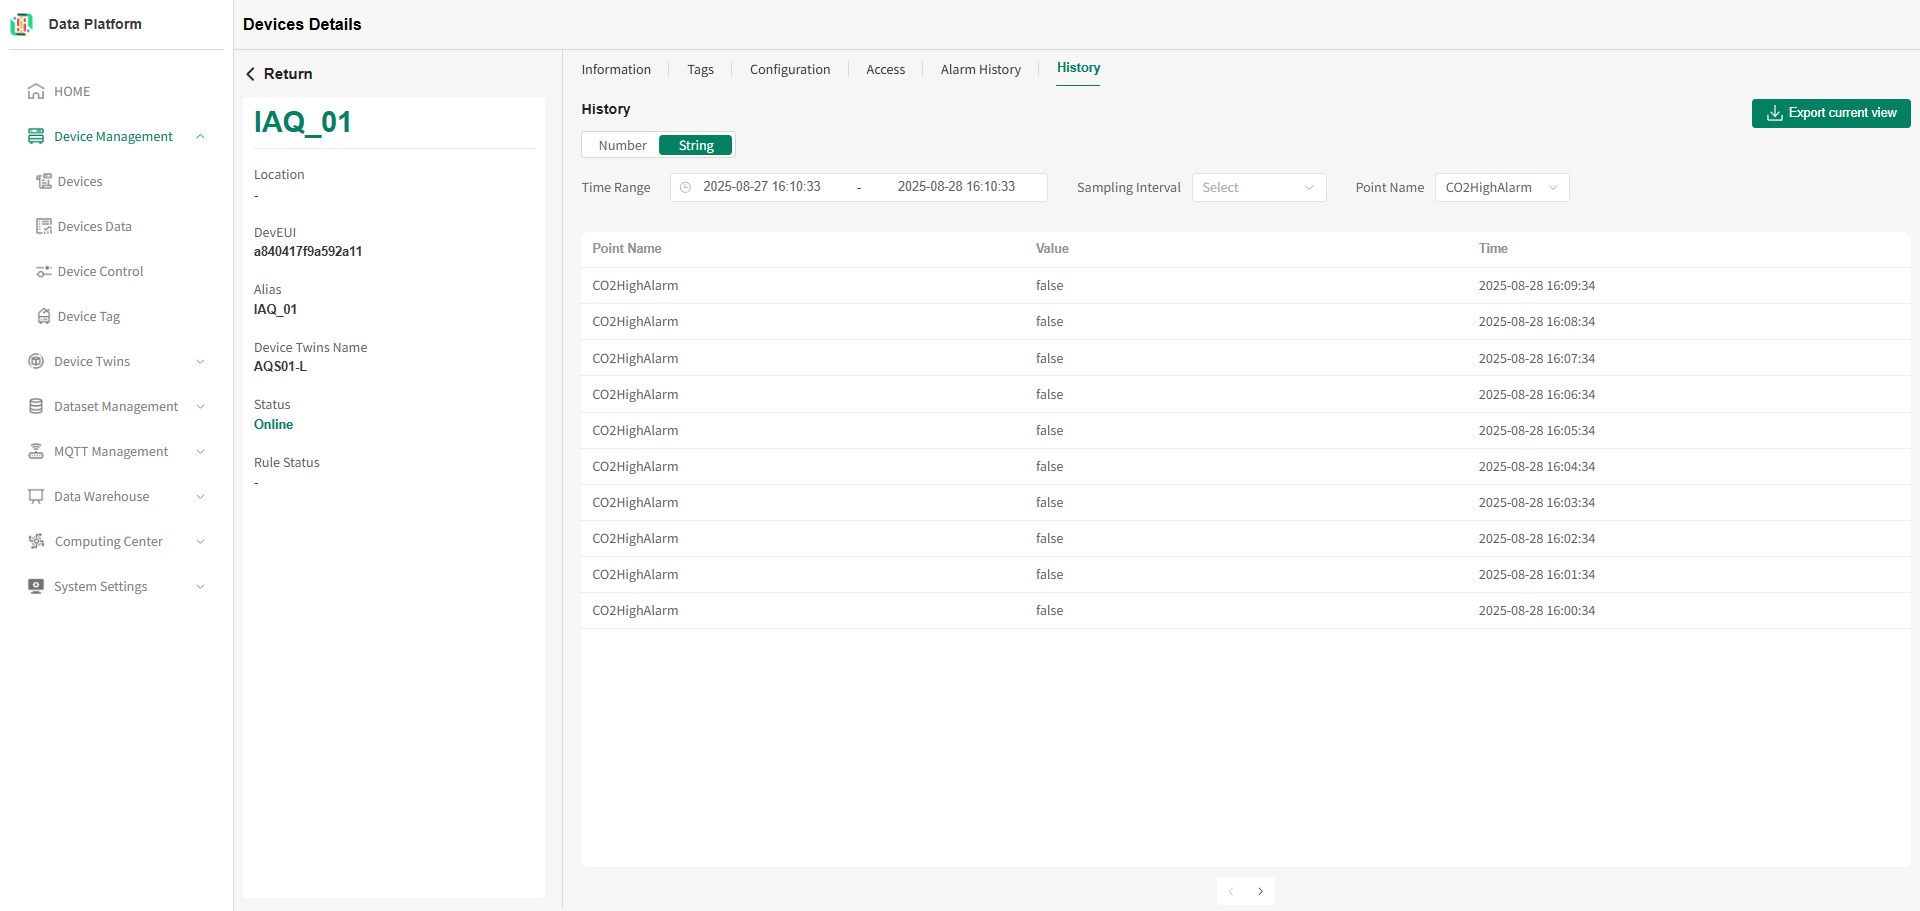 As shown below, check the device Function types you want to view to see data for multiple function points, as shown below.tip
On the device string time-series query page, you can query data for a single function point within a time range.
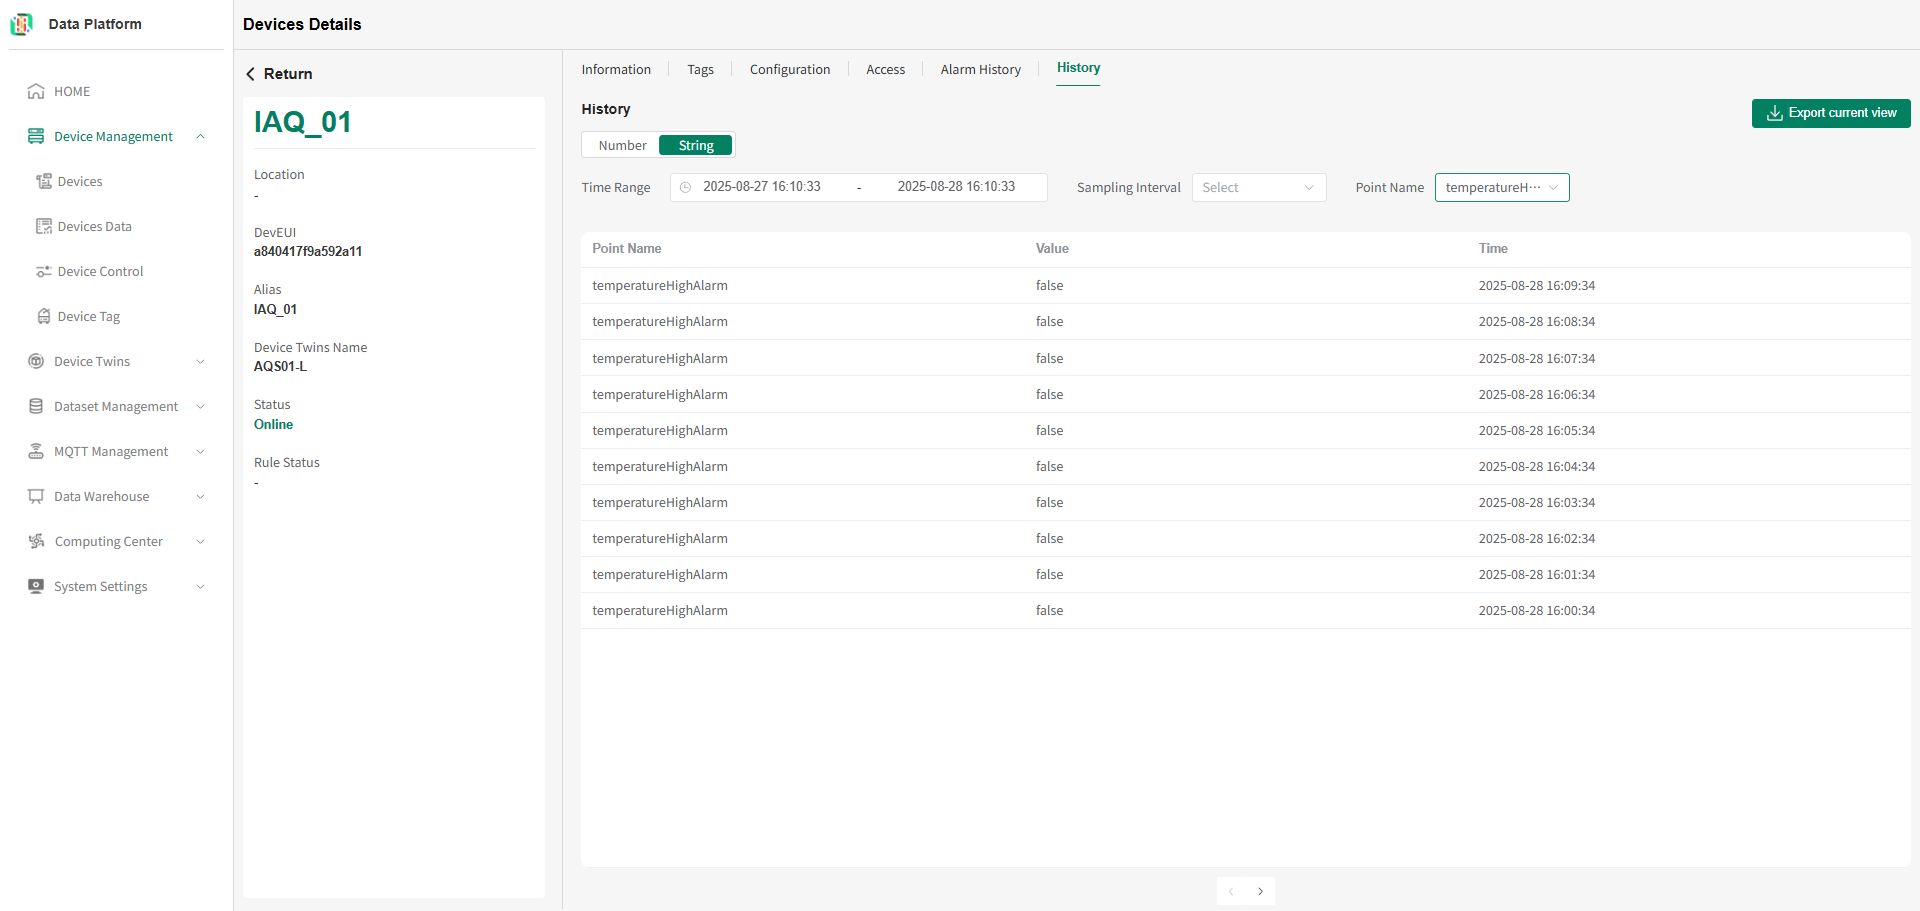
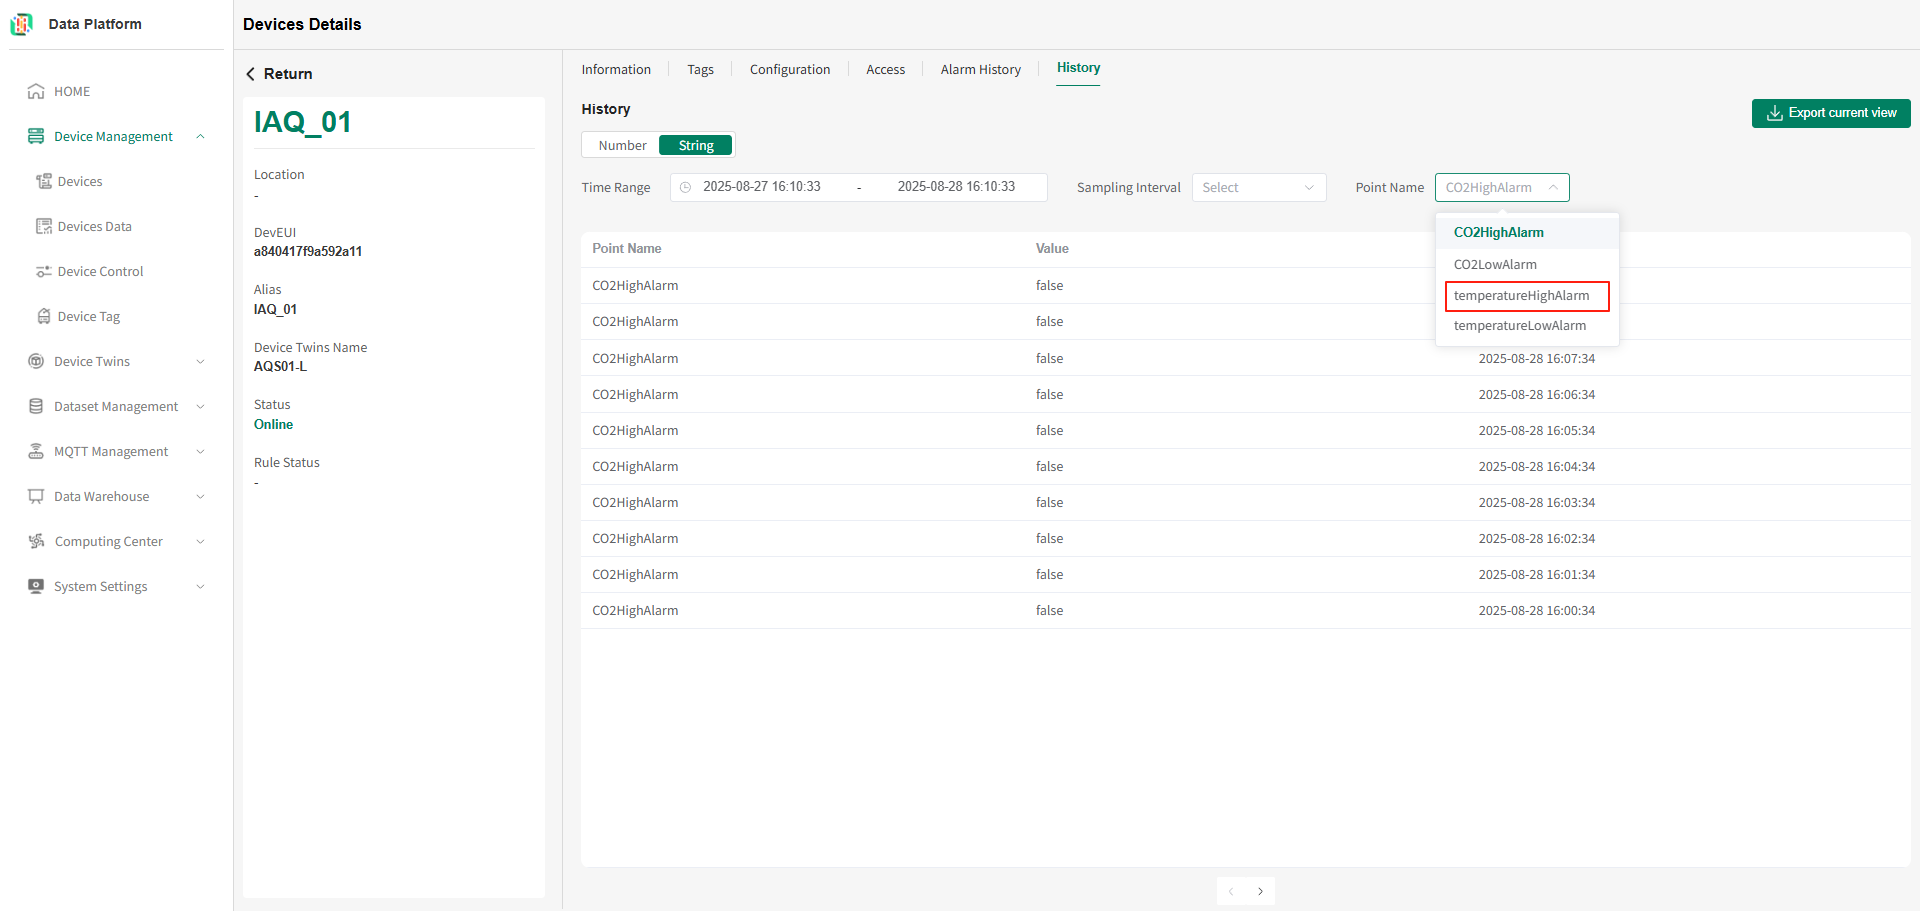 As shown above, select different Function type values to switch the data displayed in the table below, as shown below.
Delete Device
For successfully connected devices, if the device twins is marked incorrectly, the device name is entered incorrectly, etc., you can delete the device and re-add it. The system supports device deletion in 3 ways 【IoT devices, non-IoT devices, API-accessed devices】. The device deletion operations are as follows:
IoT Device Deletion
- Enter Device Registration Page
For how to enter the Device Management page, see Device Management.
On the Device Management page, click the "Register Device" button, as shown below.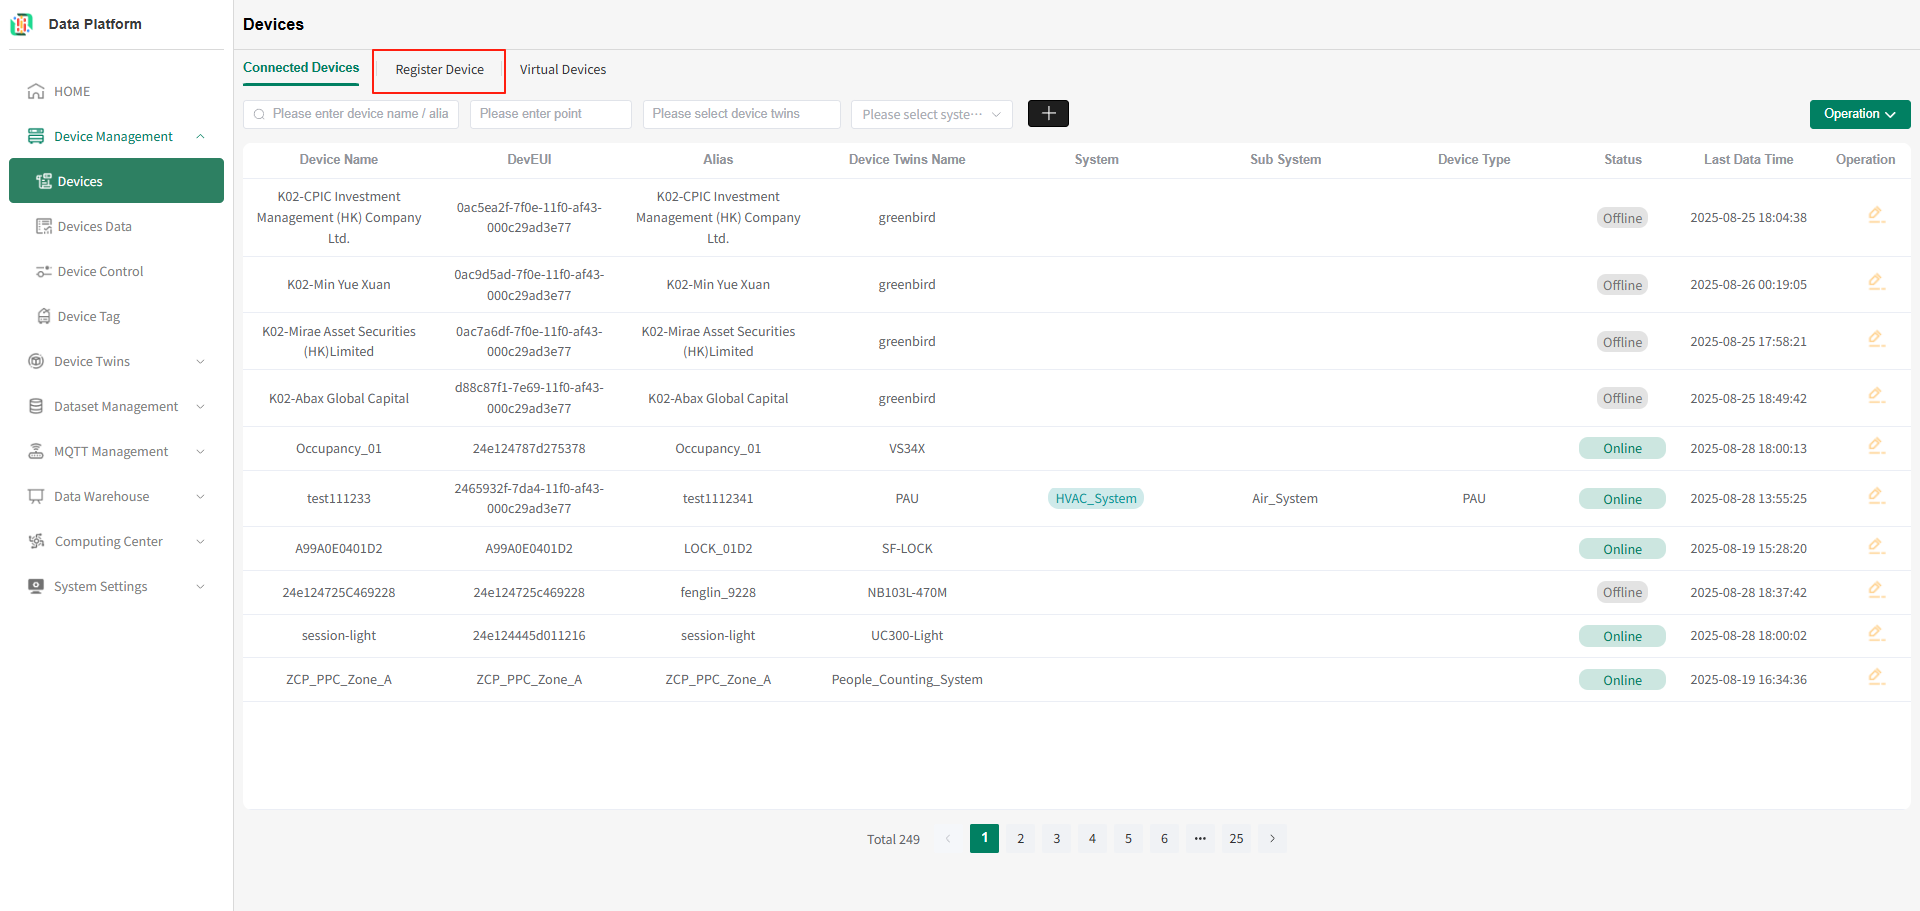 tip
tipThe device registration page has three types of registered devices. The default is IoT type devices. IoT type devices support querying by device name and device access status, as shown below.
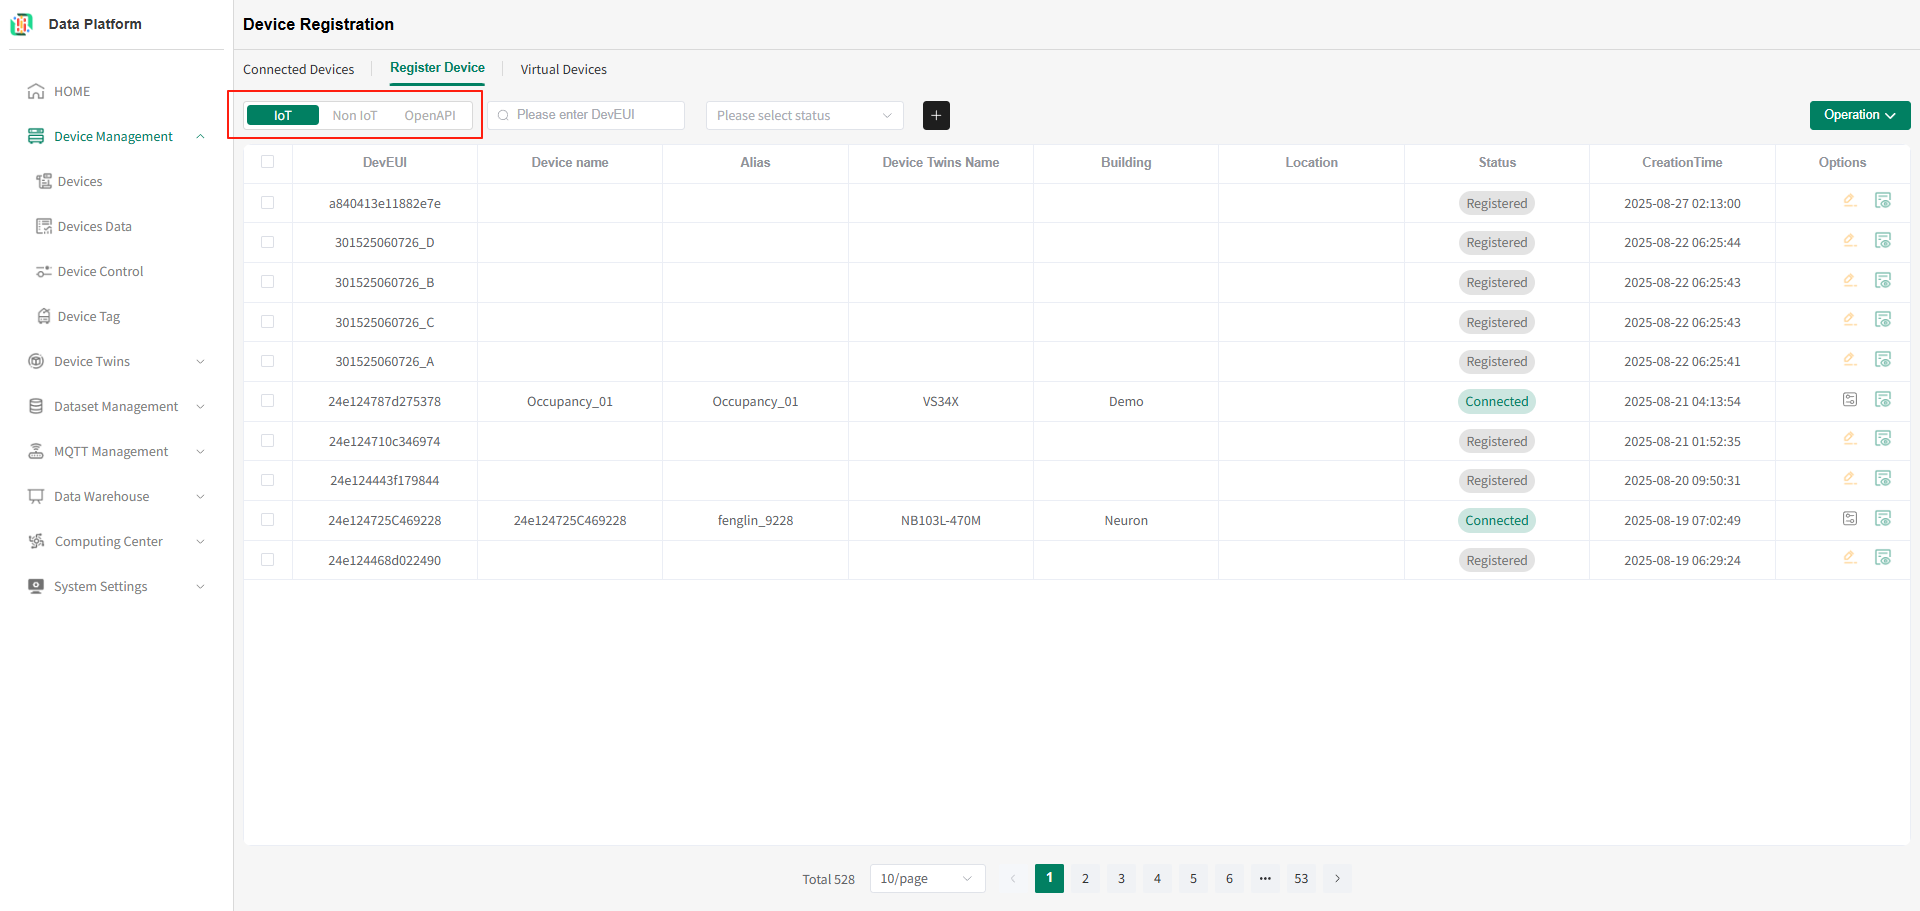
- Device Deletion
tip
Device deletion supports both deleting all devices and deleting selected devices.
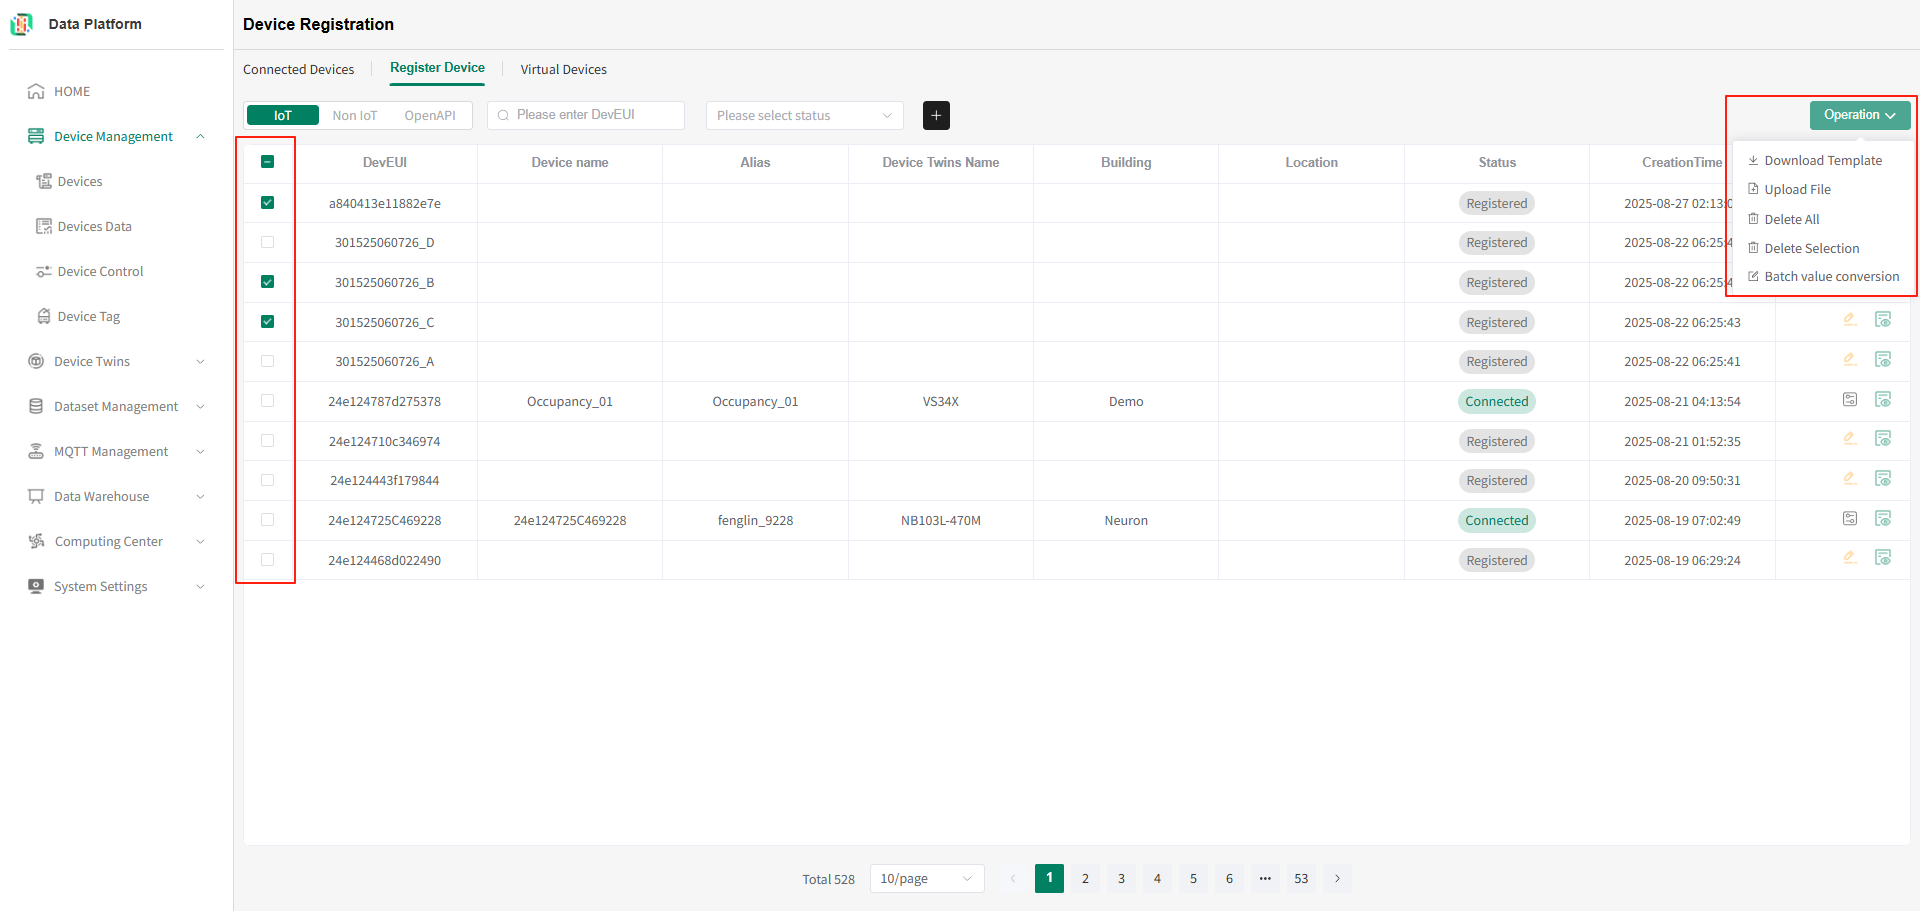
- Delete Selected Devices
As shown above, check the devices to be deleted, click the menu bar on the right, select "Delete Selection". After user confirmation, the selected devices can be deleted. - Delete All Devices As shown above, click the menu bar on the right, select "Delete All". After user confirmation, all devices of the current IoT type can be deleted.
- Delete Selected Devices
Non-IoT Device Deletion
- Enter Device Registration Page
For how to enter the Device Management page, see Device Management.
On the Device Management page, click the "Register Device" button, as shown below. tip
tipThe device registration page has three types of registered devices. The default is IoT type devices. This module requires switching to the non-IoT type, as shown below.
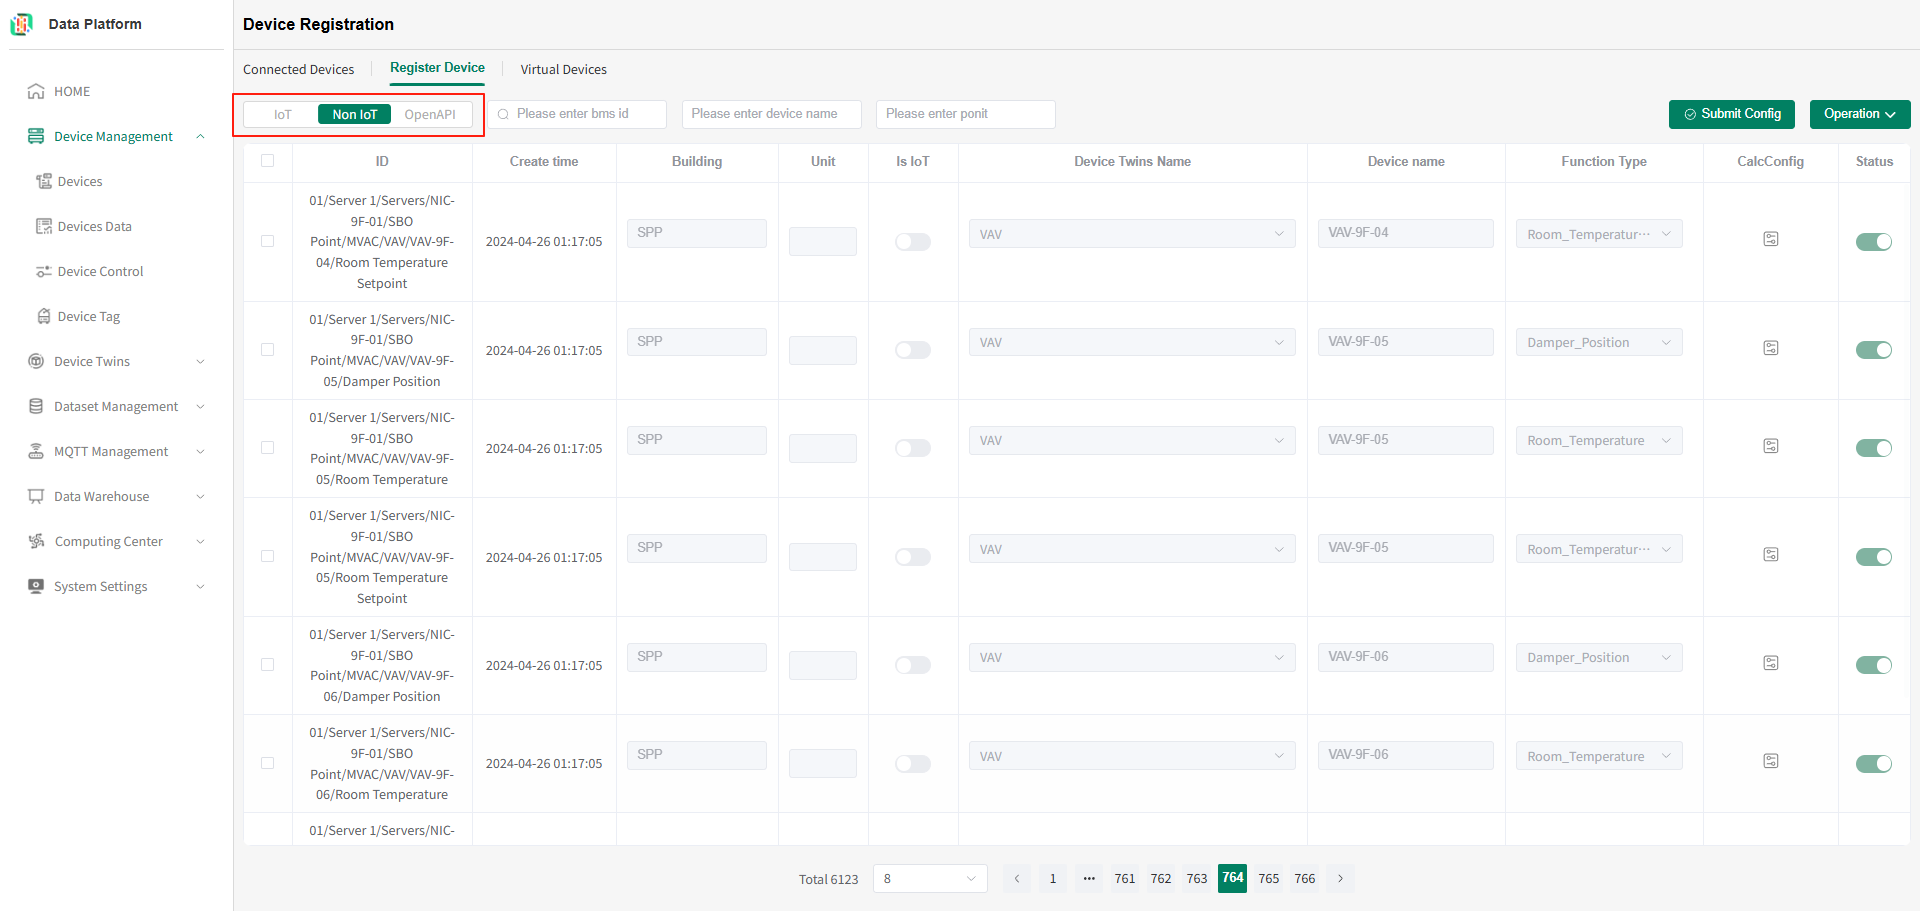
- Device Deletion
tip
Device deletion supports both deleting all devices and deleting selected devices.
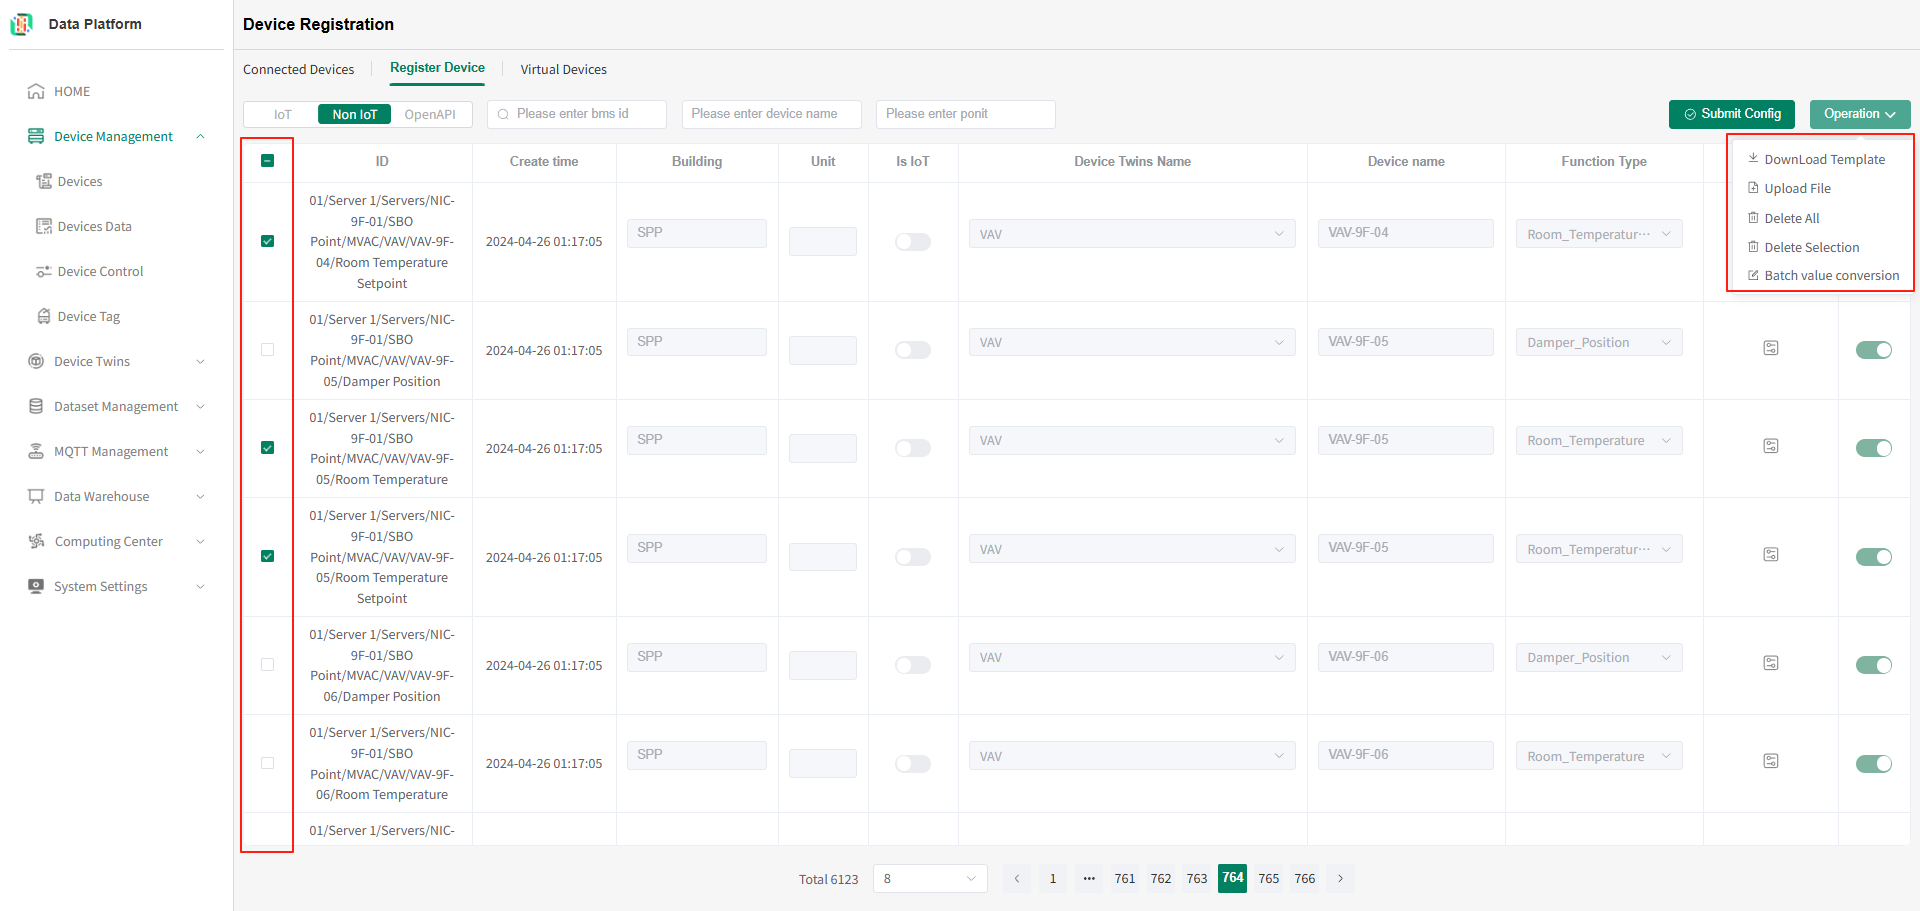
- Delete Selected Devices
As shown above, check the devices to be deleted, click the menu bar on the right, select "Delete Selection". After user confirmation, the selected devices can be deleted. - Delete All Devices As shown above, click the menu bar on the right, select "Delete All". After user confirmation, all devices of the current non-IoT type can be deleted.
- Delete Selected Devices
API-Accessed Device Deletion
- Enter Device Registration Page
For how to enter the Device Management page, see Device Management.
On the Device Management page, click the "Register Device" button, as shown below. tip
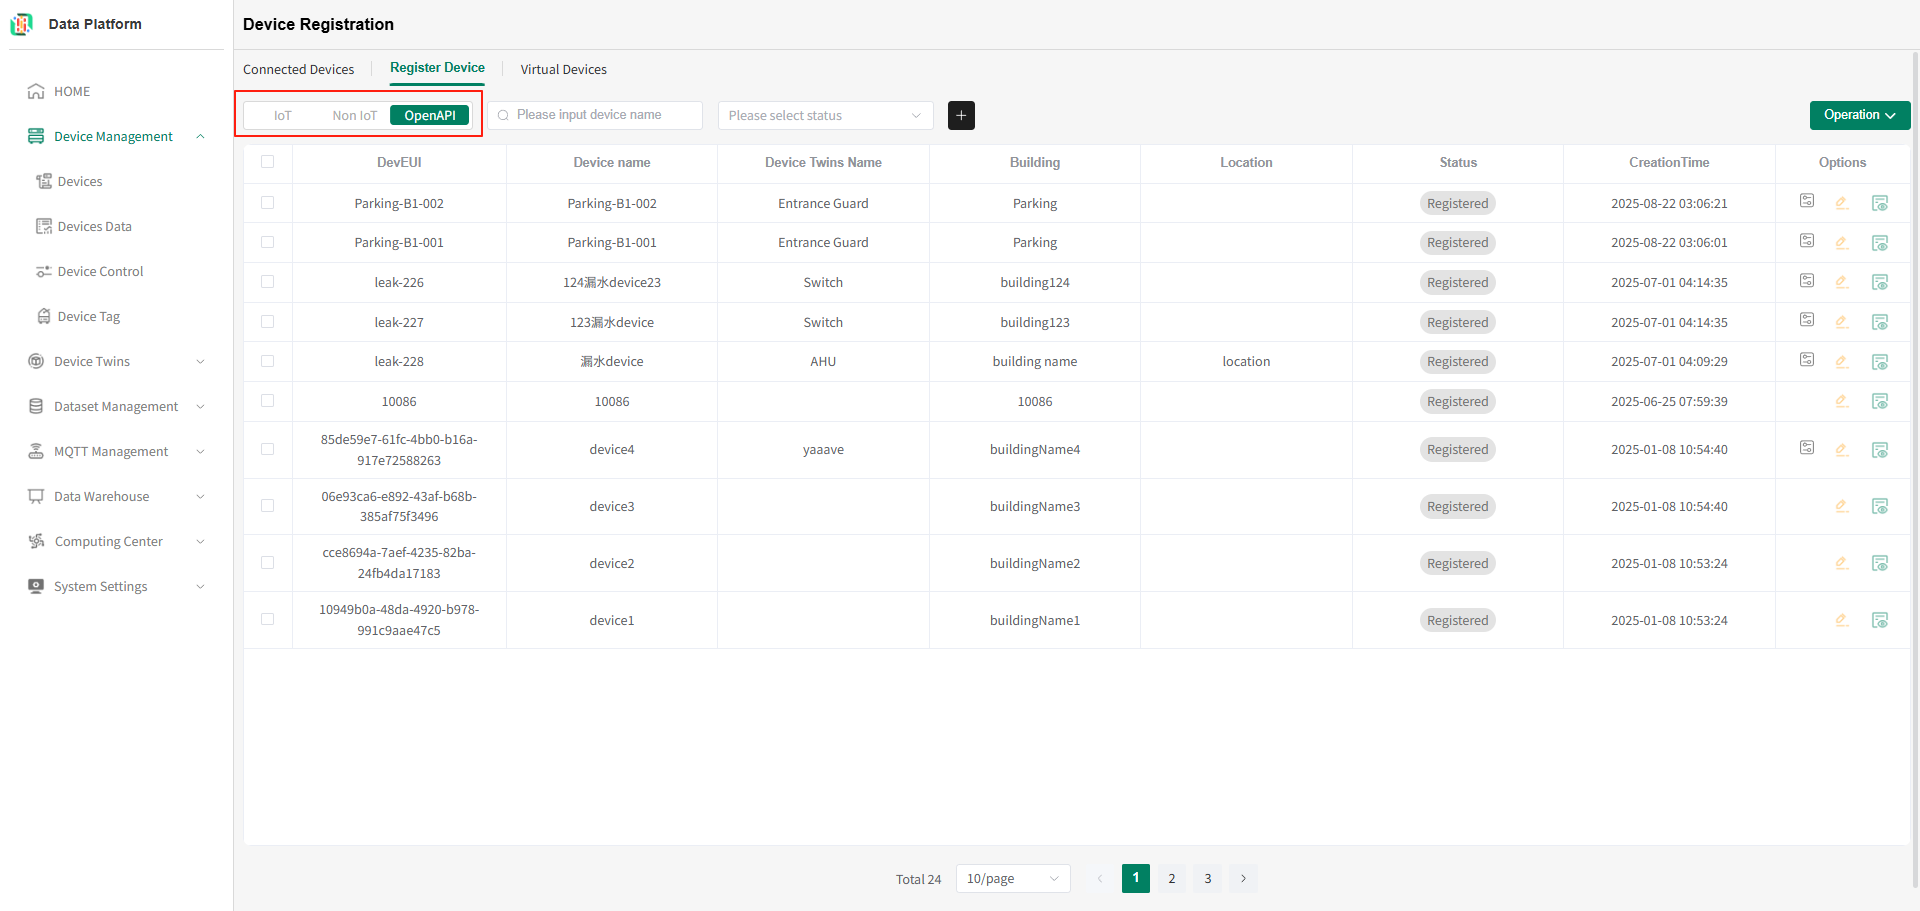
tipThe device registration page has three types of registered devices. The default is IoT type devices. This module requires switching to the OpenAPI type, as shown below.
- Device Deletion
tip
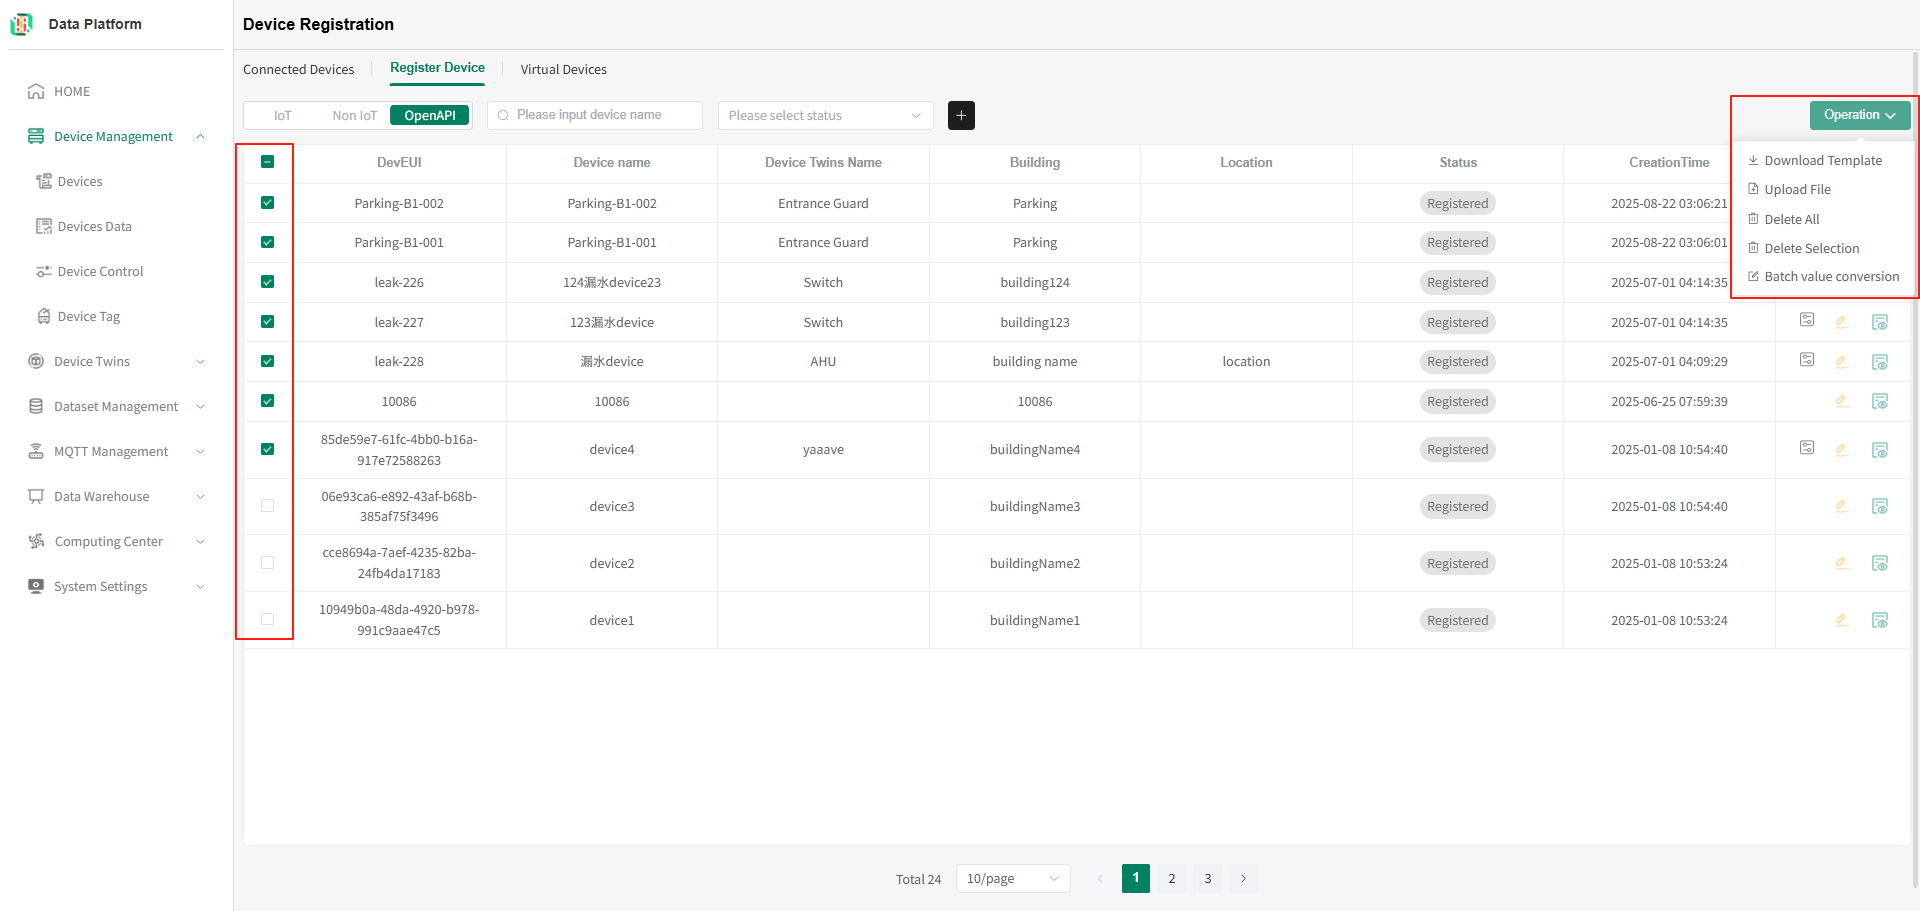
Device deletion supports both deleting all devices and deleting selected devices.
- Delete Selected Devices
As shown above, check the devices to be deleted, click the menu bar on the right, select "Delete Selection". After user confirmation, the selected devices can be deleted. - Delete All Devices As shown above, click the menu bar on the right, select "Delete All". After user confirmation, all devices of the current API access type can be deleted.
- Delete Selected Devices