Device access process
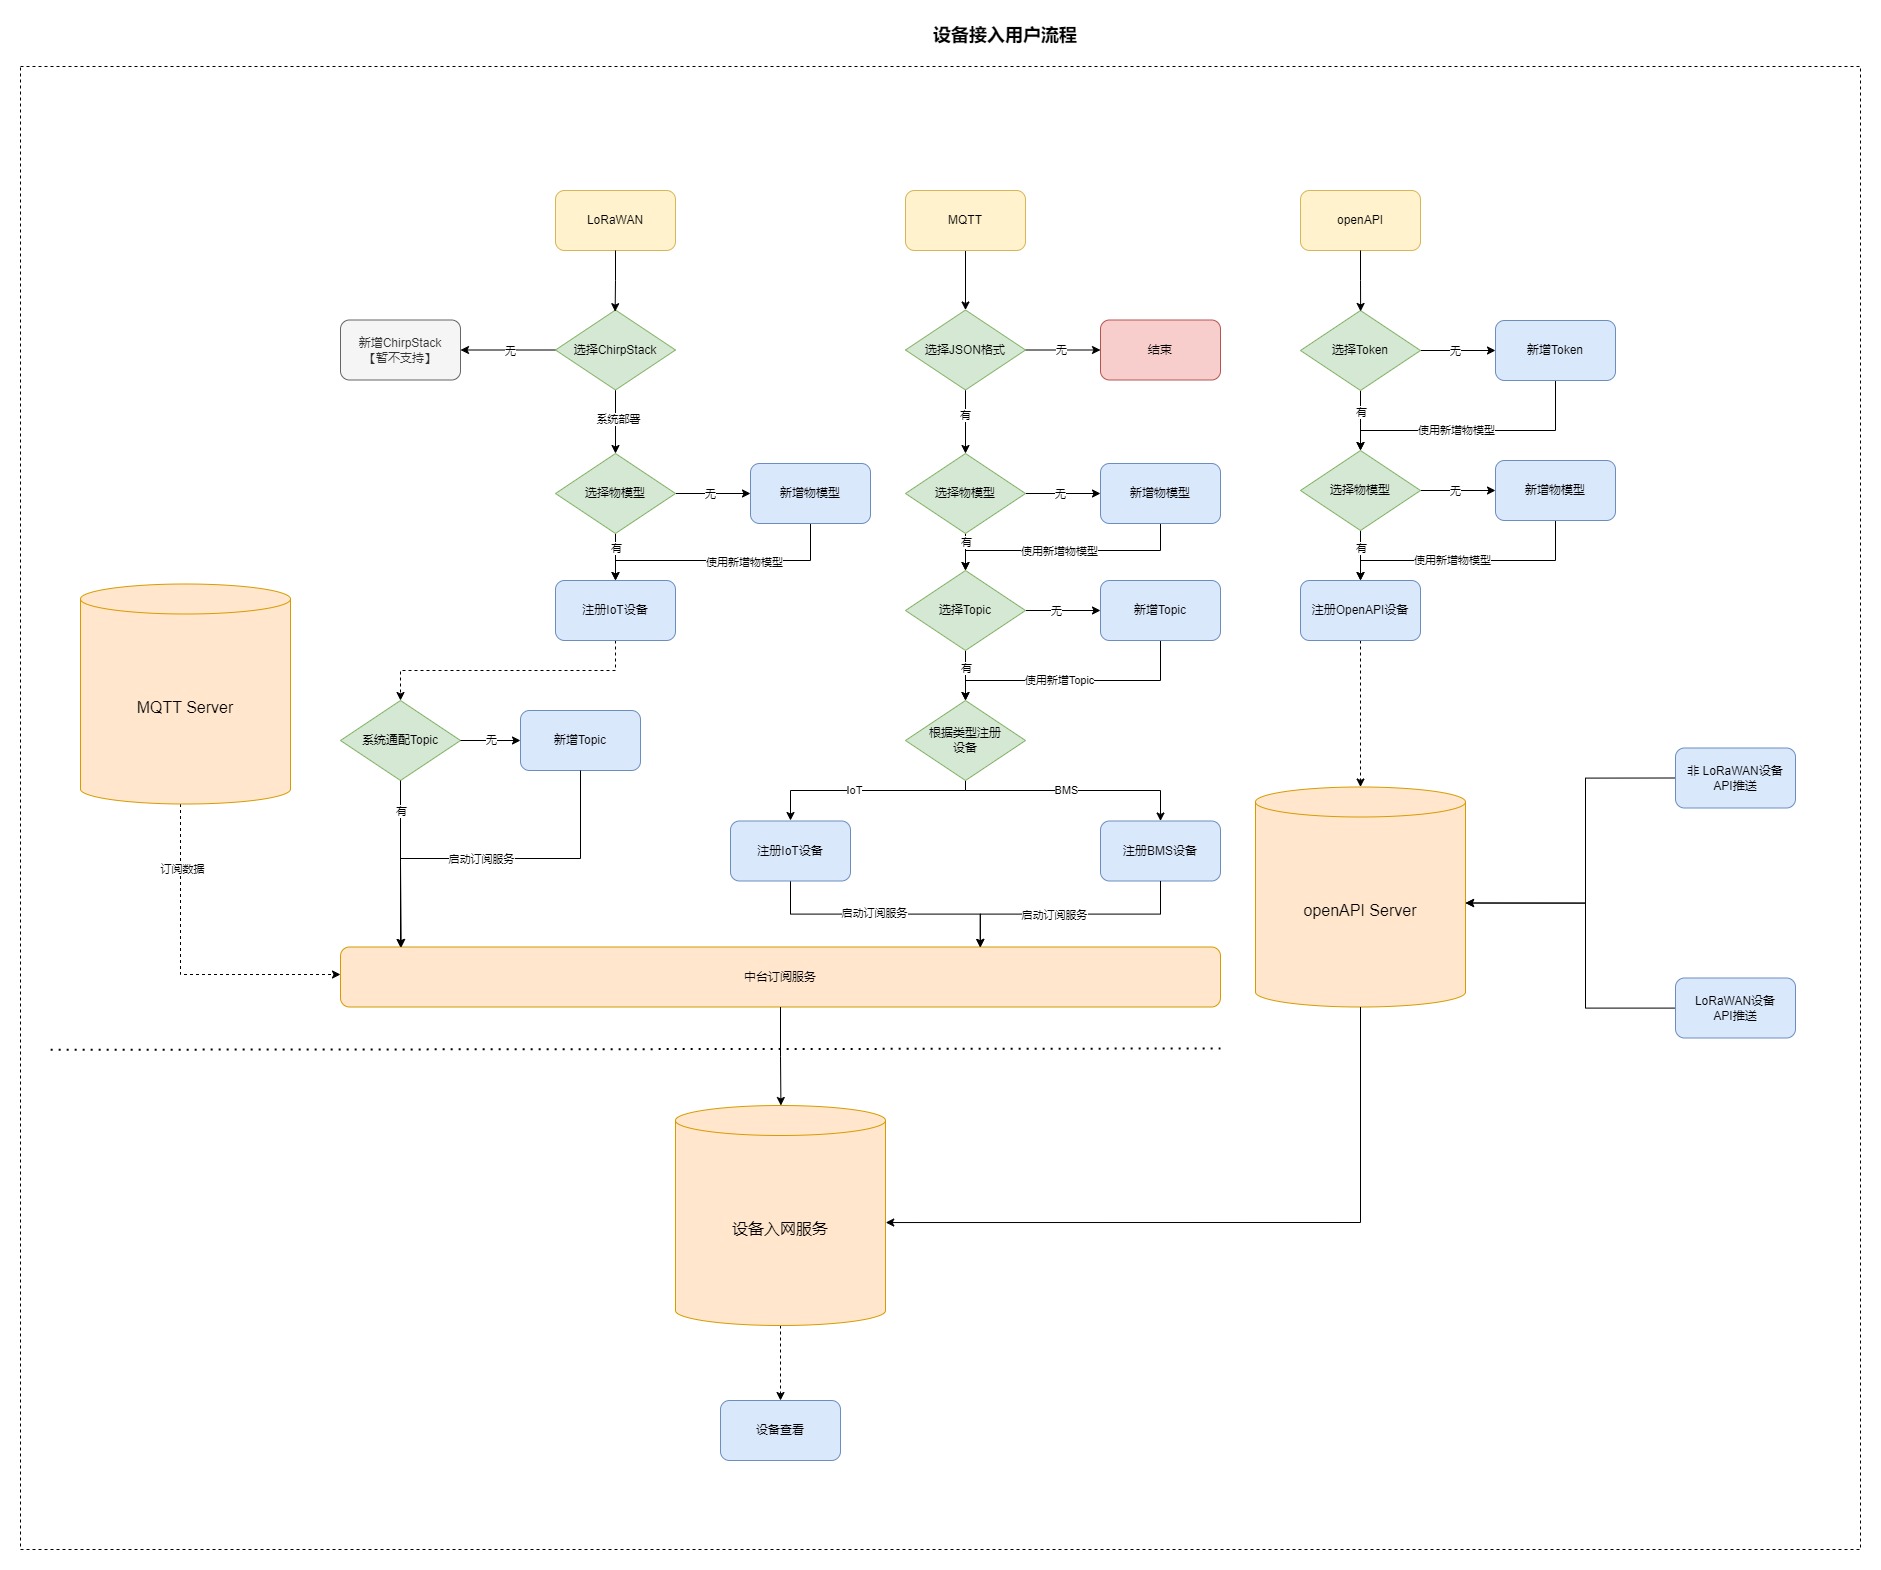
The platform currently supports three device access methods: LoRaWAN NS, MQTT, and Open API.
Device access process diagram
LoRaWAN device access
LoRaWAN can connect to all types of IoT sensor devices, and the specific operation process is as follows
-
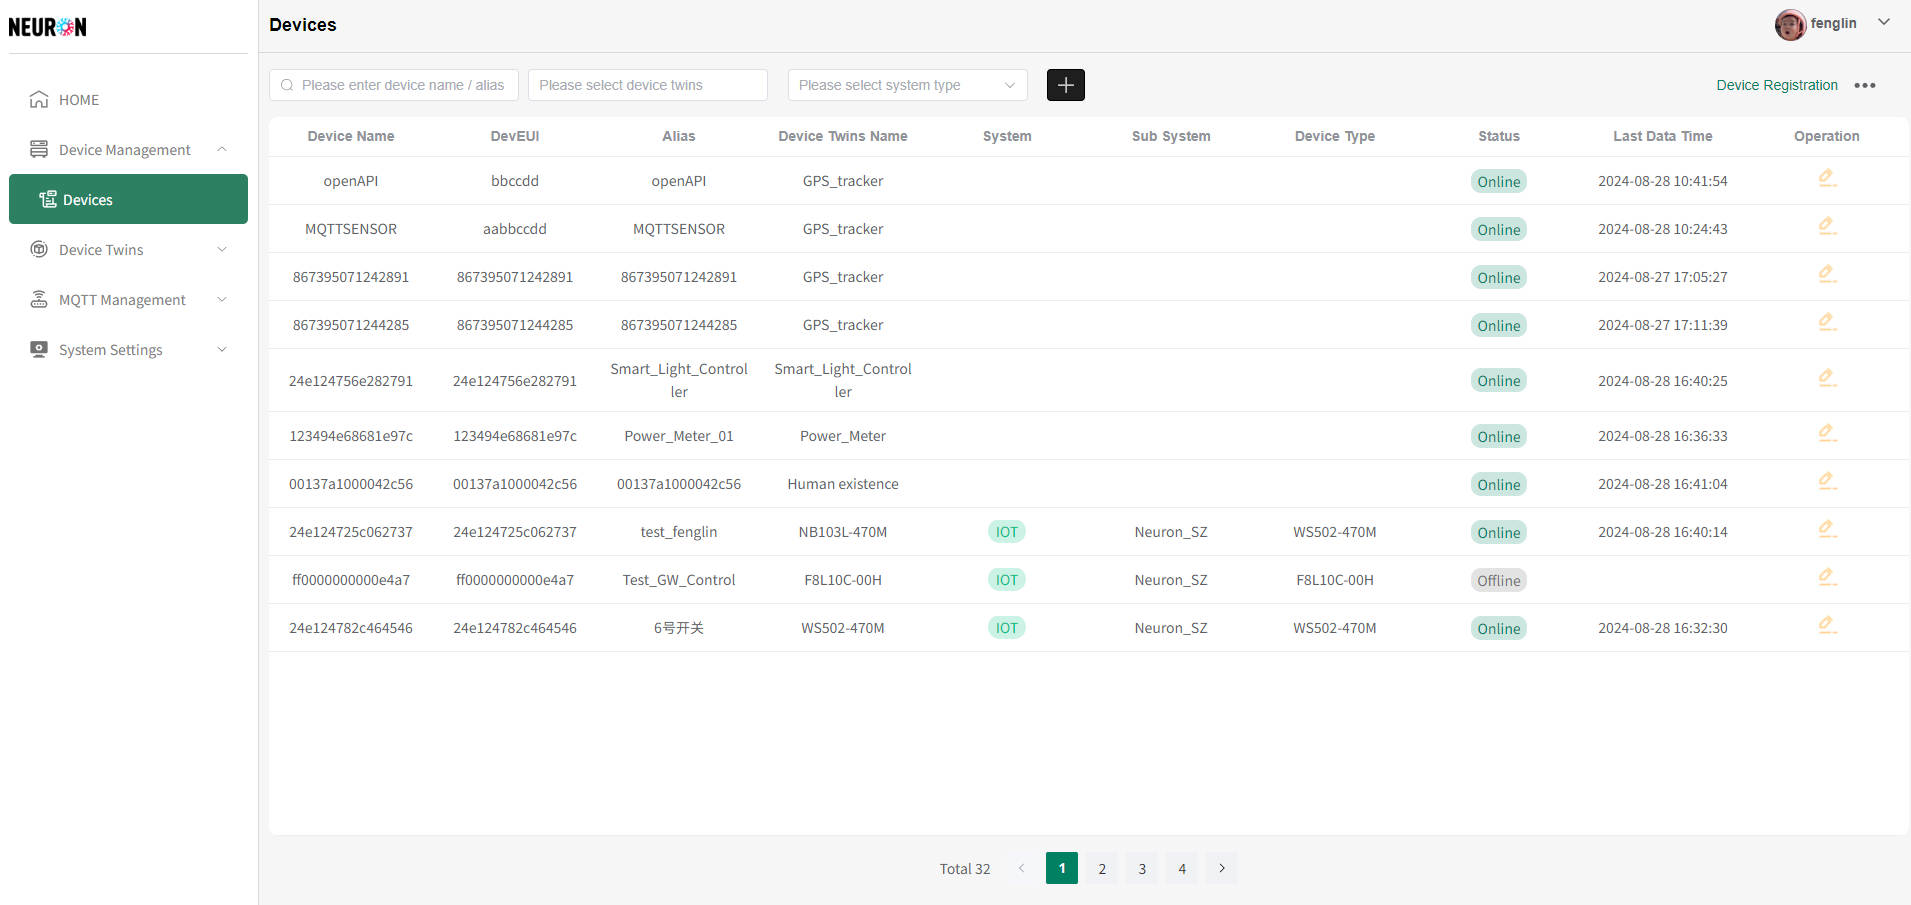
In the device management module[Operation details can be found in Device Management, click the "Add" button to enter the device addition process, as shown in the following figure
-
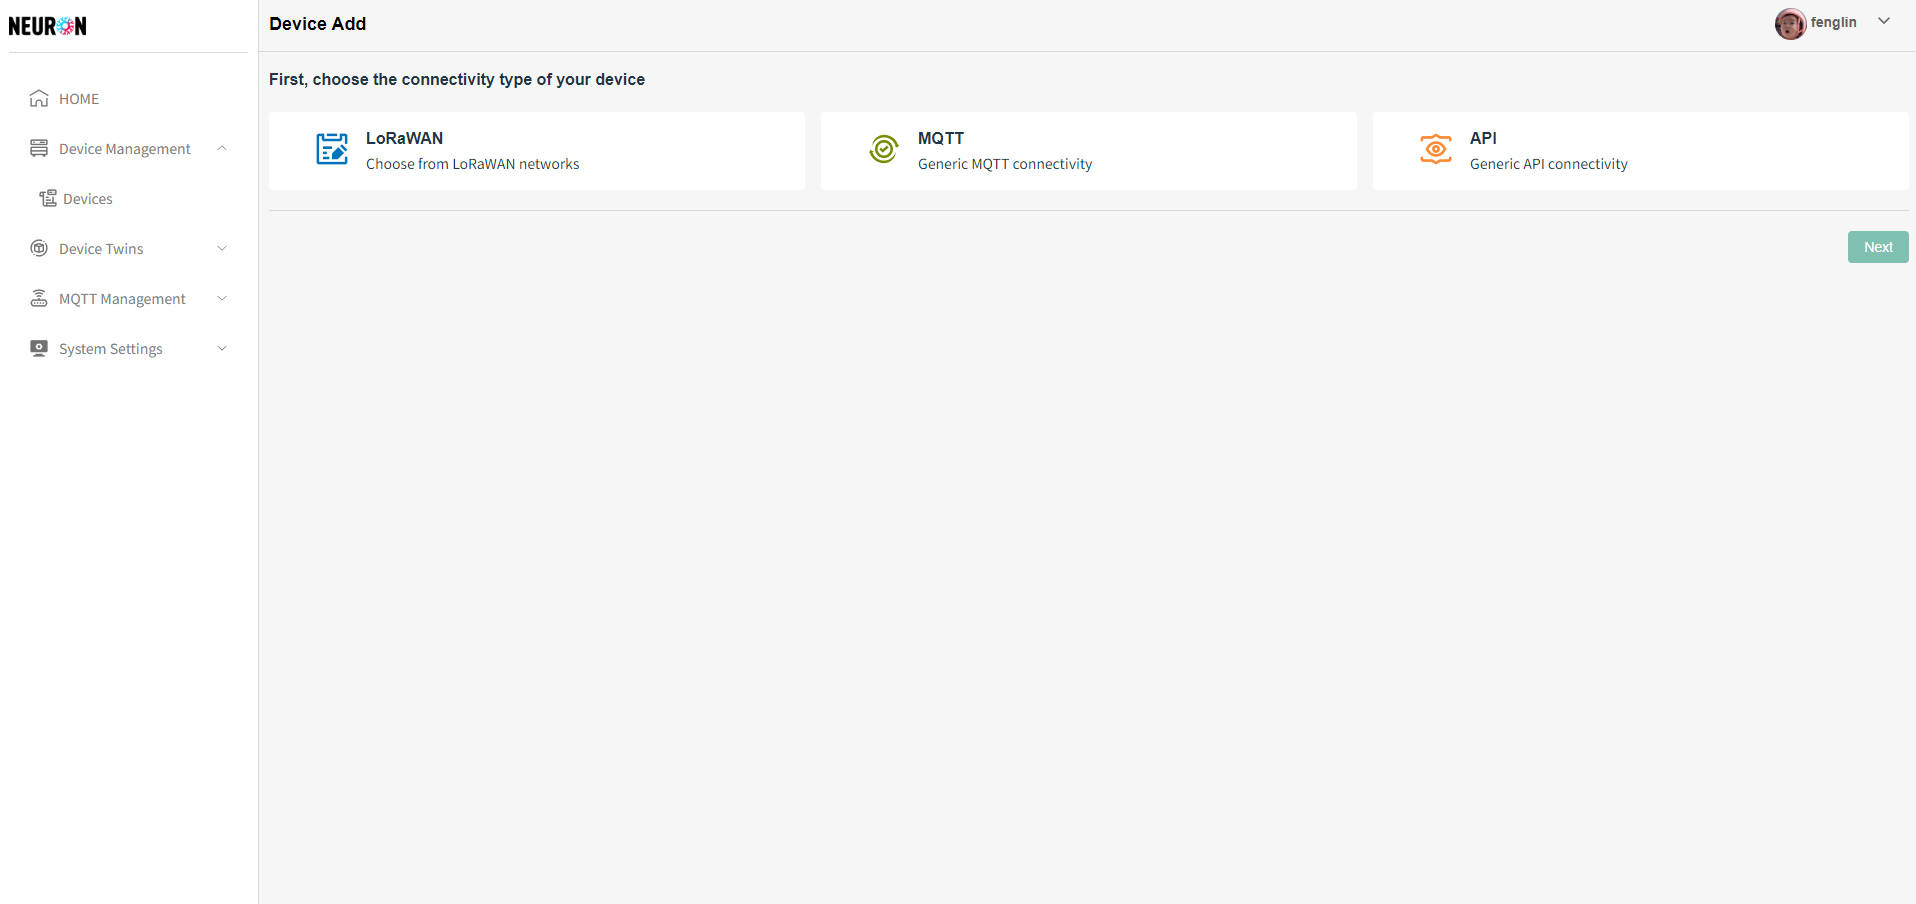
On the device access interface, select LoRaWAN and click Next to perform LoRaWAN device access, as shown in the following figure
-
The access of LoRaWAN NS is divided into three steps[device access method, configuration model, and device registration]
Device access method
LoRaWAN NS is one of the core components in LoRaWAN networks, responsible for handling communication between terminal nodes (such as sensors, actuators, etc.) and application servers (such as ChirpStack, Activiti, etc.). As a hub for data transmission, it manages key tasks such as terminal node connections, data forwarding, storage, and protocol conversion.
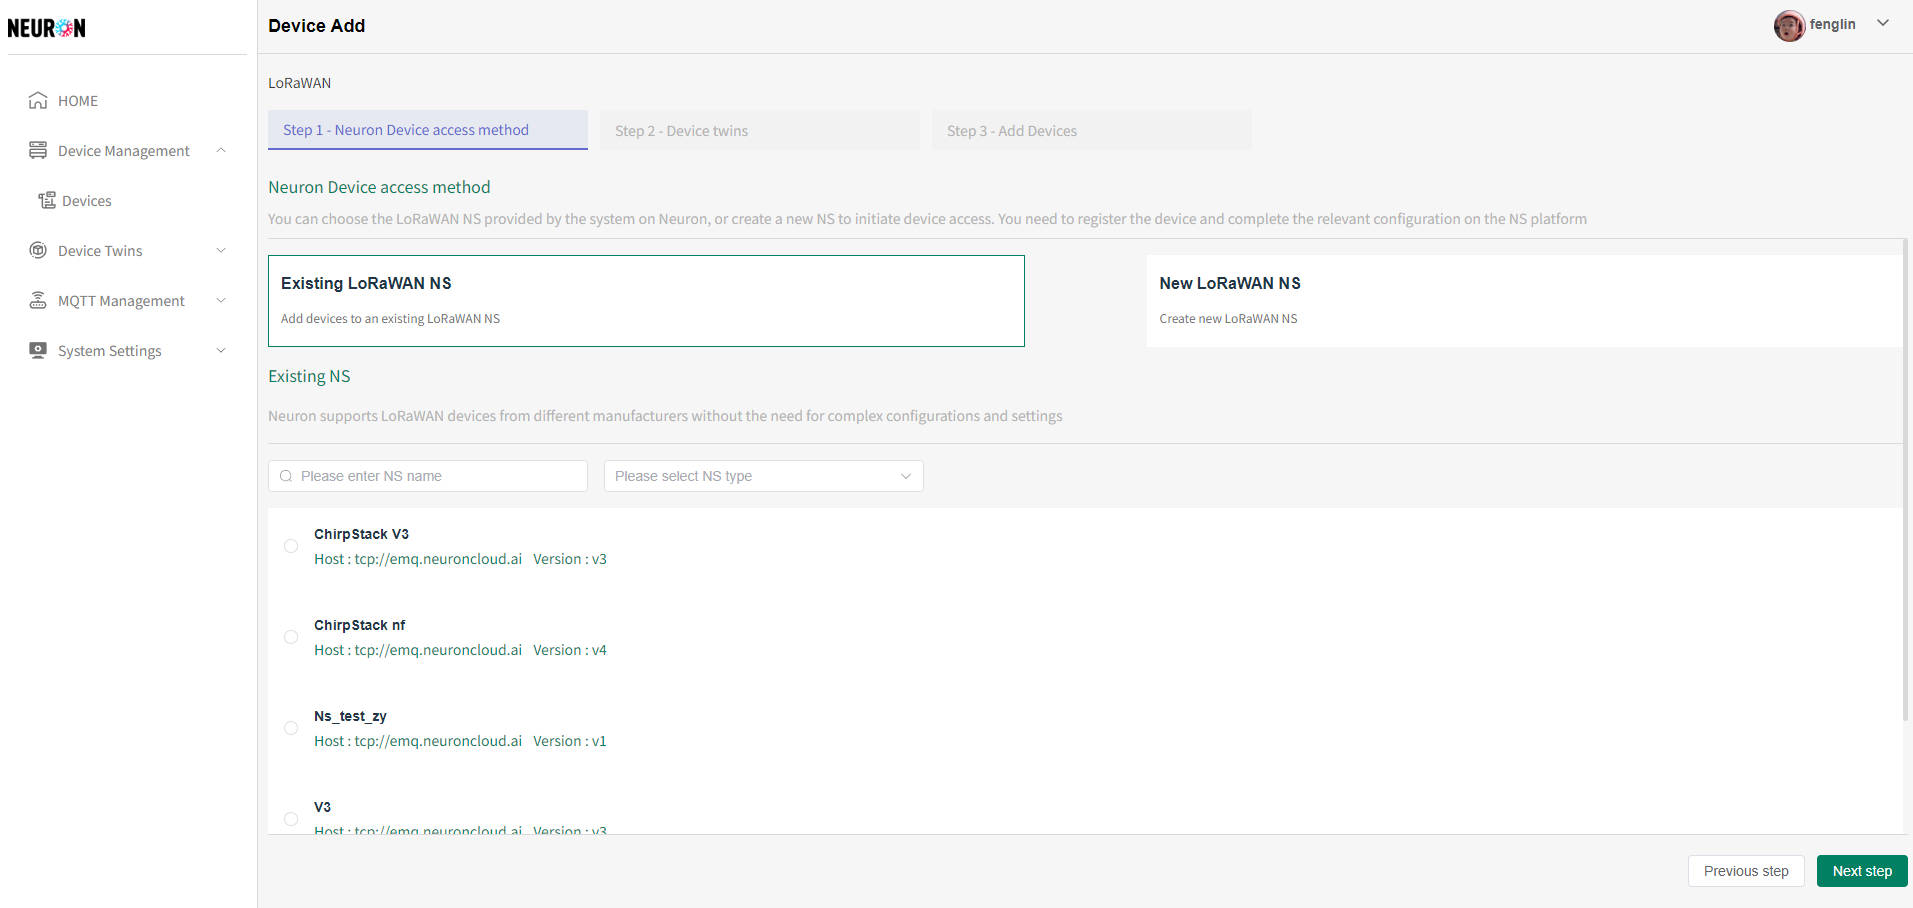
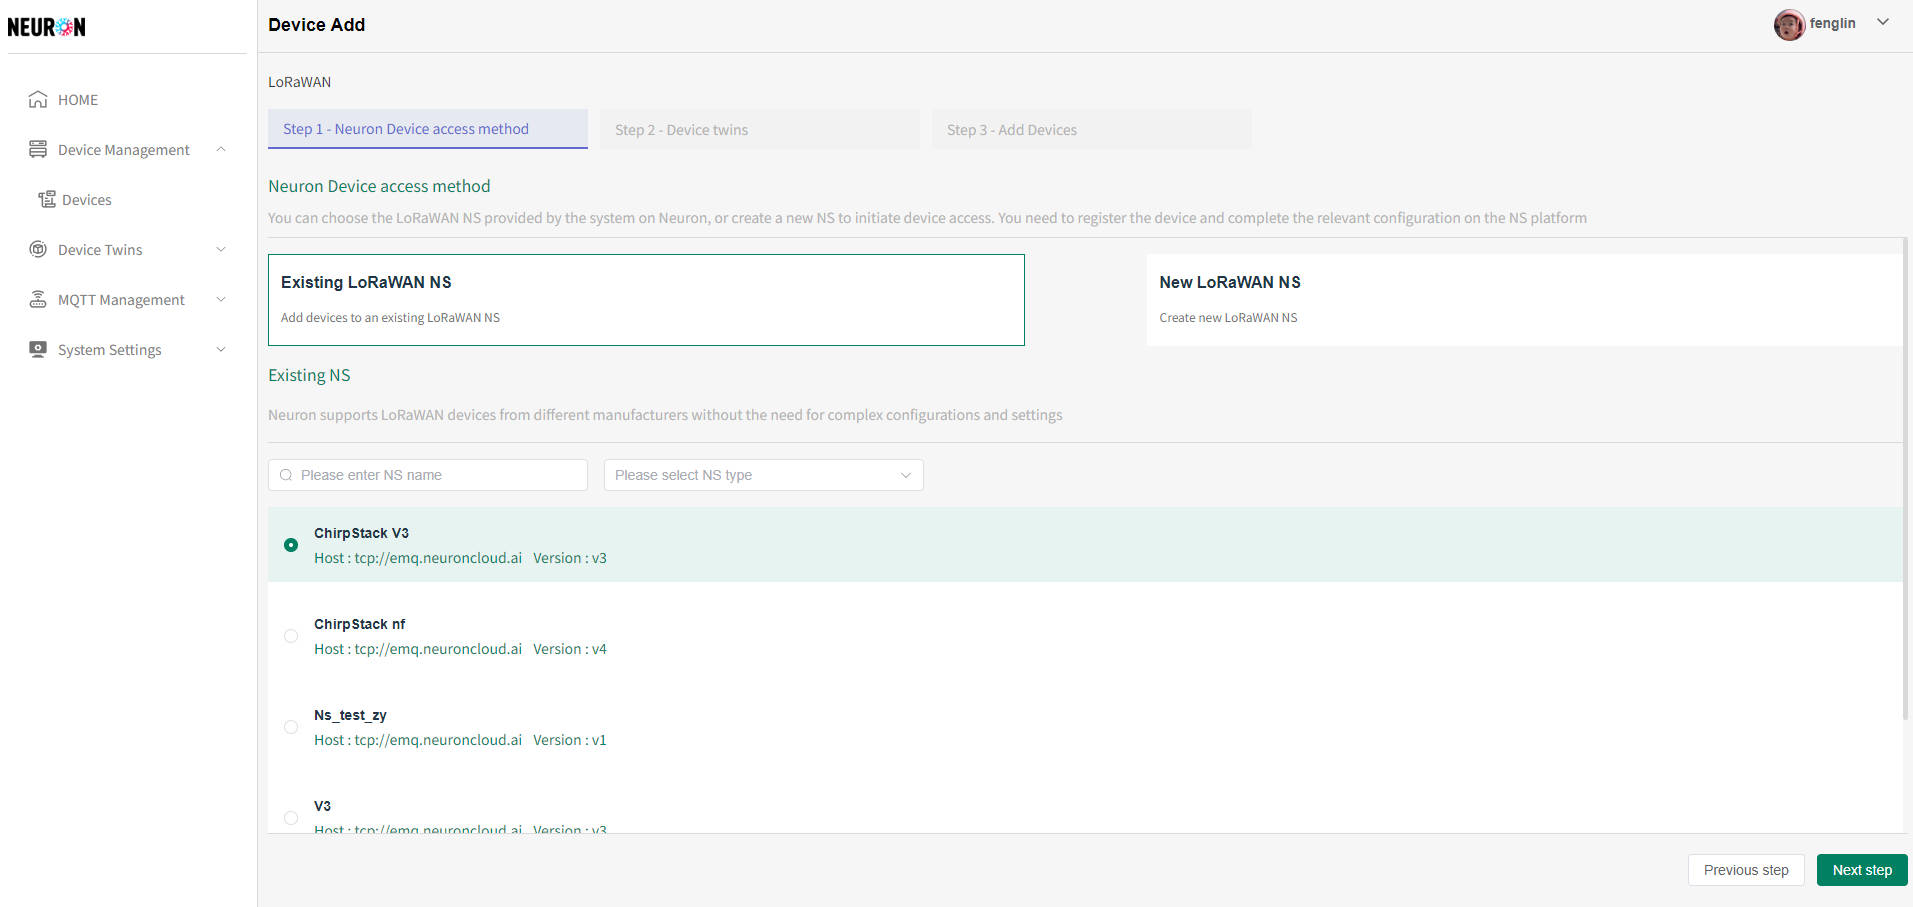
- The system can select existing NS or create its own NS. The system defaults to selecting existing NS, as shown in the following figure
-
Select an existing LoRaWAN NS
Attention should be paid to the information of MQTT server and the JSON format of data access, The system will strictly subscribe to device data according to the MQTT server information and parse the data using NS's JSON. If there is no match, the device will not be successfully connected
- Click on the desired NS, then click Next to configure the device twins
The system supports fuzzy matching of names and precise matching of LoRaWAN NS types for searching LoRaWAN NS data
-
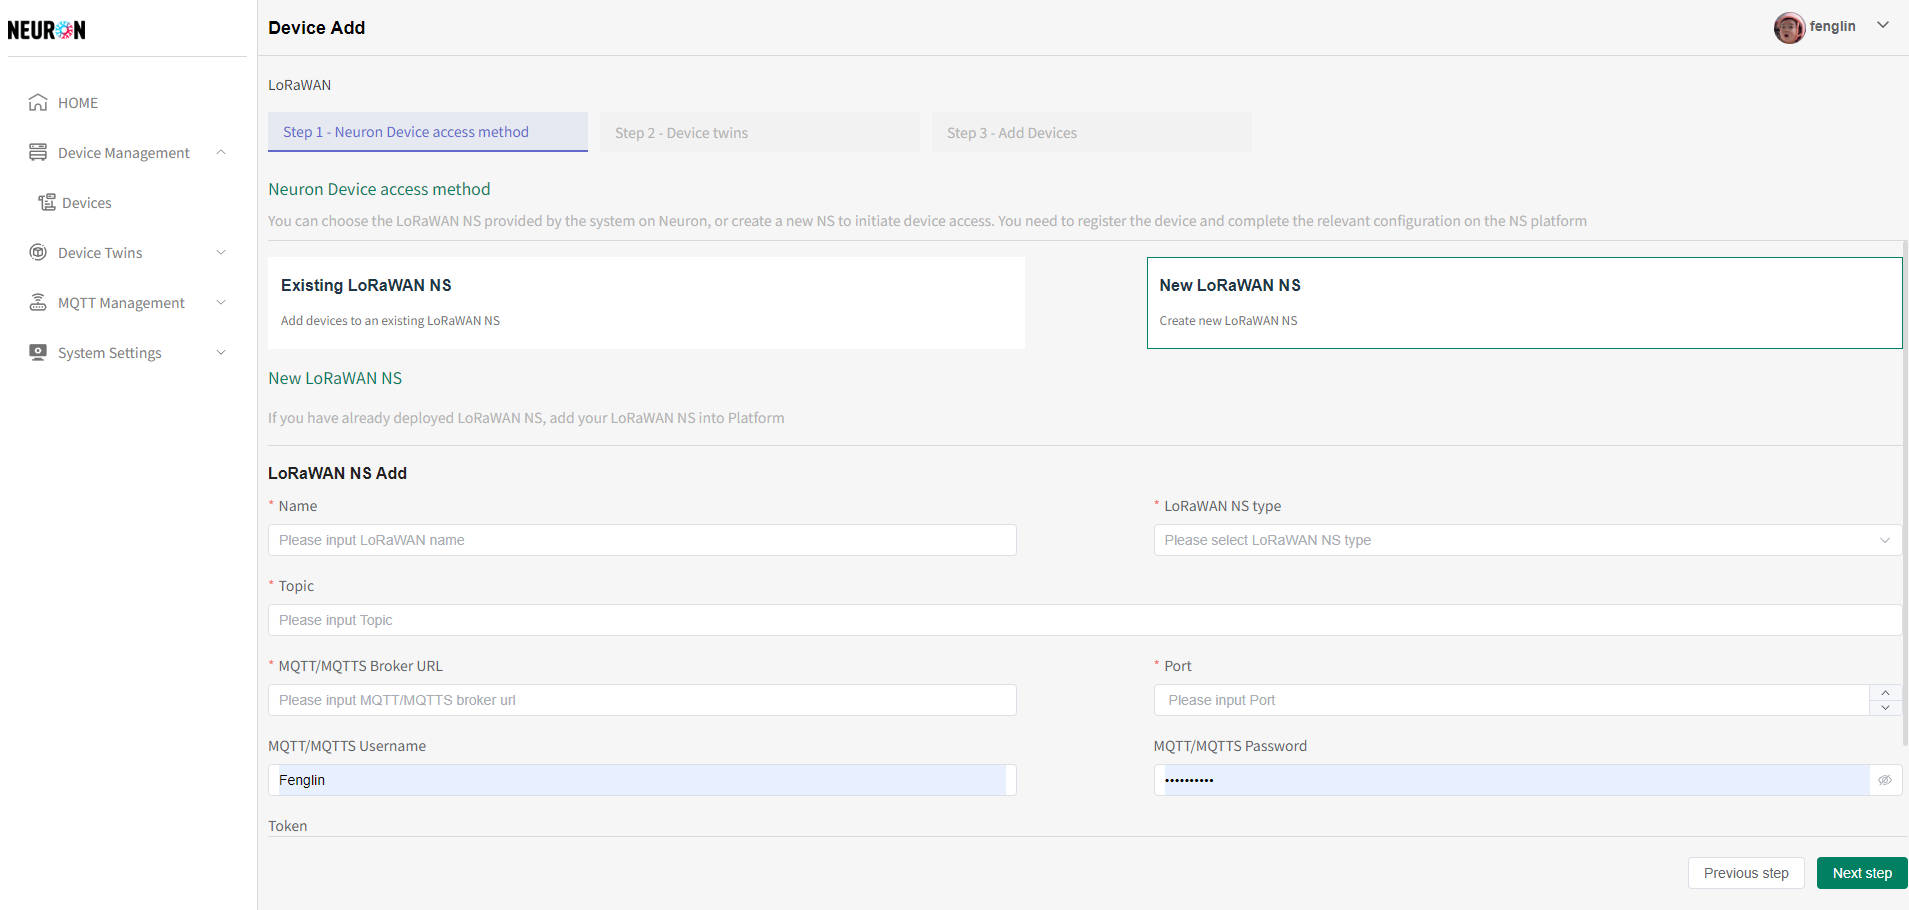
Add LoRaWAN NS
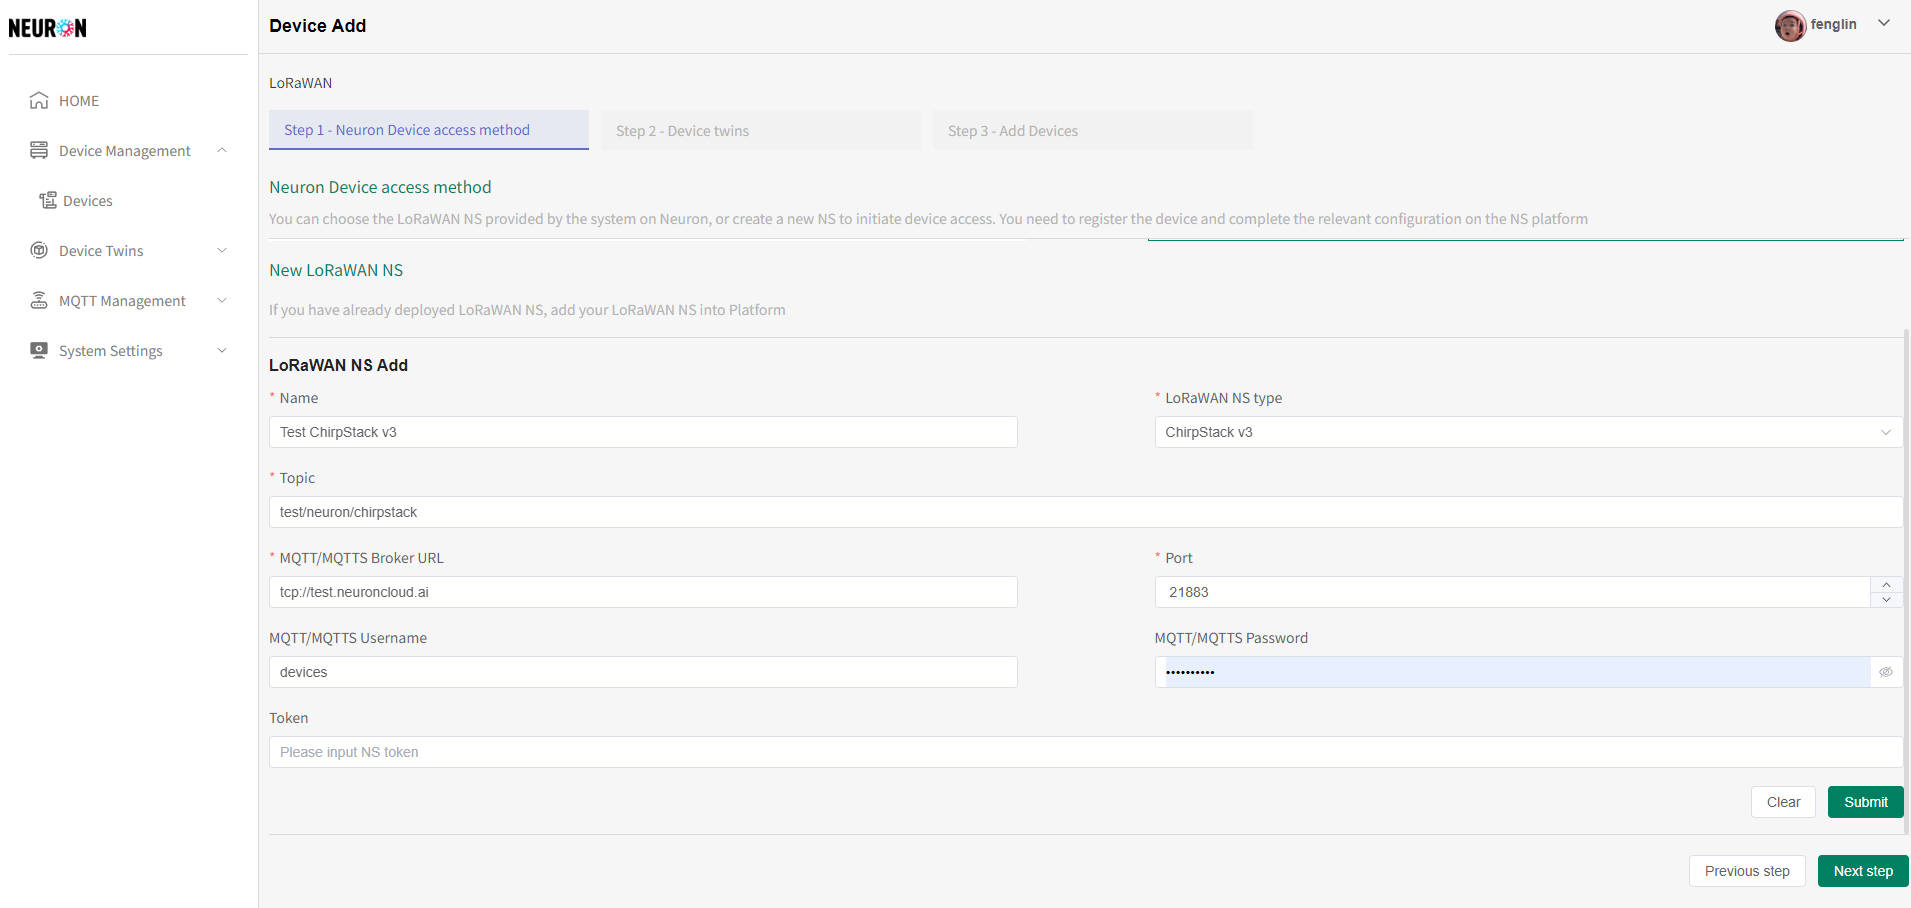
Enter the LoRaWAN NS name (system name cannot be duplicated), select the corresponding LoRaWAN NS type, record the JSON data format and MQTT information [to be used for push data], and when submitting the information, the system will verify whether the MQTT information connection is normal. If there is an exception, the addition will not be successful
- LoRaWAN NS default interface, click on add NS to enter the add interface, as shown below
- After completing the information input, click the "Submit" button, and the system will automatically enter the device twins configuration module, as shown in the following figure
- LoRaWAN NS default interface, click on add NS to enter the add interface, as shown below
-
Configuration device twins
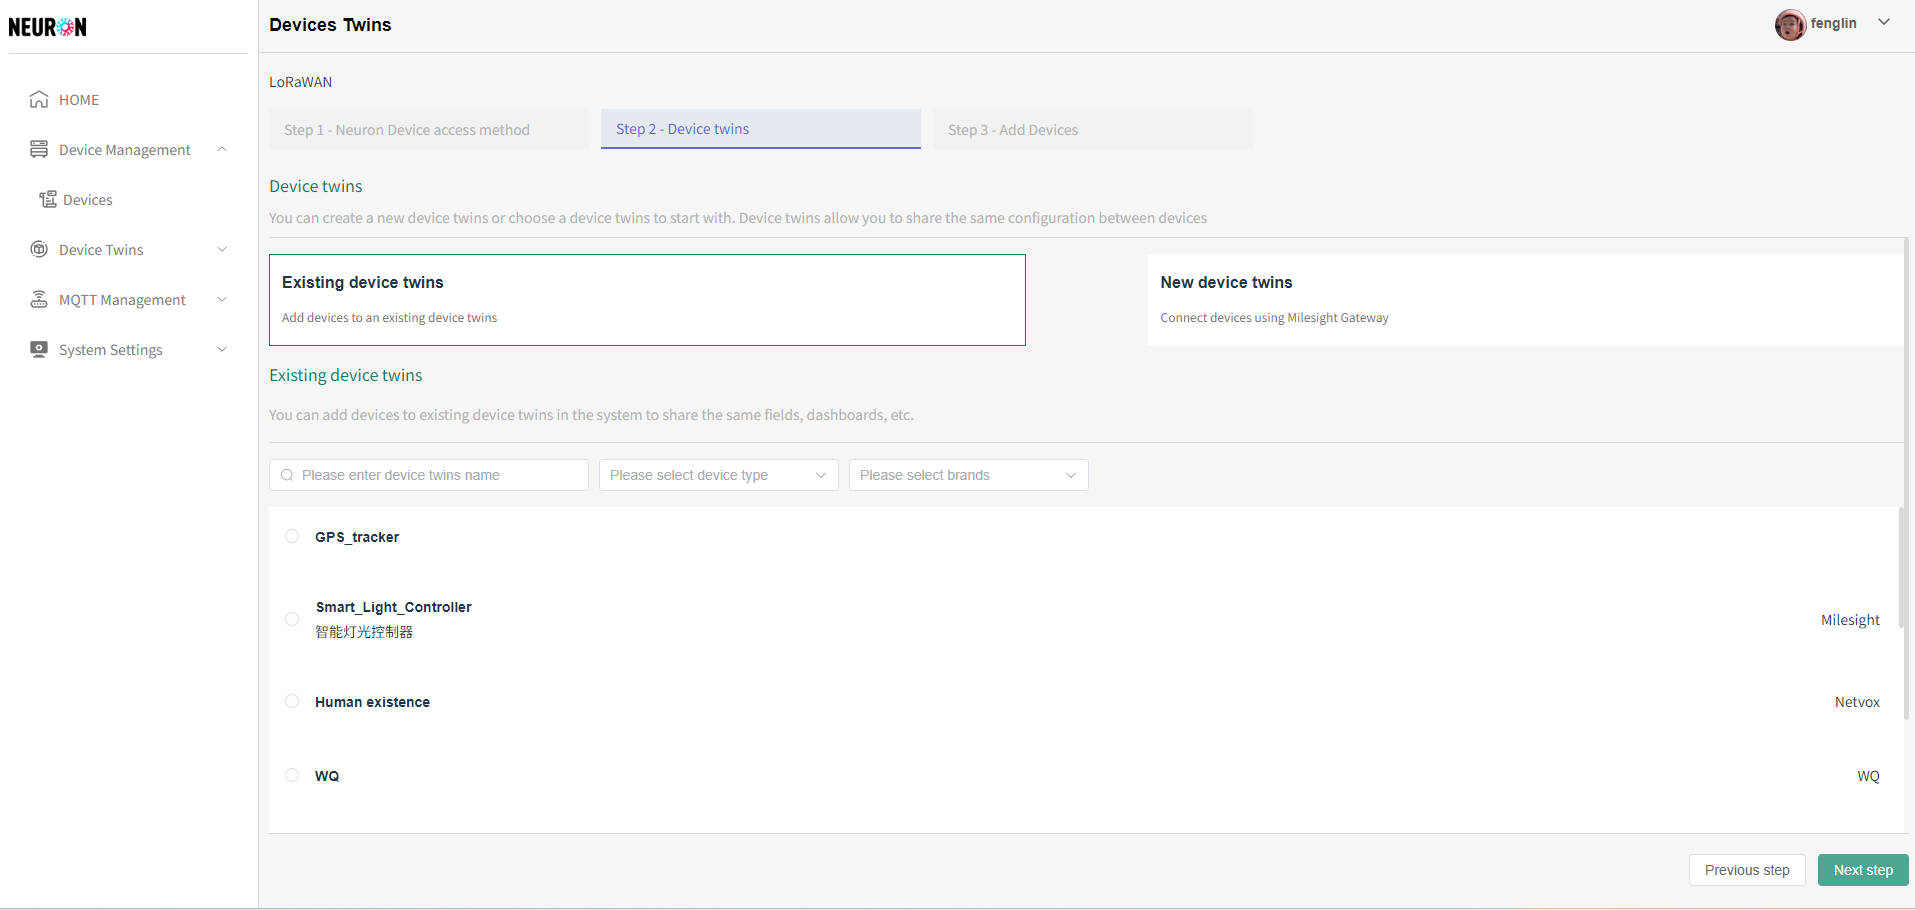
The system can select existing device twins or create new ones by itself. The system defaults to selecting existing device twins
-
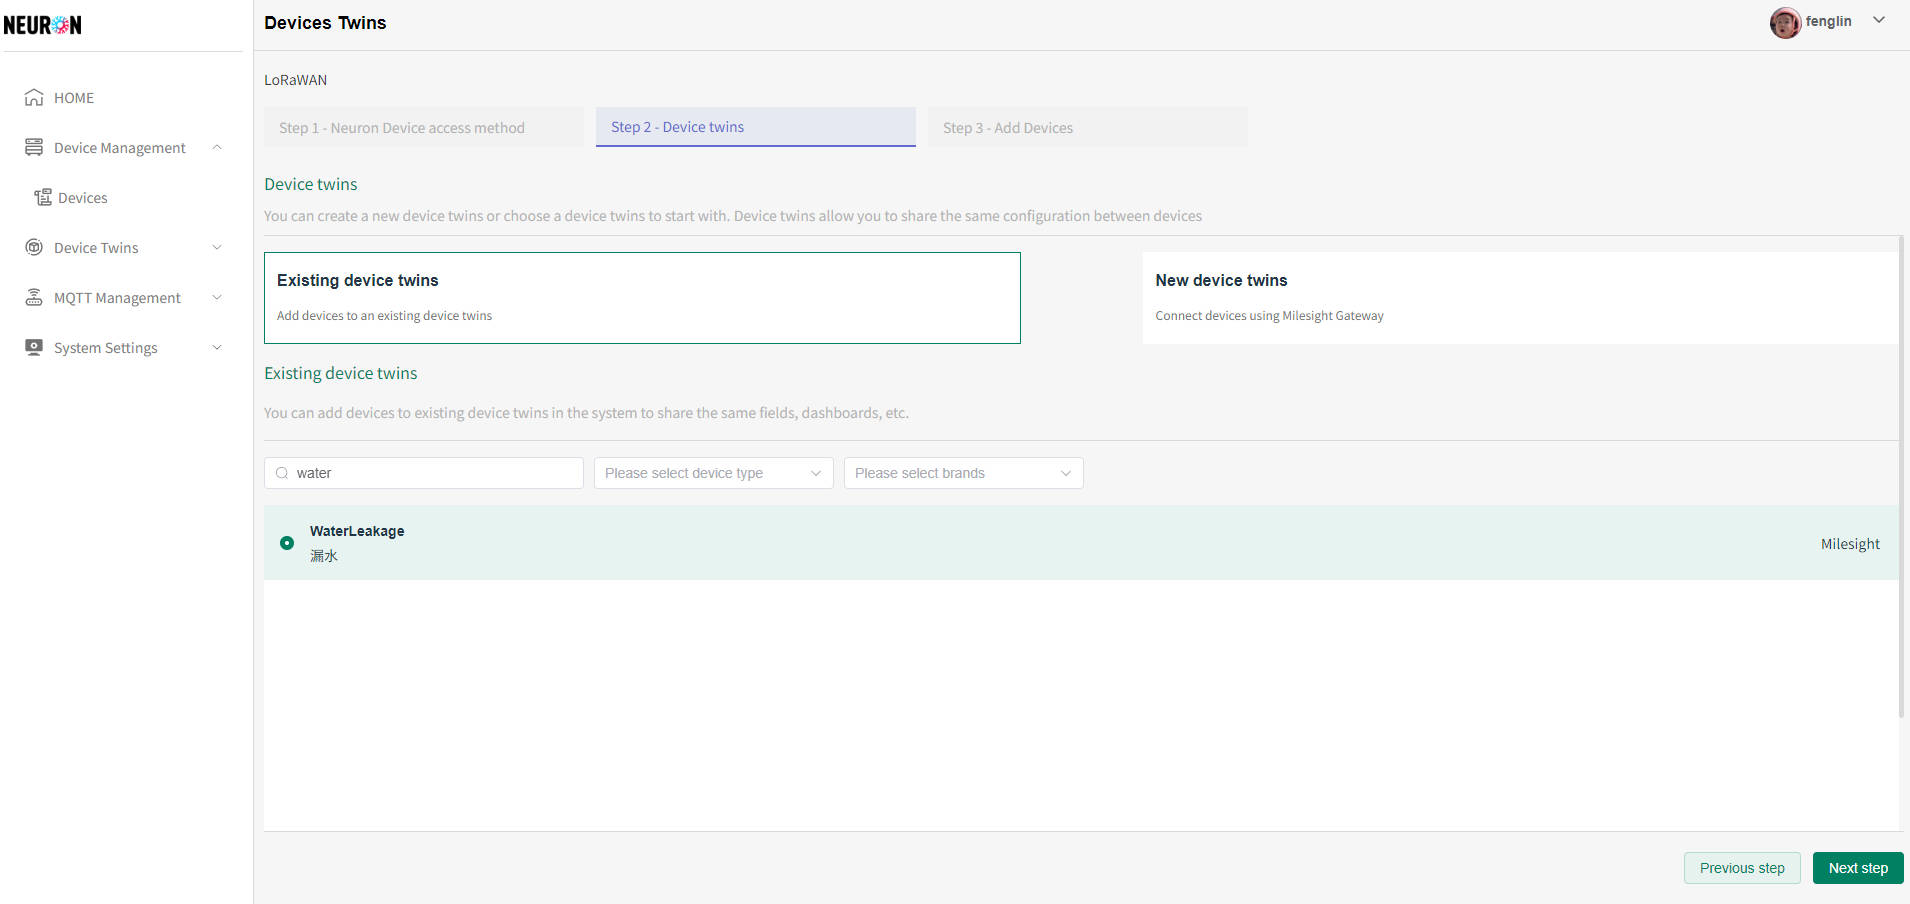
Select an existing device twins
- Click on the desired device twins, then click Next to register the device, as shown in the following figure
The system supports fuzzy matching of names and precise matching of types and brands for searching device twins data
-
Add a new device twins
The name of the device twins cannot be duplicated. When submitting information, the system will verify the uniqueness of the name. If the name is duplicated, the addition will not be successful
- LoRaWAN device twins default interface, click on add device twins, as shown below
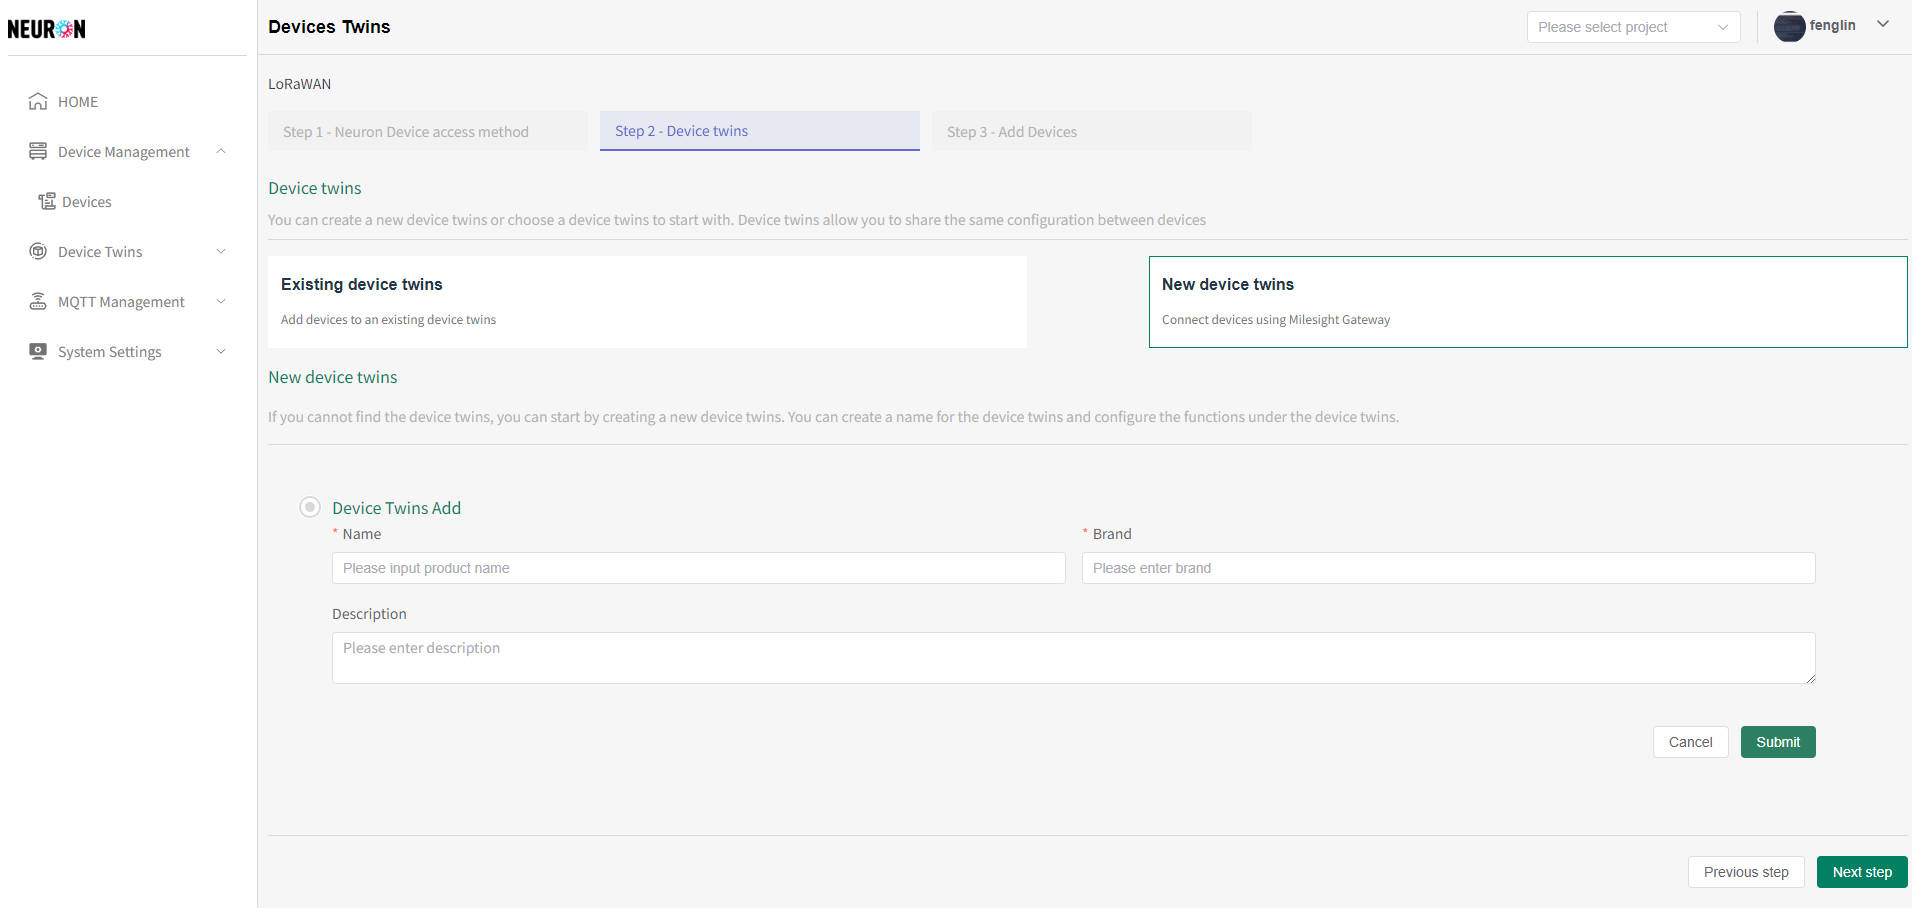
- After completing the information input, click the "Submit" button, as shown in the following figure
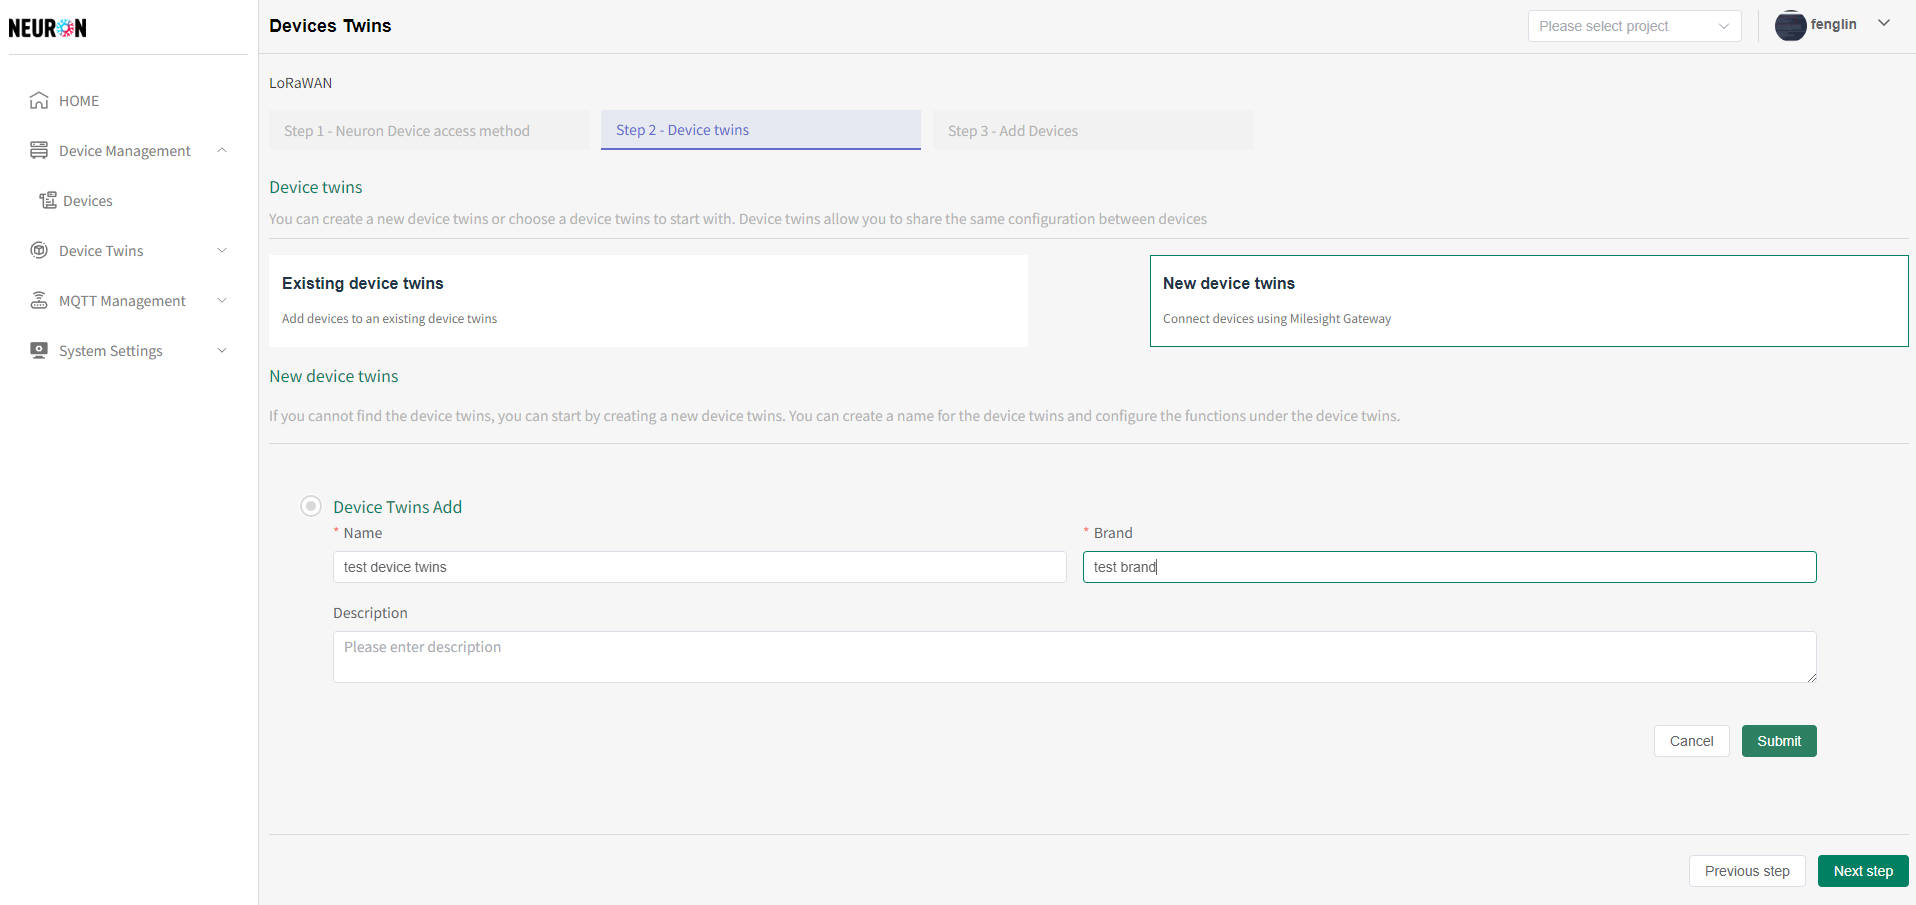
- After configuring the device twins name, the function points under the device twins can be configured, as shown in the following figure
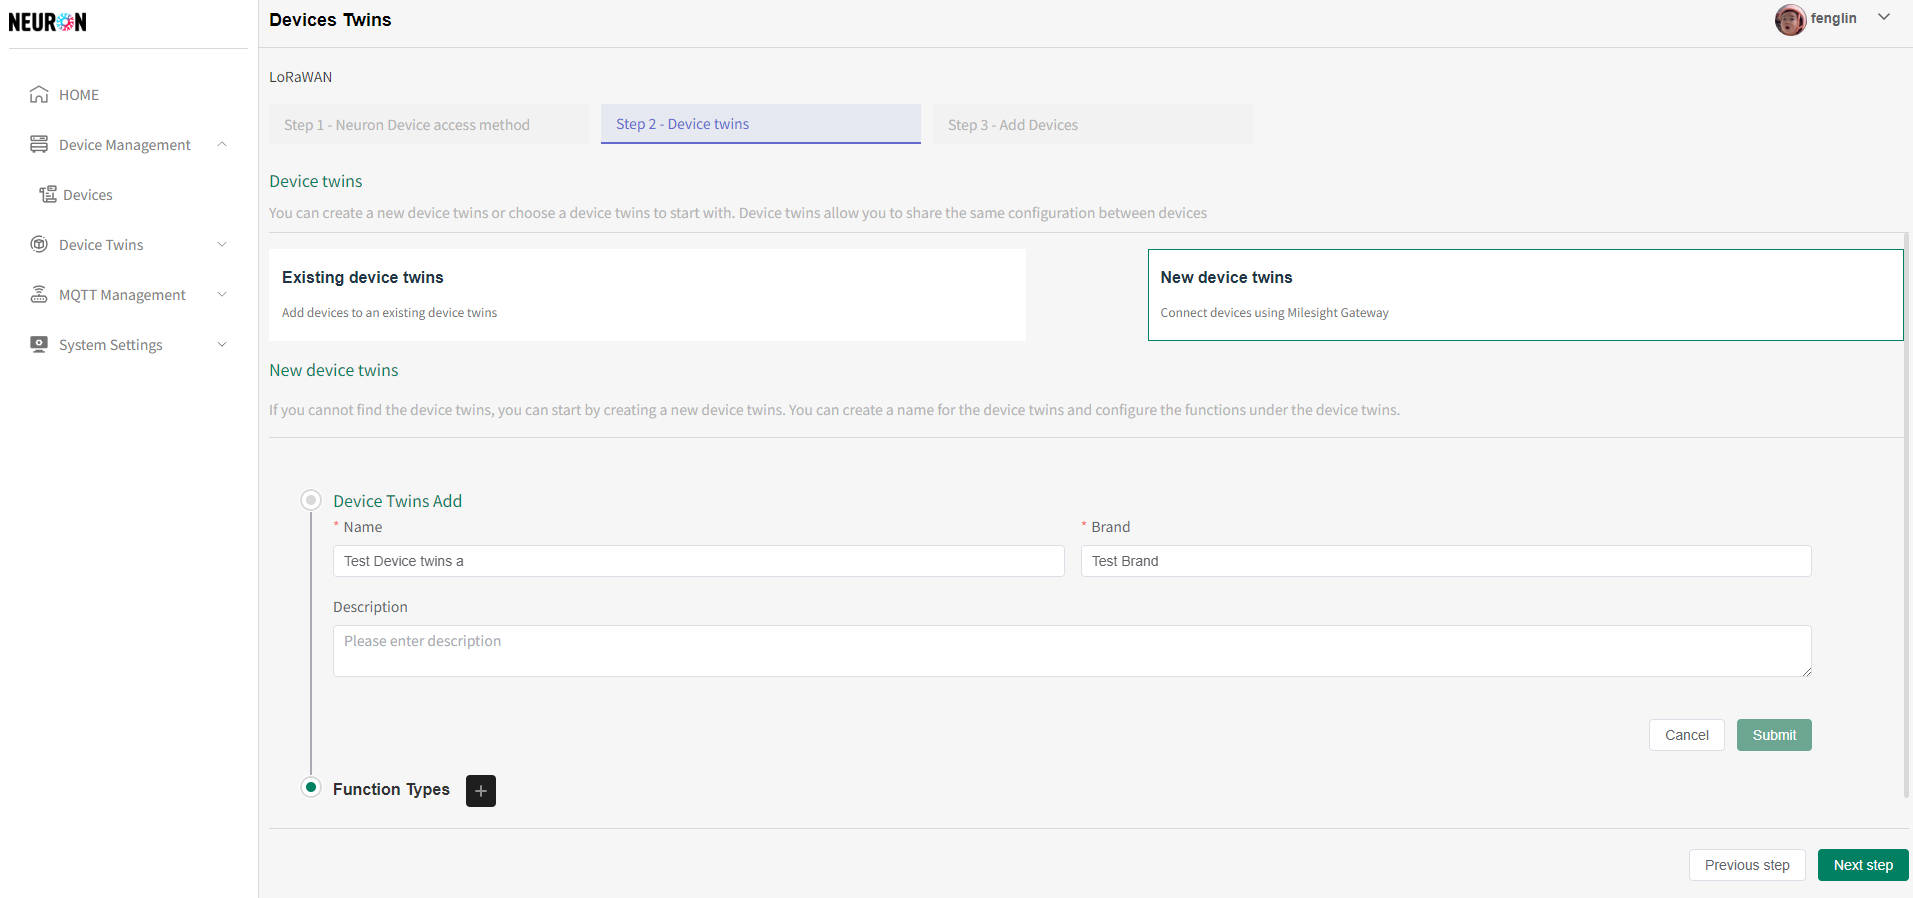
- Click the "plus" button next to the Function type in the new module of the device twins to add function points under the device twins, as shown in the following figure
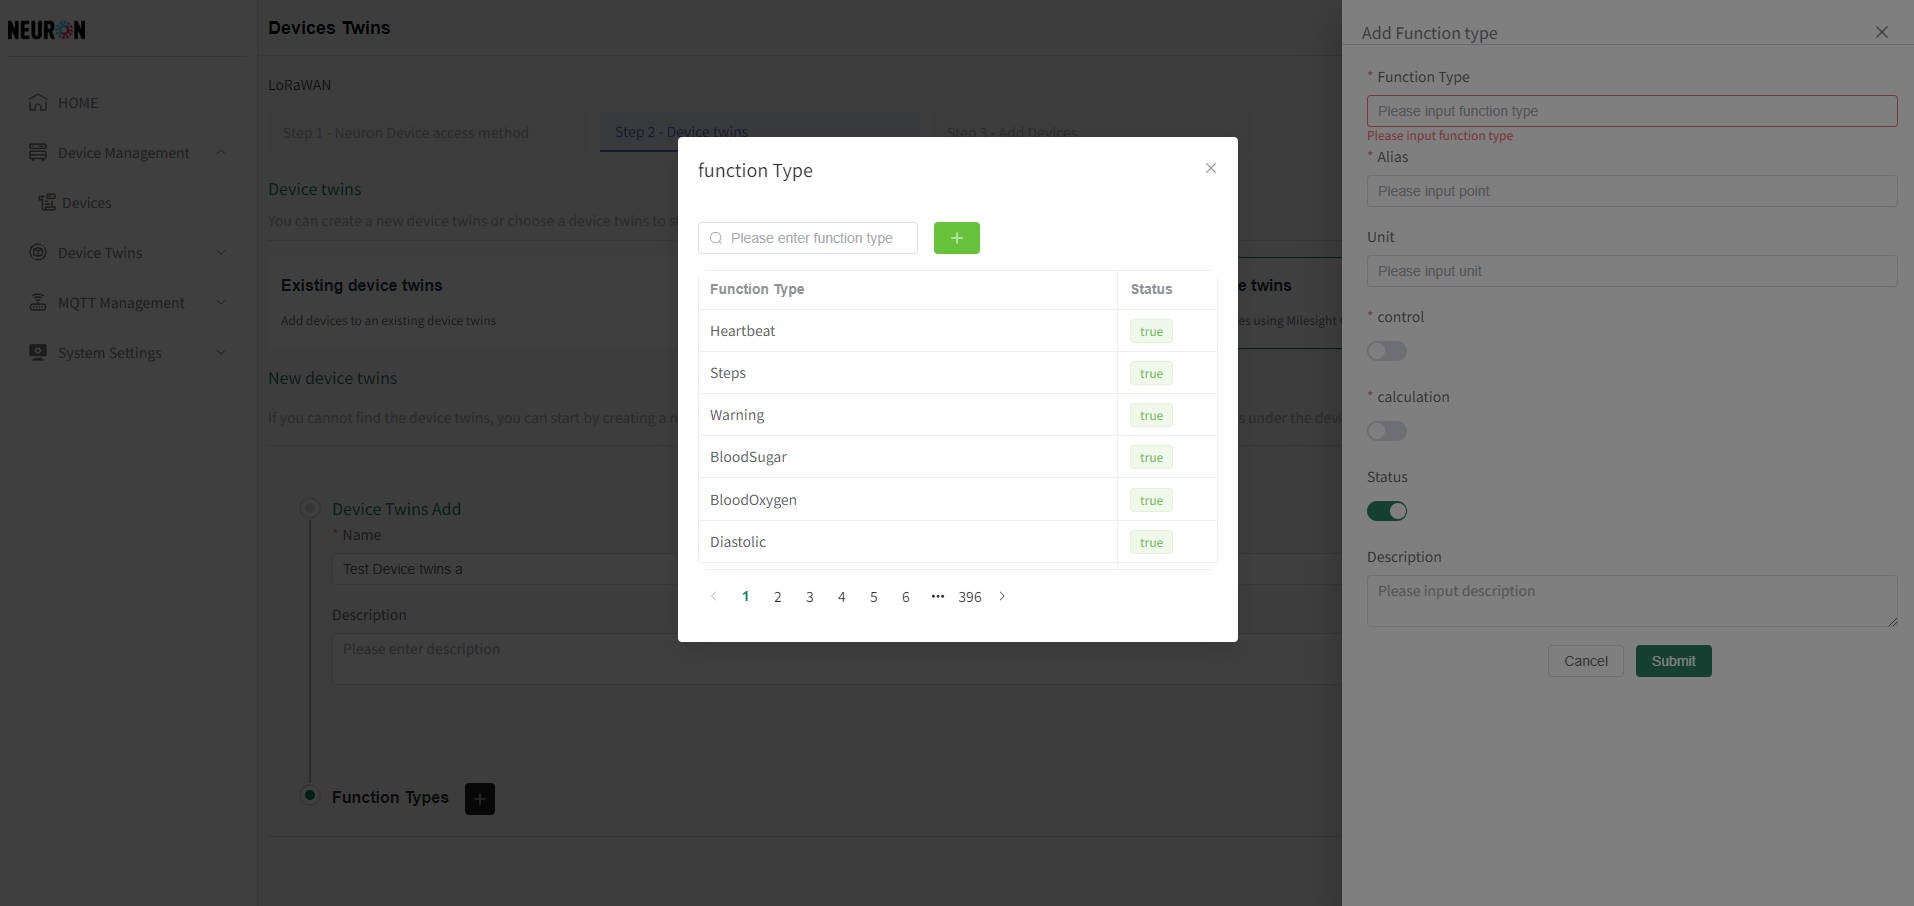
- You can repeat the above steps to add multiple functional points under the device twins. After configuration is complete, click Next to register the device for this type of device twins, as shown in the following figure
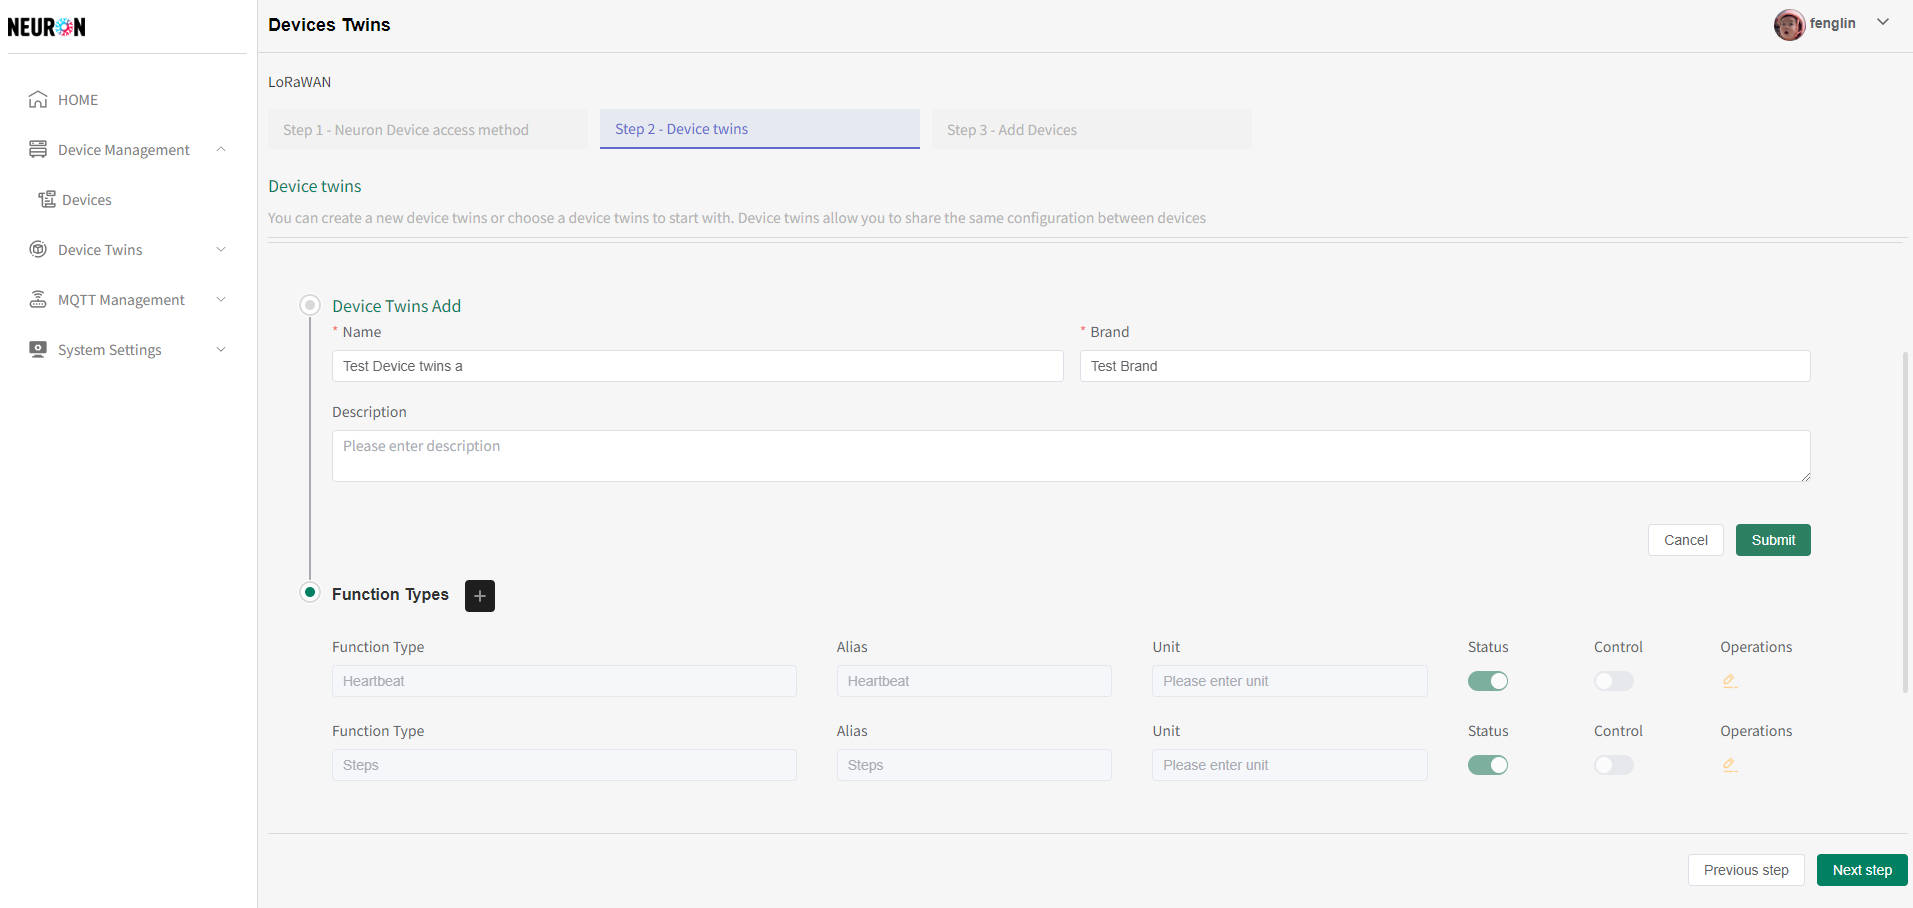
- LoRaWAN device twins default interface, click on add device twins, as shown below
Device registration
The system supports uploading and online editing while entering device data. The operation steps are: first download the template, then upload it to the page, then edit it online, and finally submit it to the system to complete device registration. The successful registration of the device only completes the device registration. The system needs to successfully subscribe to the device data and clean it before completing the device access
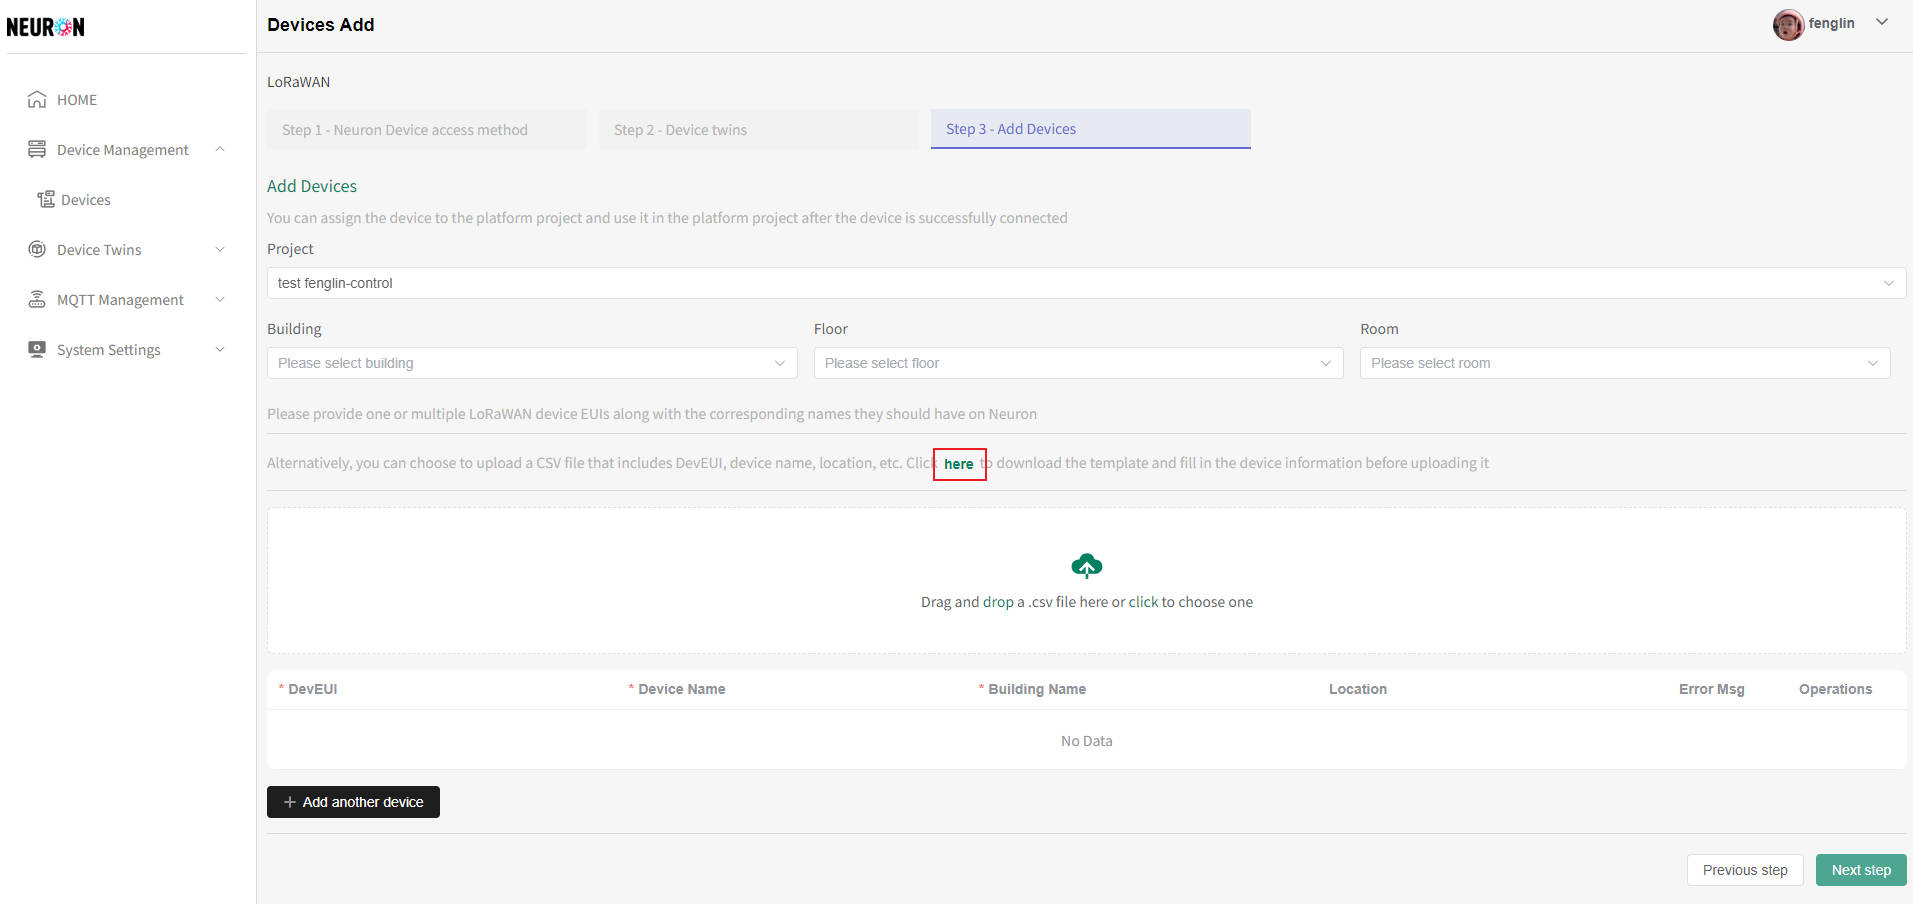
- Template Download
On the device registration page, click on the red box in the following image to download the template file
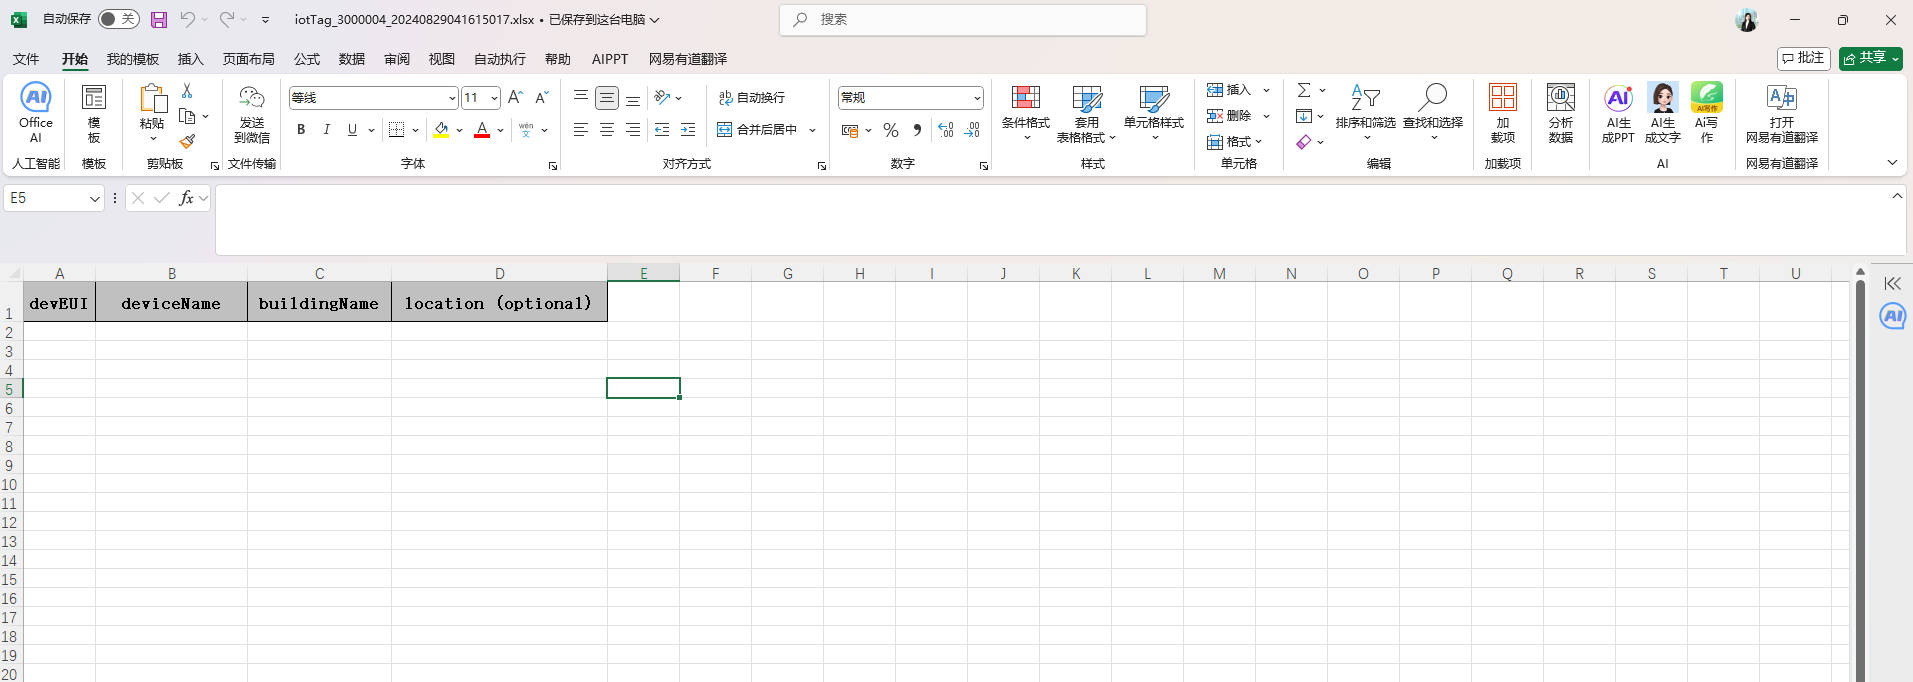
- Device template filling
As shown in the template, Device DevEUI (required) is the unique identifier for IoT devices. Simply fill in the DevEUI on the device, Device Name (required) is globally unique, Building Name (required) is building information, Location (not required), and fill in the device location
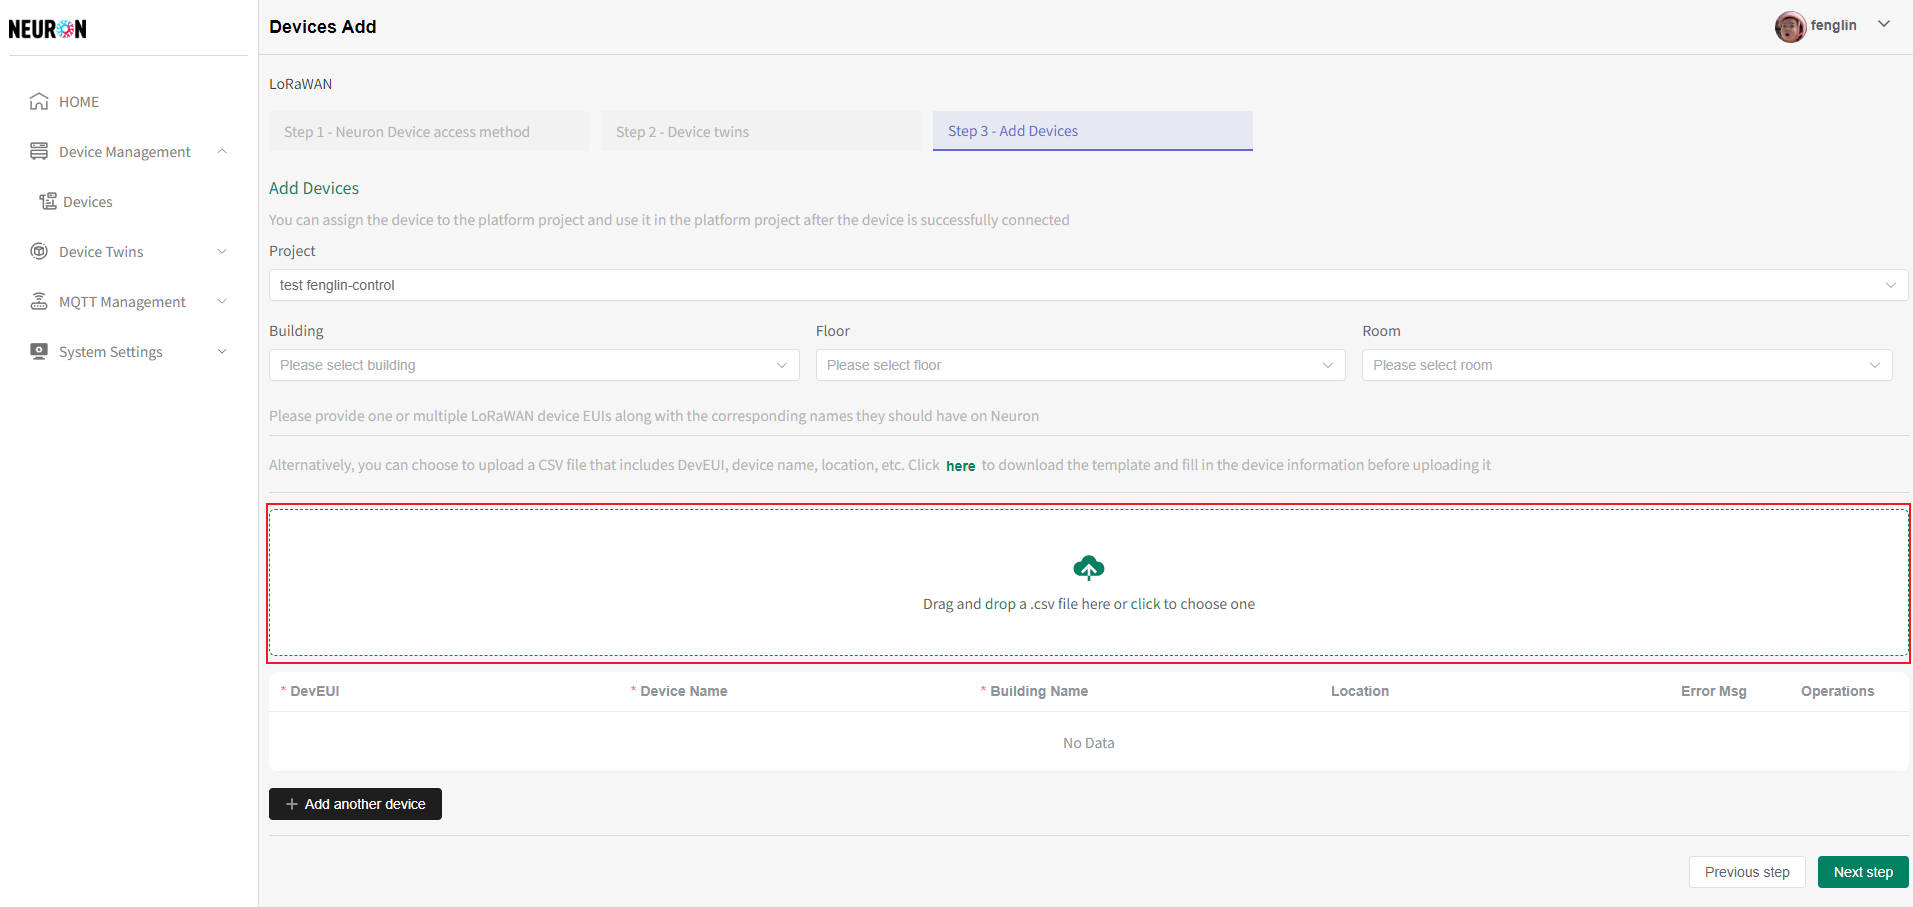
- Template upload
Upload the device information that has been filled in, and the page will display the uploaded device information. The page can also perform operations such as adding and deleting device data
Click on the red box in the following image and select the corresponding template file to complete the device registration data upload
-
Device online editing
- Add new device
The data on the page includes two types of device information uploaded by the user and added to the page, which can be added, deleted, and other operations
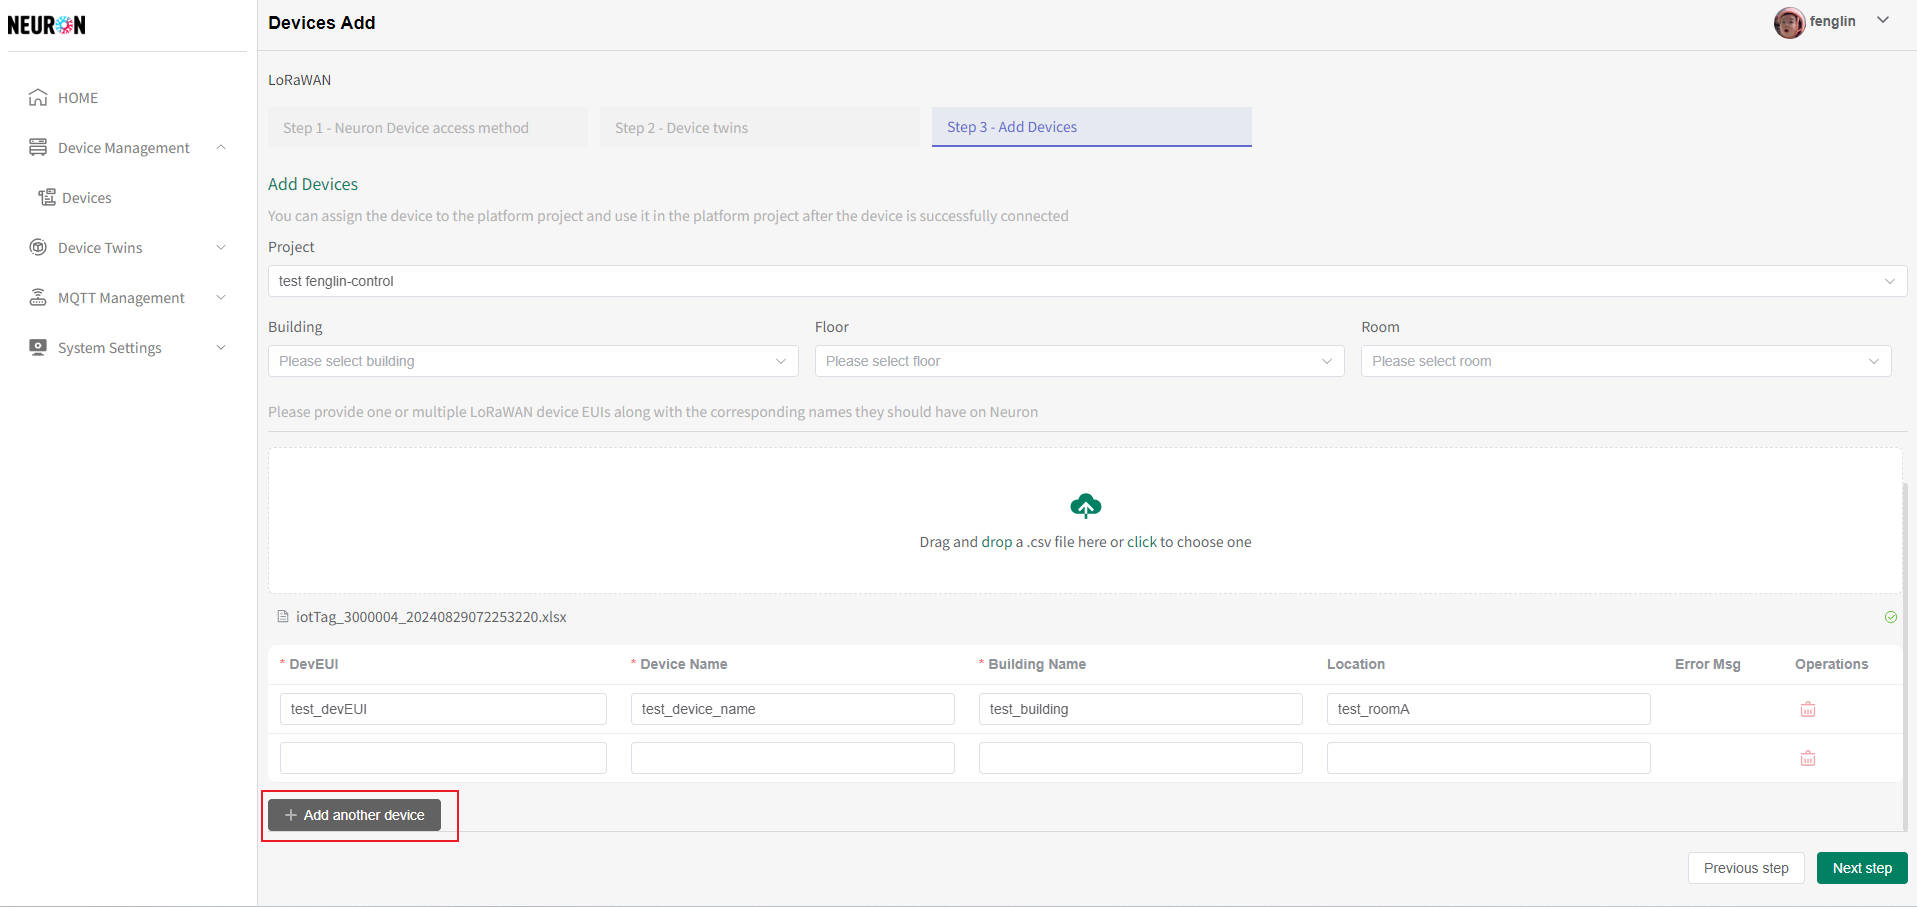
- Click on 'add other device' in the above image to add a new line and enter device information
- Add new device
-
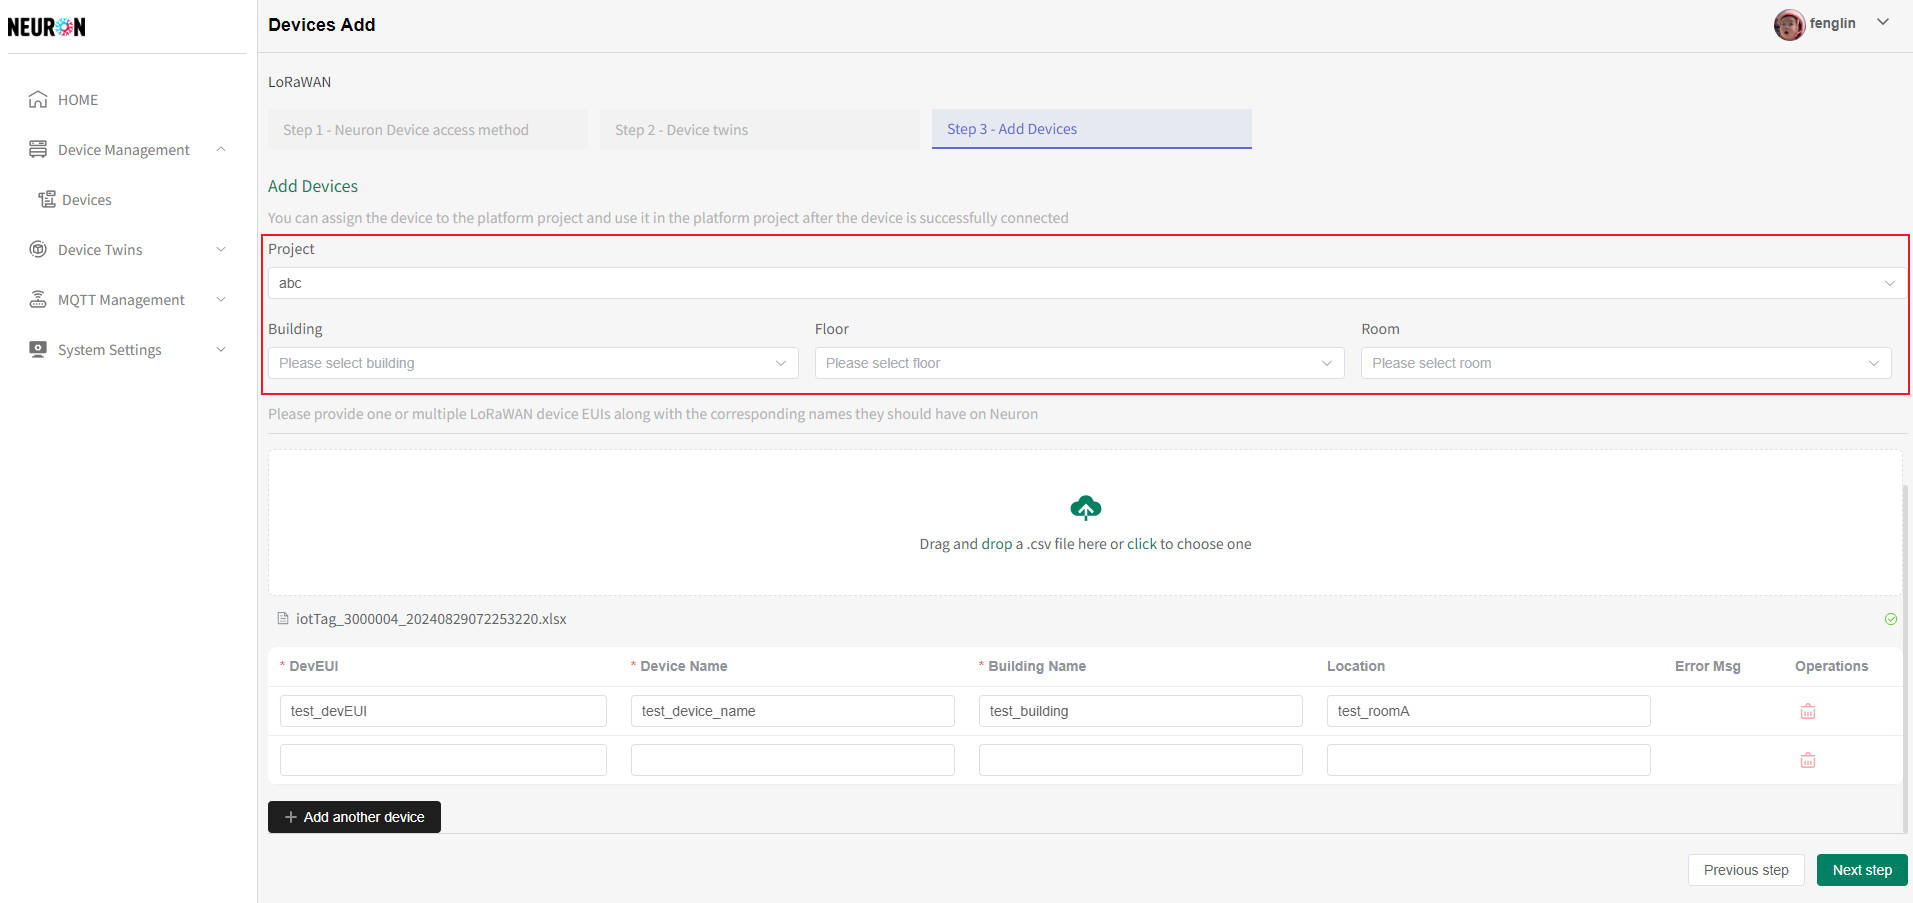
Device Binding Platform Project
The system can bind platform projects while adding new devices. After successful submission, all devices added to the page will belong to the configured platform projects
- As shown in the following figure, select the project that needs to be bound to complete the binding between the platform and the newly added device
- As shown in the following figure, select the project that needs to be bound to complete the binding between the platform and the newly added device
-
Device addition submission
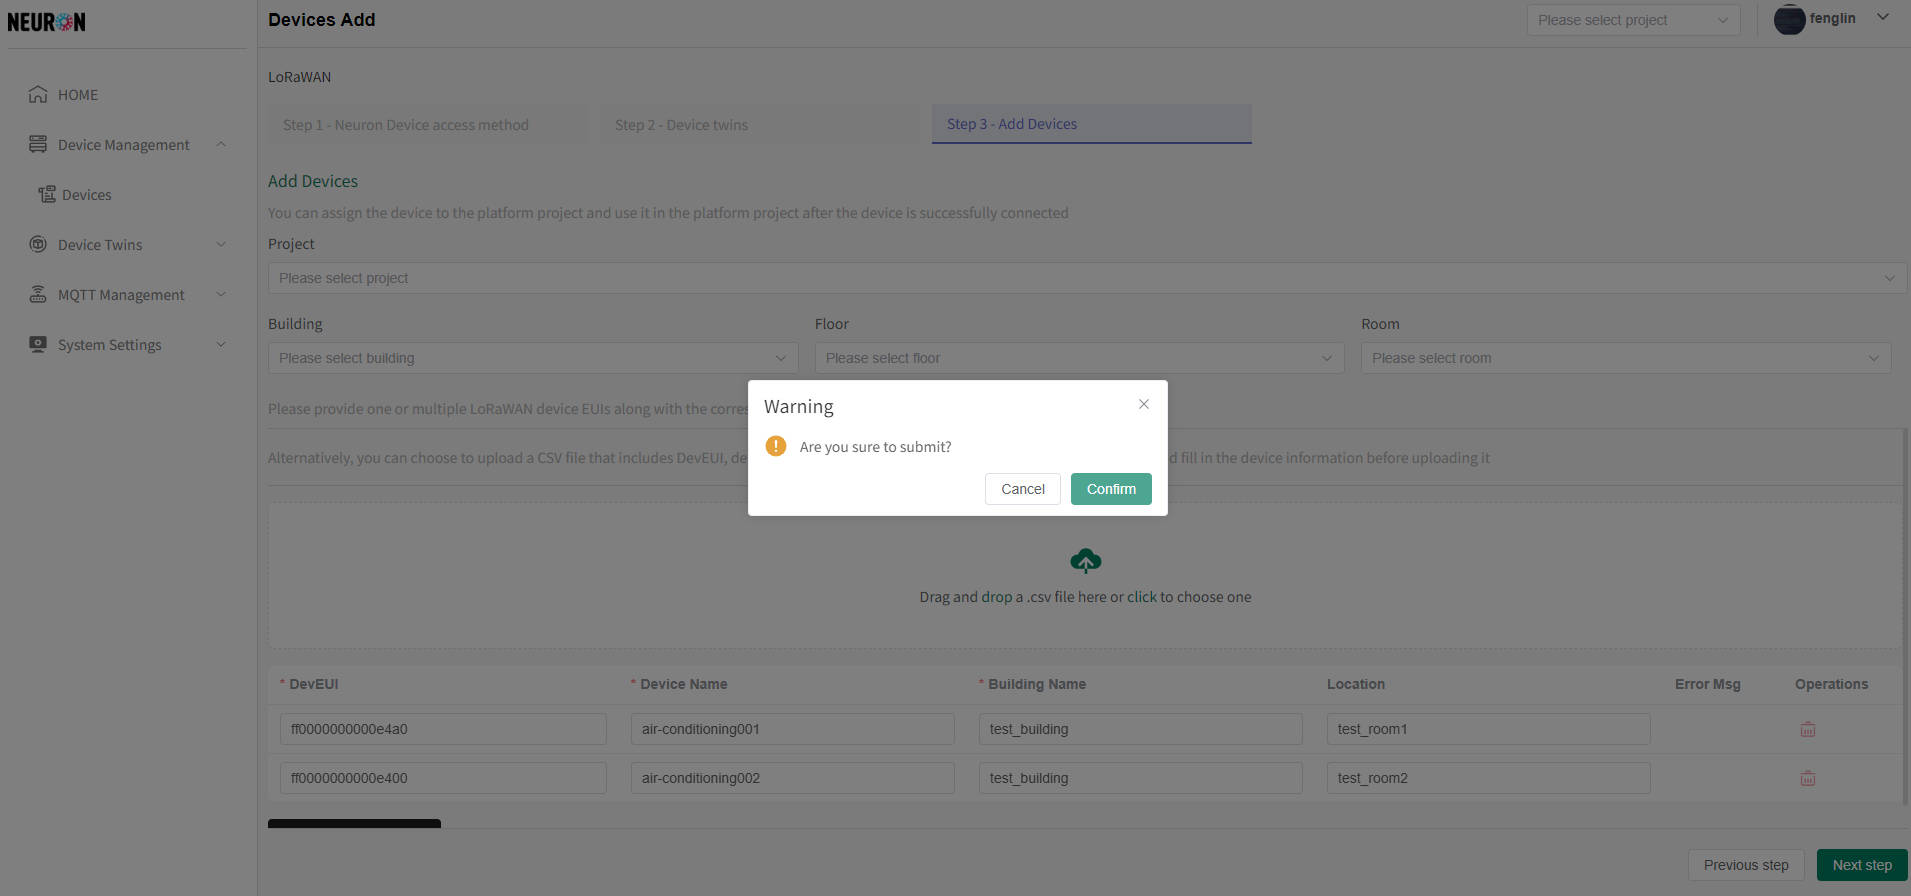
When submitting a device, the system will perform device information verification (such as if the device name already exists), and the abnormal device needs to be deleted before submitting
- After completing the device filling, click the submit button and a confirmation window will appear, as shown in the following figure
- After clicking confirm, submit device data
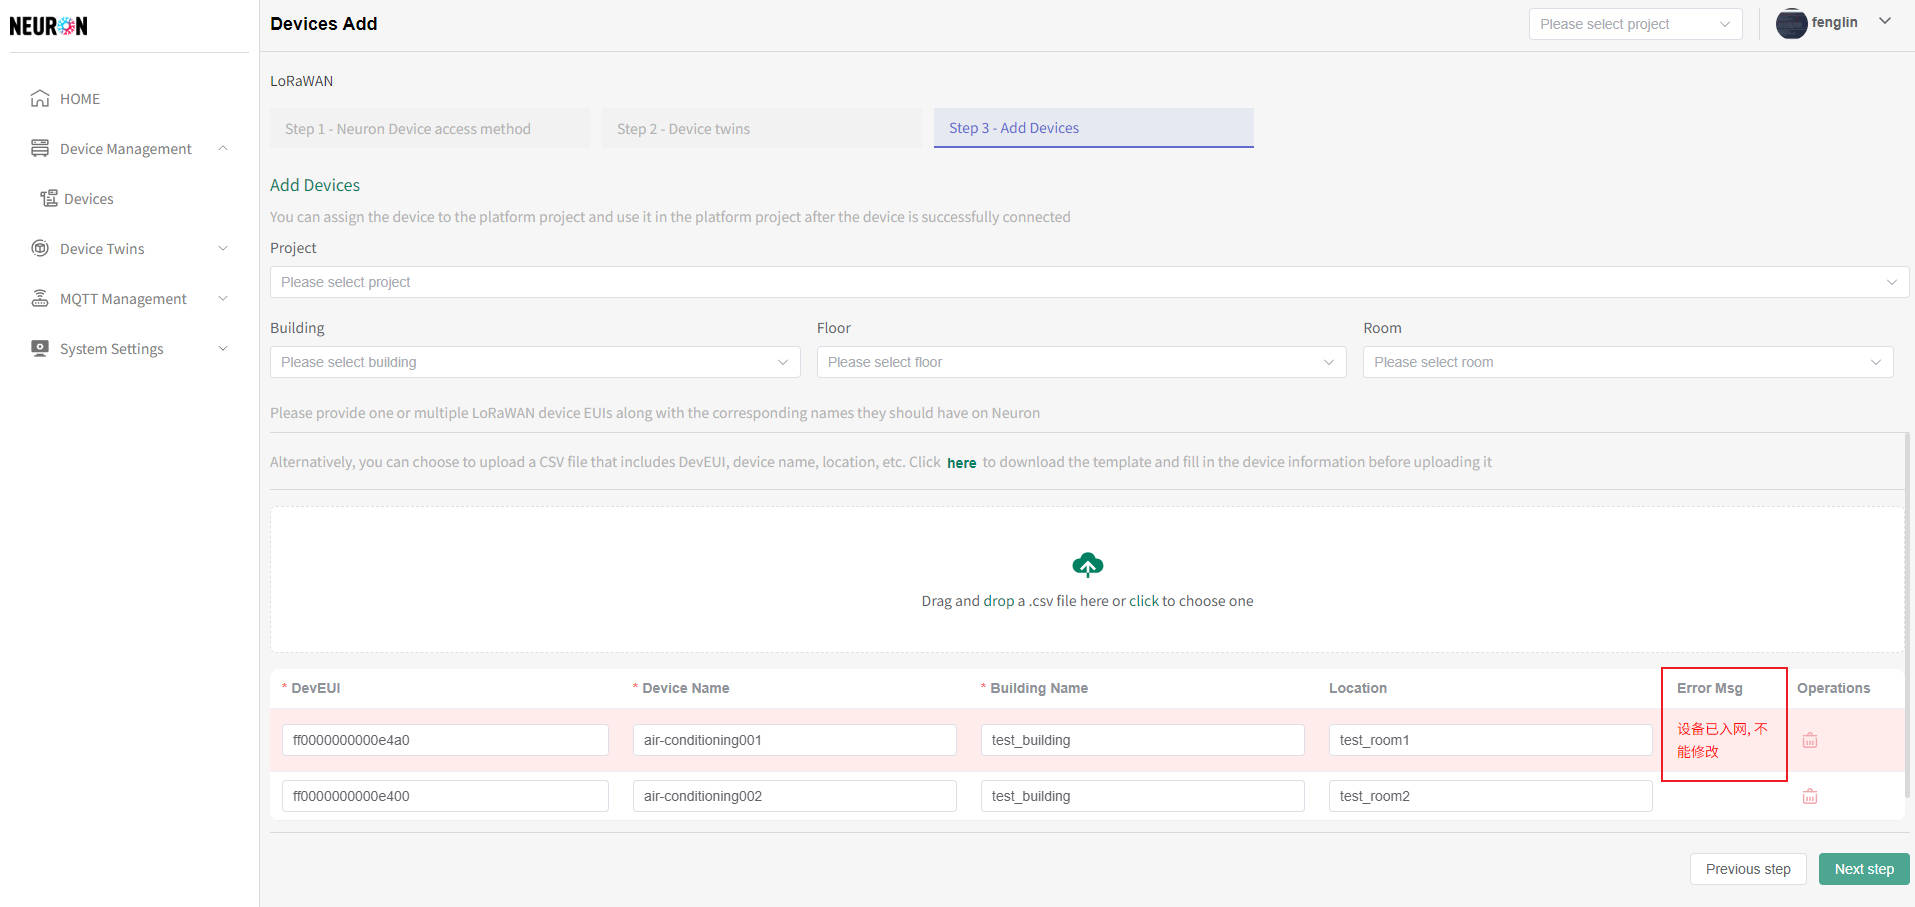
- The system prompts an error, as shown in the figure below. The background of the incorrect device is displayed in light red, and the data bar will show the reason for the error (see the red box in the figure below). After deleting or modifying the data, it can be resubmitted
- The system prompts success and will redirect to the device registration page (as shown in the red box below for newly registered device data). After subscribing to the standardized device data, the device can be successfully connected, as shown in the following figure
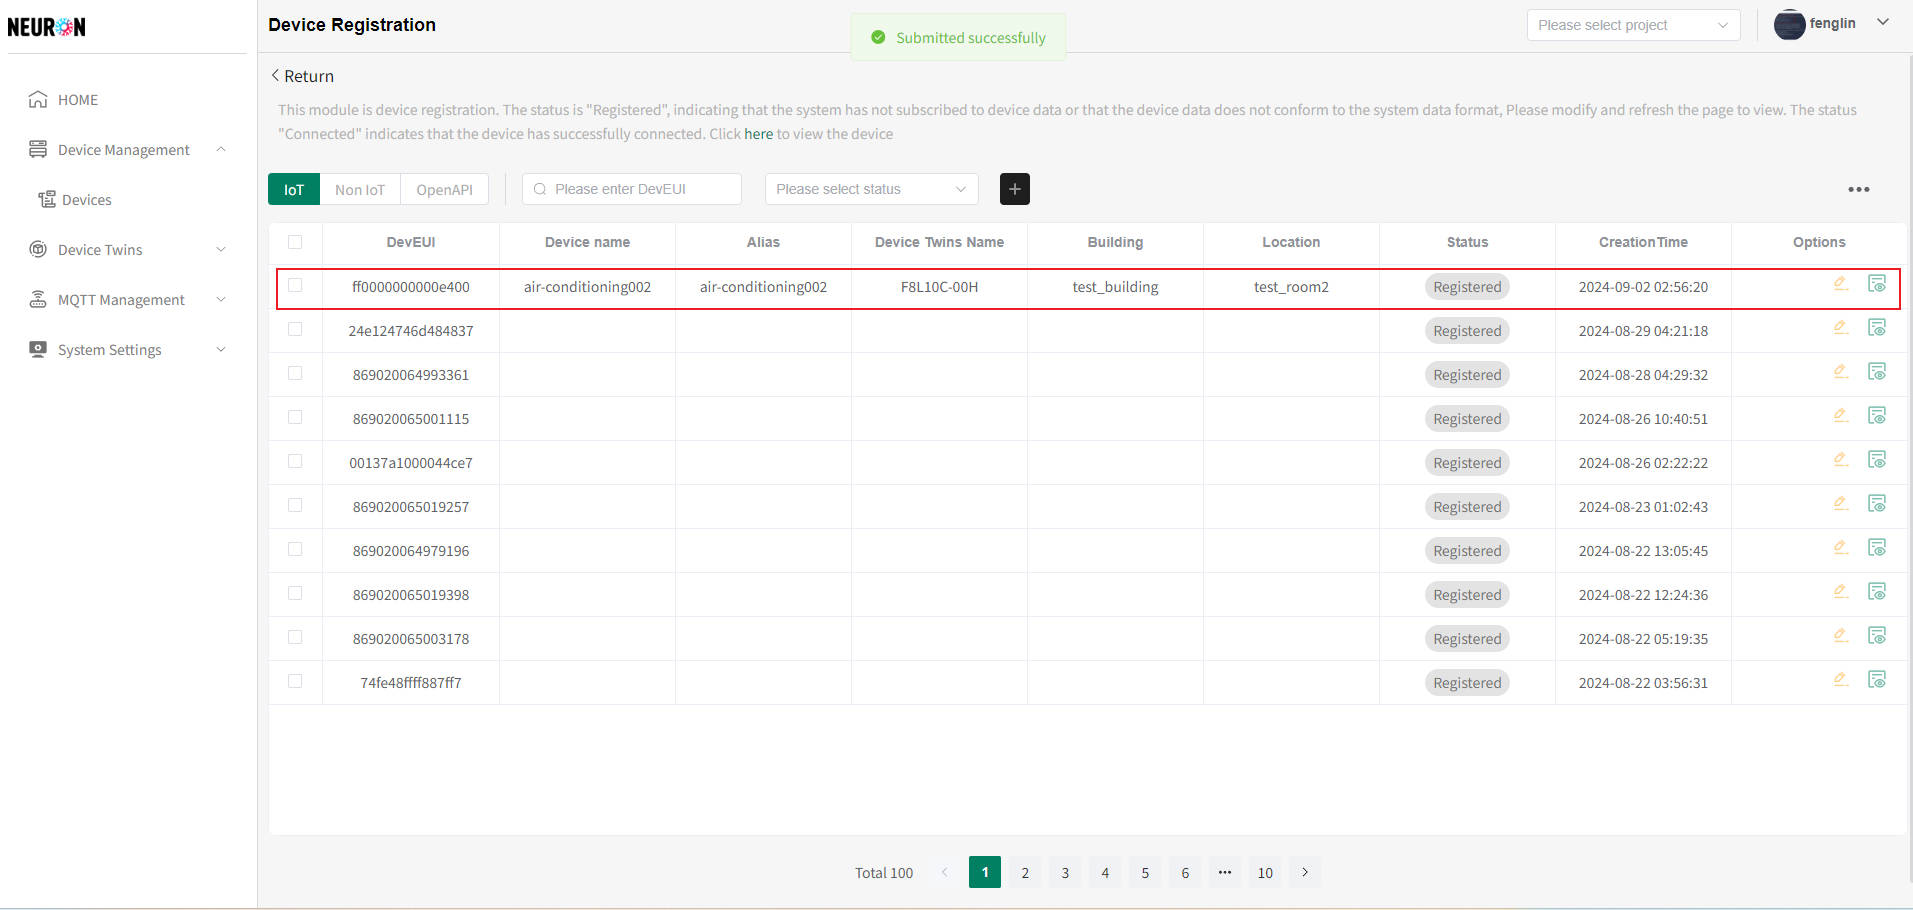 After the device is successfully connected, device management can be performed. For specific operations, please refer to the device management module Device Management
- The system prompts an error, as shown in the figure below. The background of the incorrect device is displayed in light red, and the data bar will show the reason for the error (see the red box in the figure below). After deleting or modifying the data, it can be resubmitted
- After completing the device filling, click the submit button and a confirmation window will appear, as shown in the following figure
MQTT device access
MQTT can connect to all types of devices, and the specific operation process is as follows
-
In the device management module, click the "Add" button to enter the device addition process, as shown in the following figure

-
In the device access interface, select MQTT and click Next to perform MQTT device access, as shown in the following figure

-
The access of MQTT is divided into four steps[data format, configuration device twins, network service, and device registration]
Data format
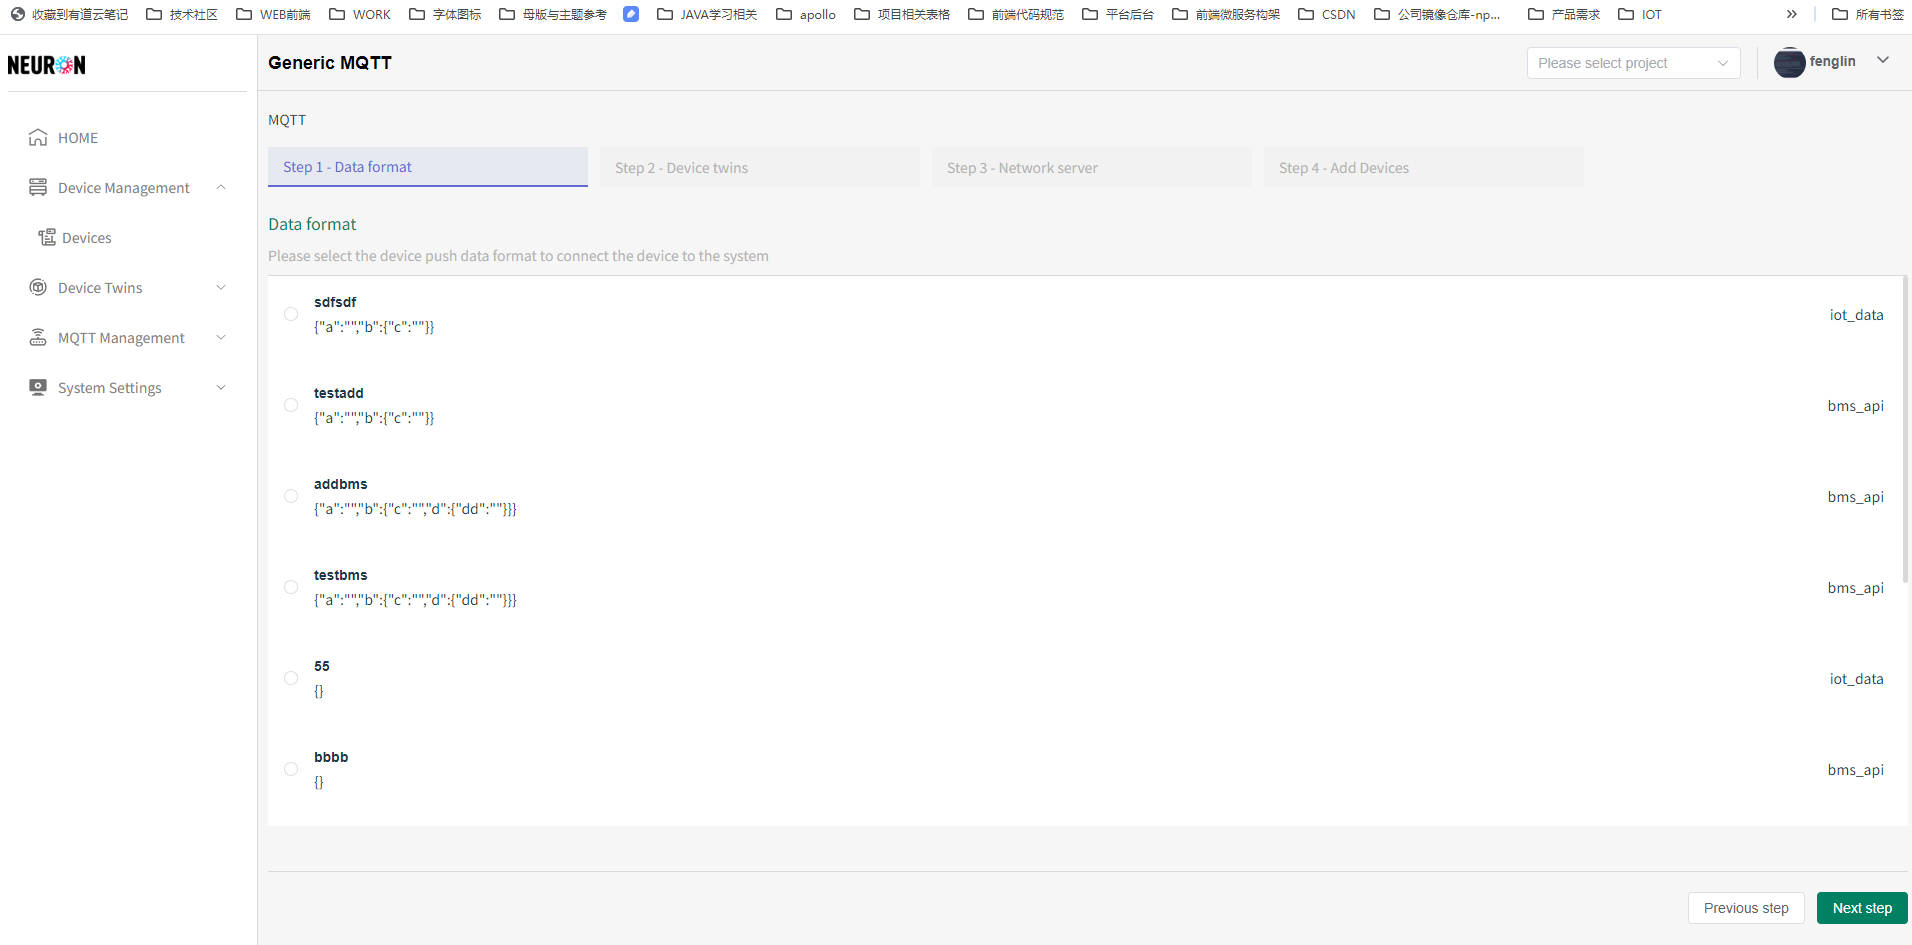
The push of device data has strict format matching. Only by pushing data in the format matched by the system can the device be successfully connected. In this stage, it is necessary to record the data format [to be used when pushing data], and the data list supports fuzzy matching of names in JSON format
Select the desired data format, then click Next to configure the device twins, as shown in the following figure
On the right side of the list, there are device types with identified data formats that can be connected to corresponding devices (iot_dat represents IoT devices, while others represent non IoT devices)
Configuration device twins
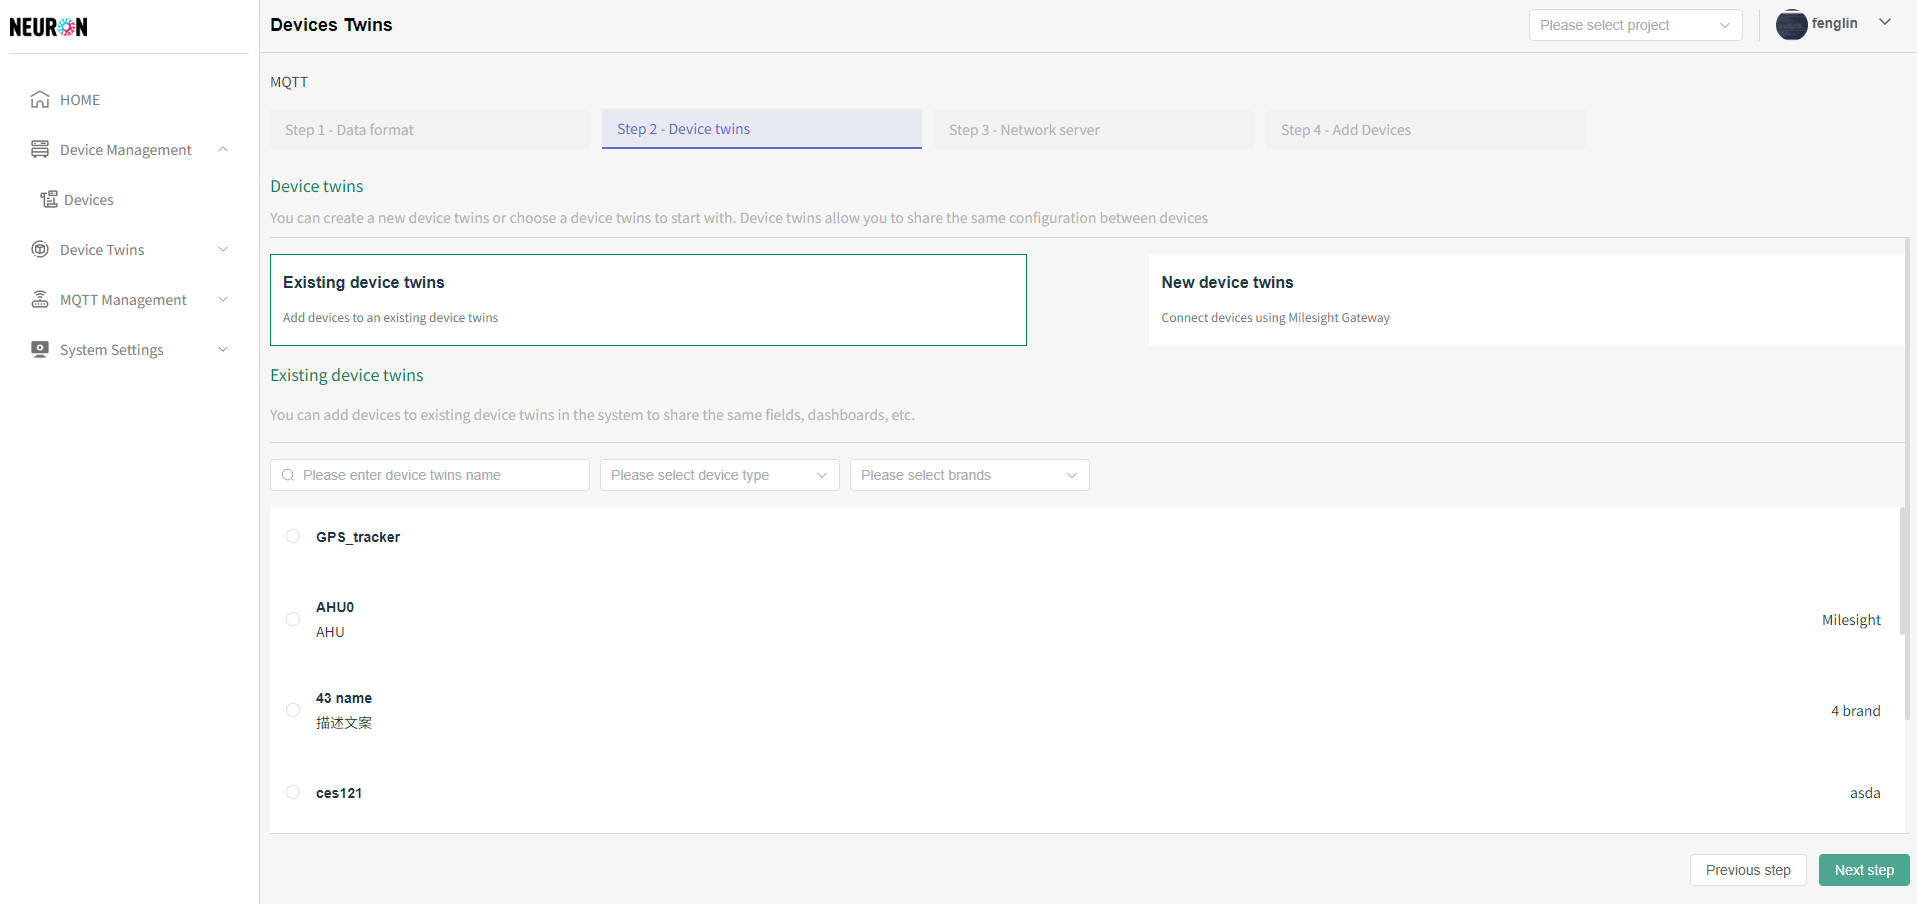
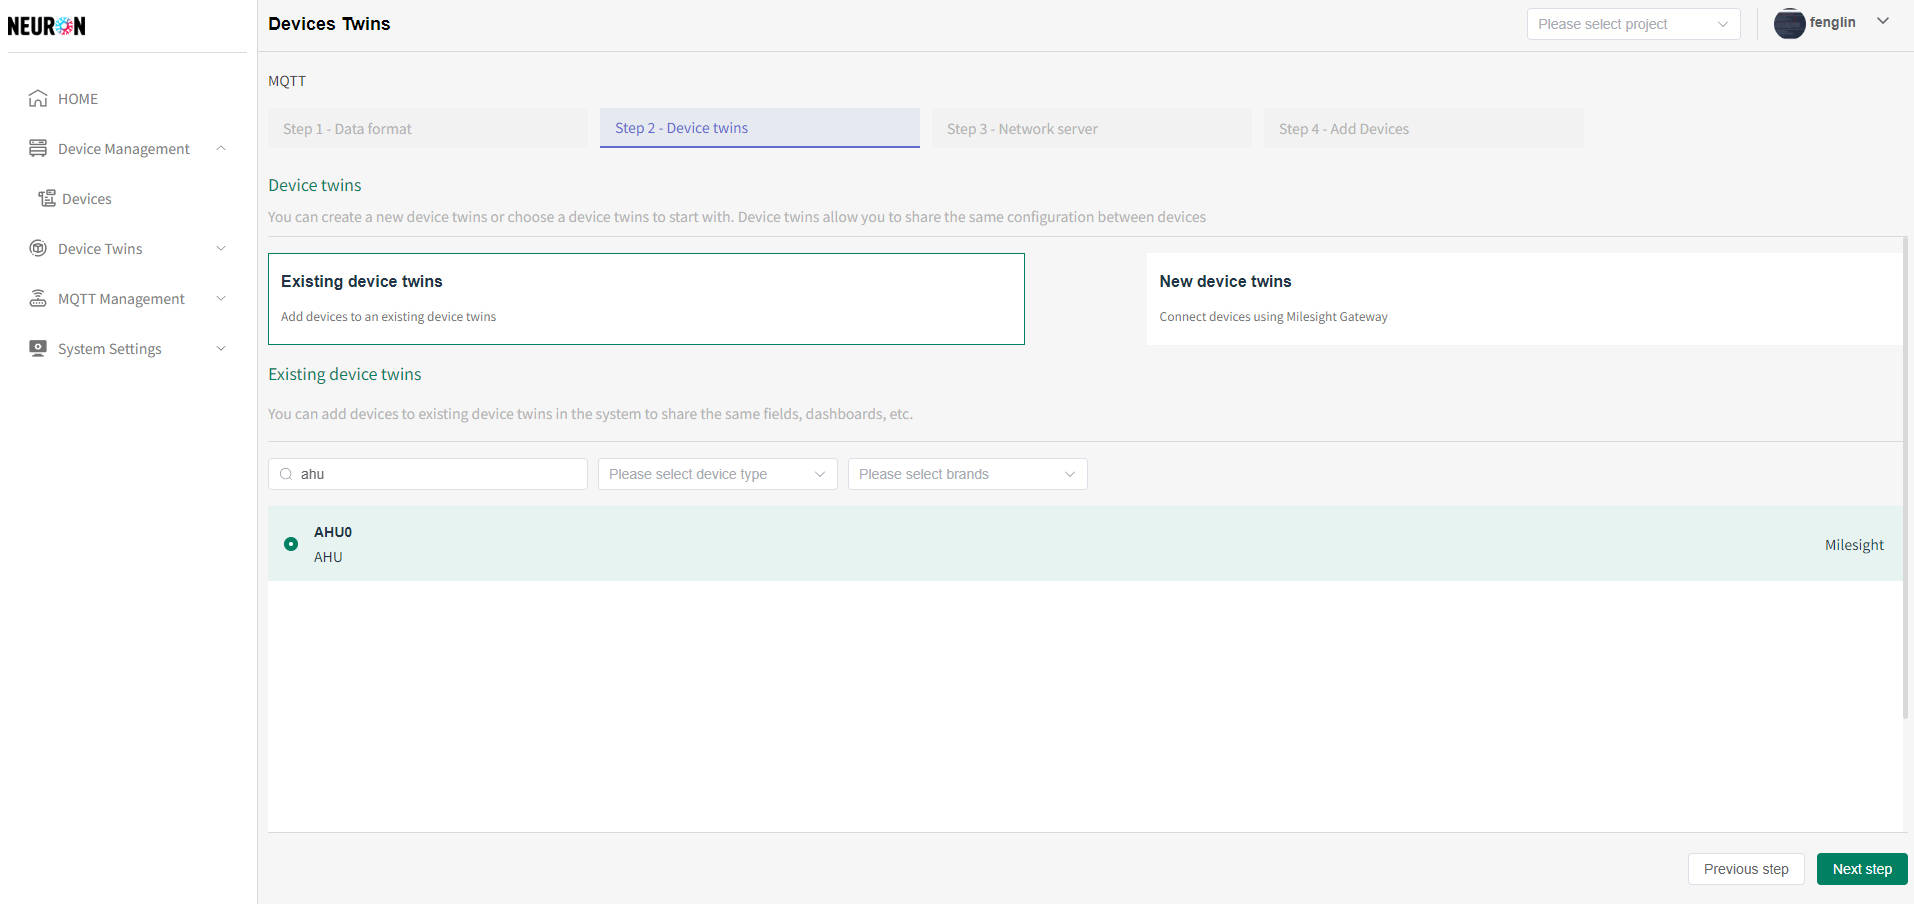
The system can select existing device twins or create new ones by itself. The system defaults to selecting existing device twins
-
Select an existing device twins
- Click on the desired device twins, then click Next to register the device, as shown in the following figure
The system supports fuzzy matching of names and precise matching of types and brands for searching device twins data
-
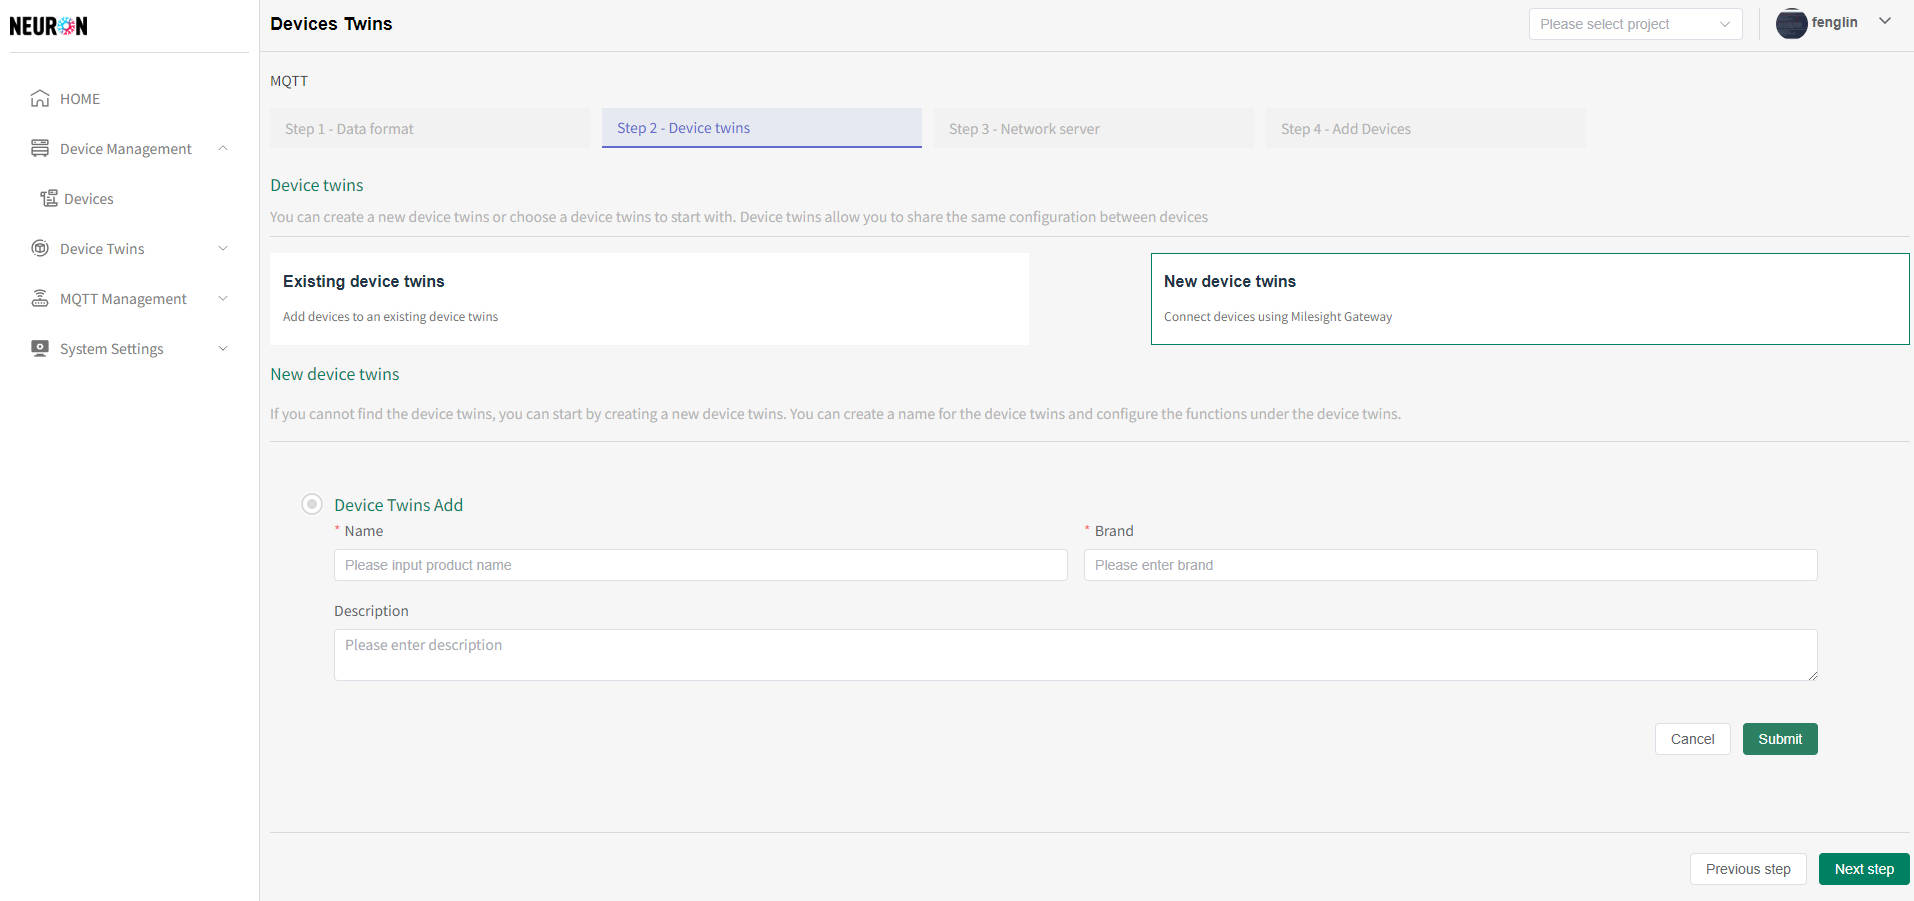
Add a new device twins
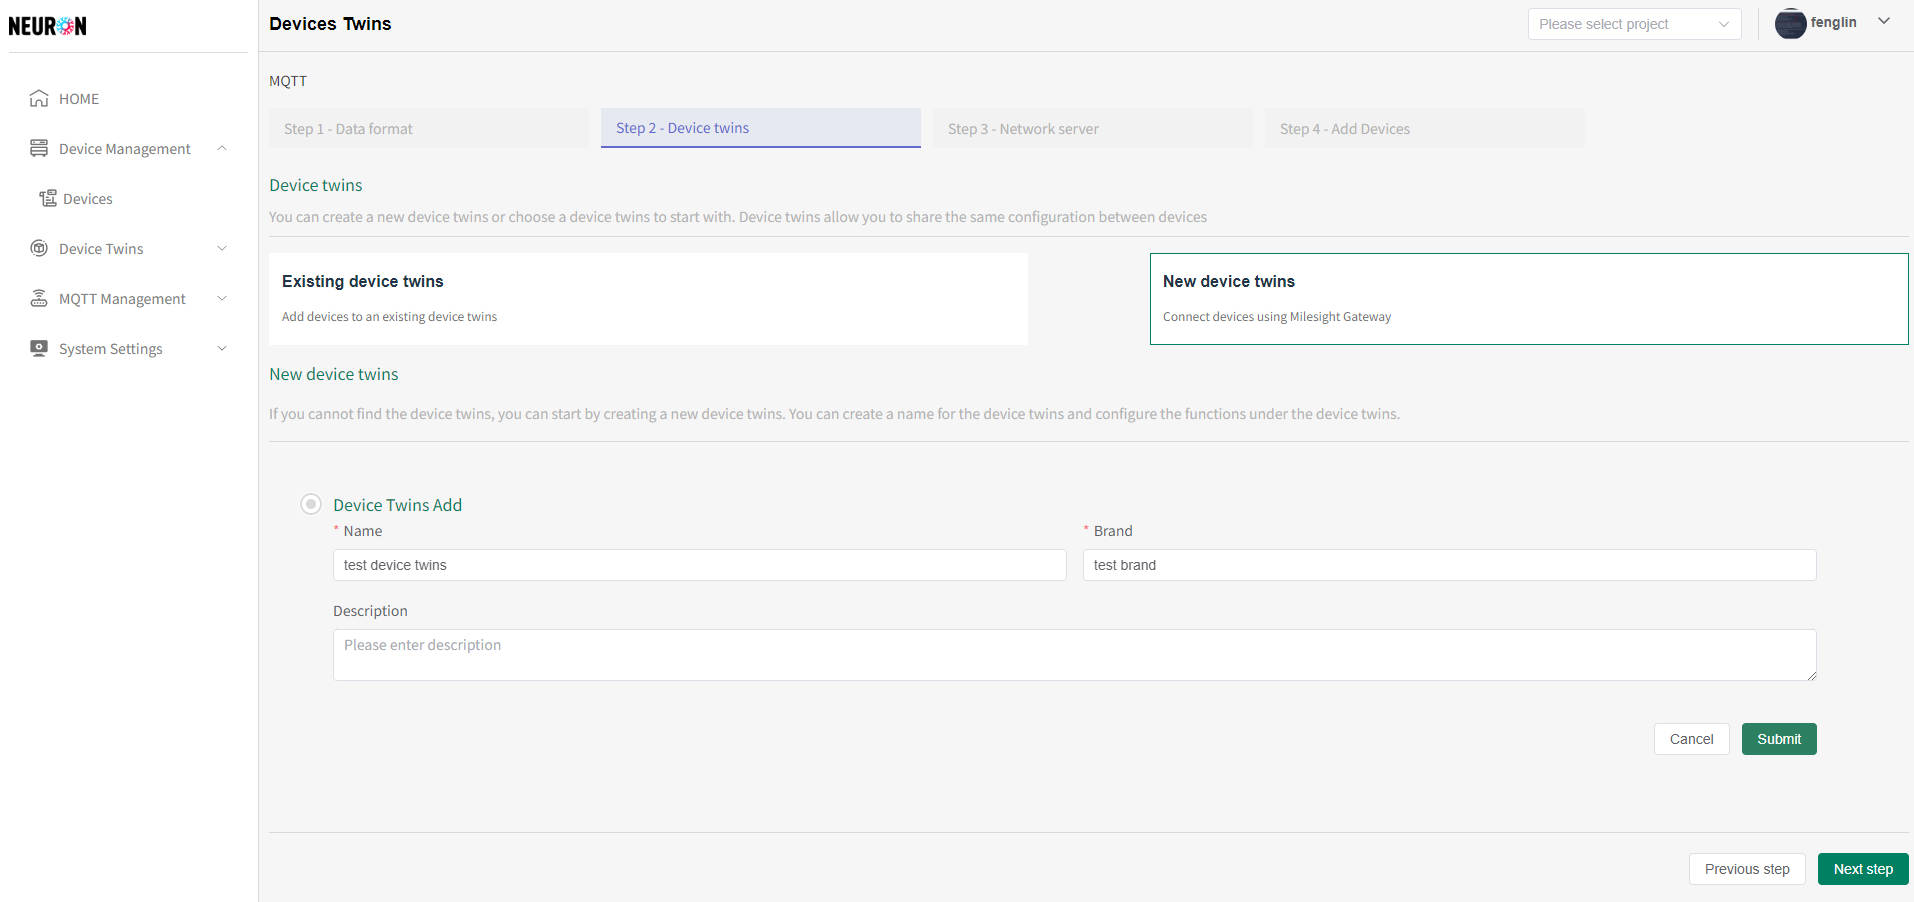
The name of the device twins cannot be duplicated. When submitting information, the system will verify the uniqueness of the name. If the name is duplicated, the addition will not be successful
- he default interface of MQTT device twins, click on add device twins, as shown in the following figure
- After completing the information input, click the "Submit" button, as shown in the following figure
- After configuring the device twins name, the function points under the device twins can be configured, as shown in the following figure
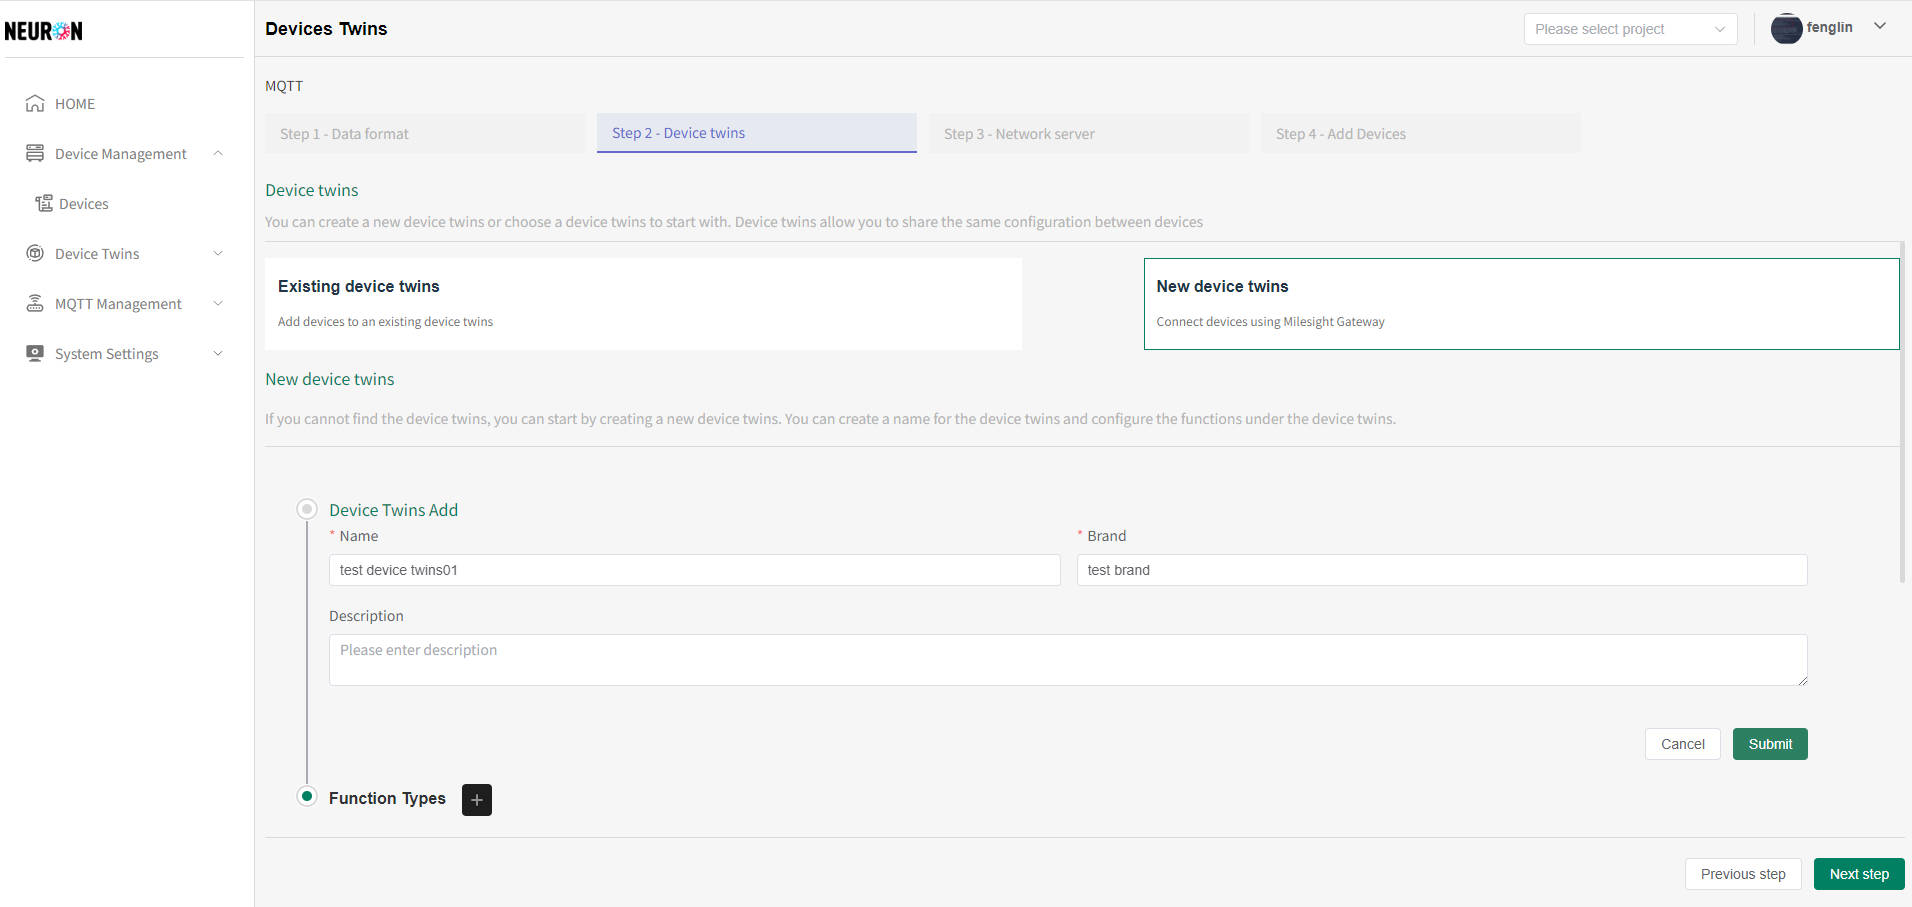
- Click the "plus" button next to the Function type in the new module of the device twins to add function points under the device twins, as shown in the following figure
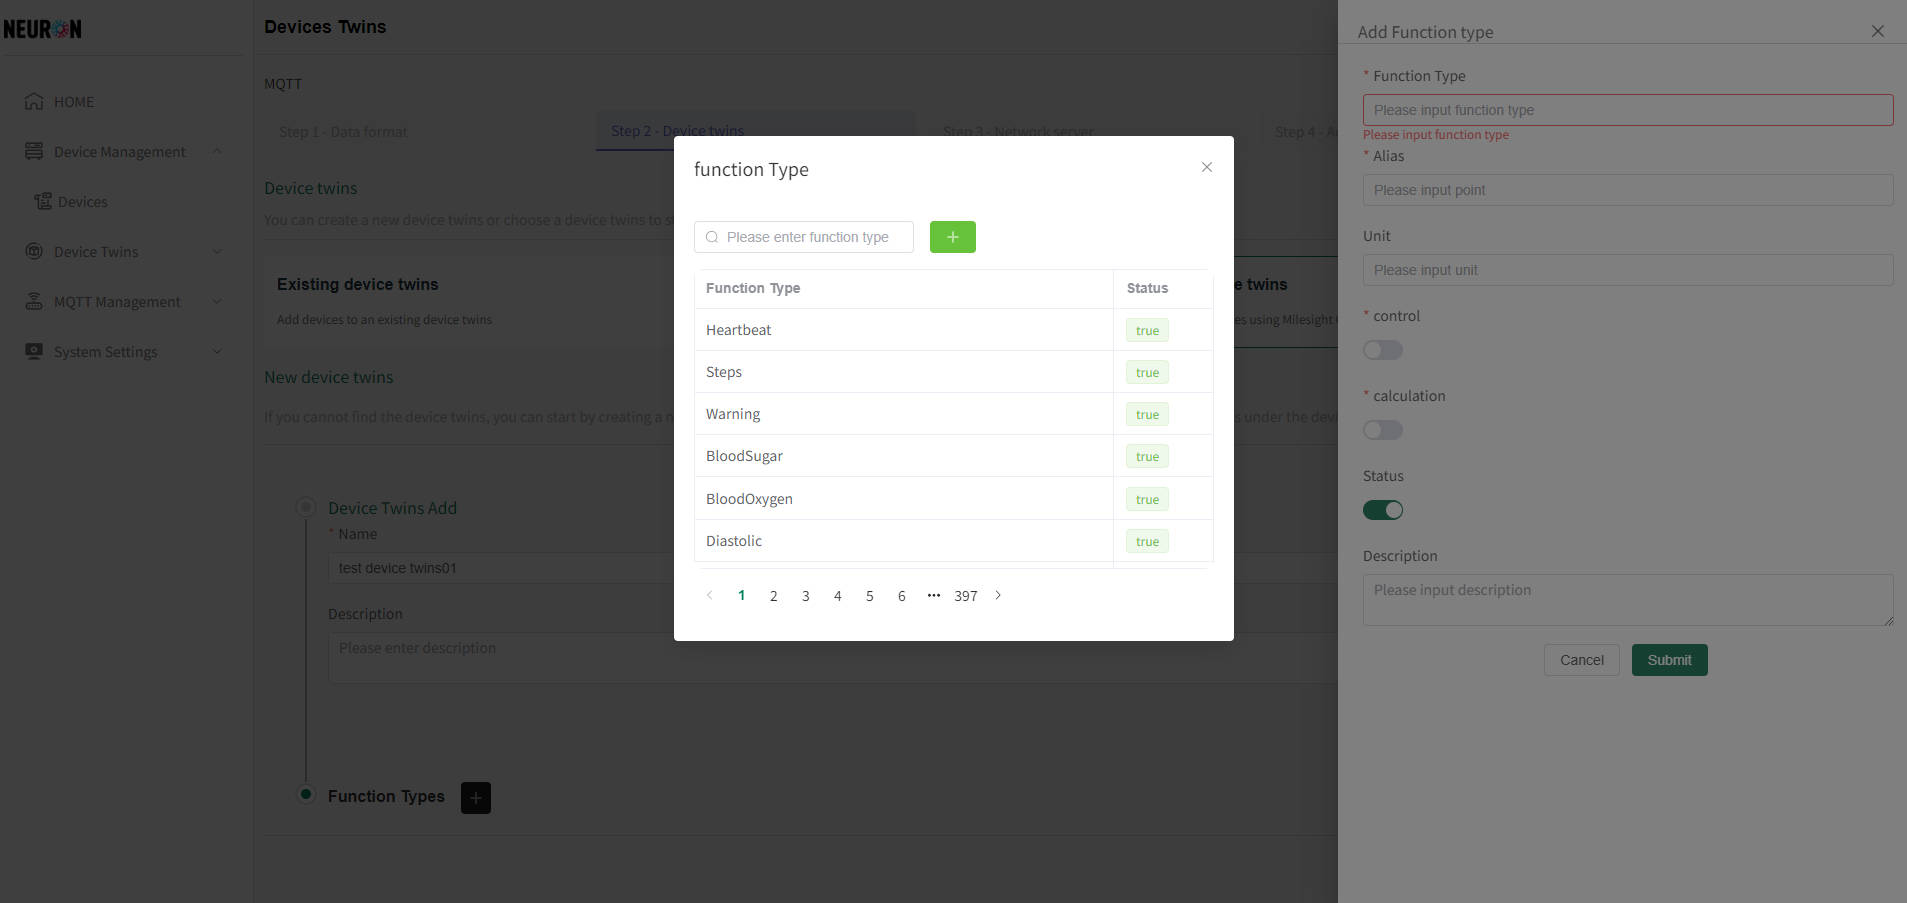
- You can repeat the above steps to add multiple functional points under the device twins. After configuration is complete, click Next to configure the network service, as shown in the following figure
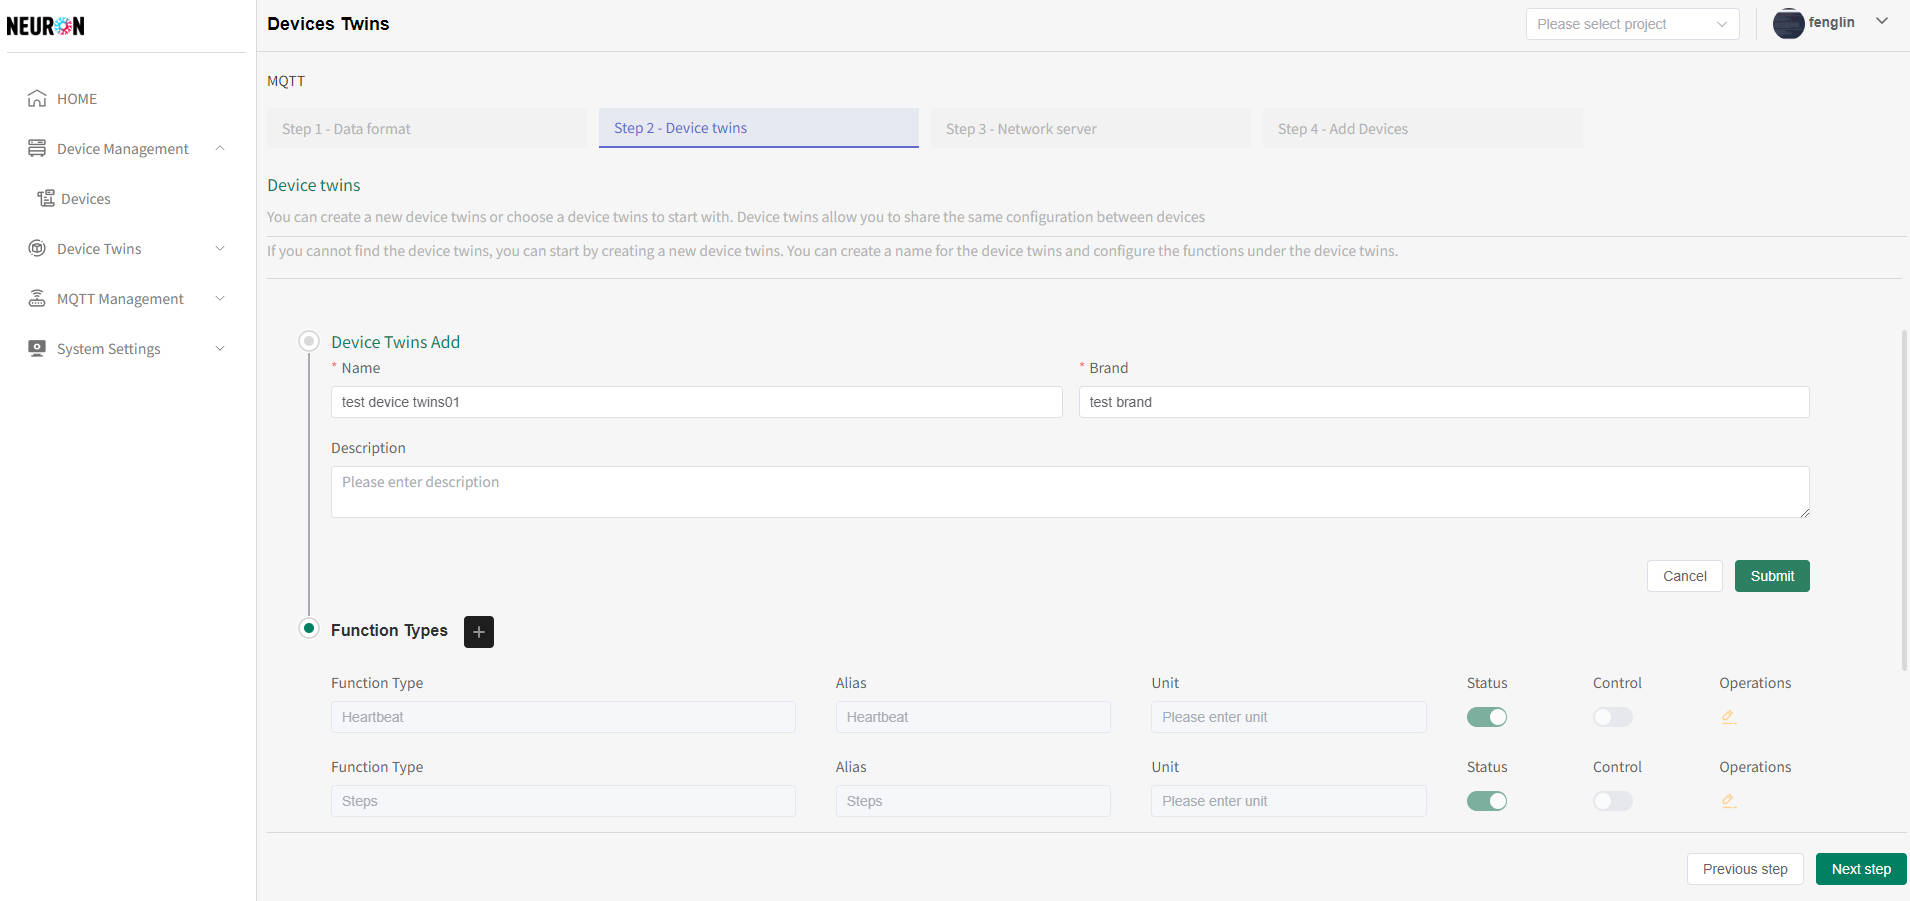
- he default interface of MQTT device twins, click on add device twins, as shown in the following figure
Network services
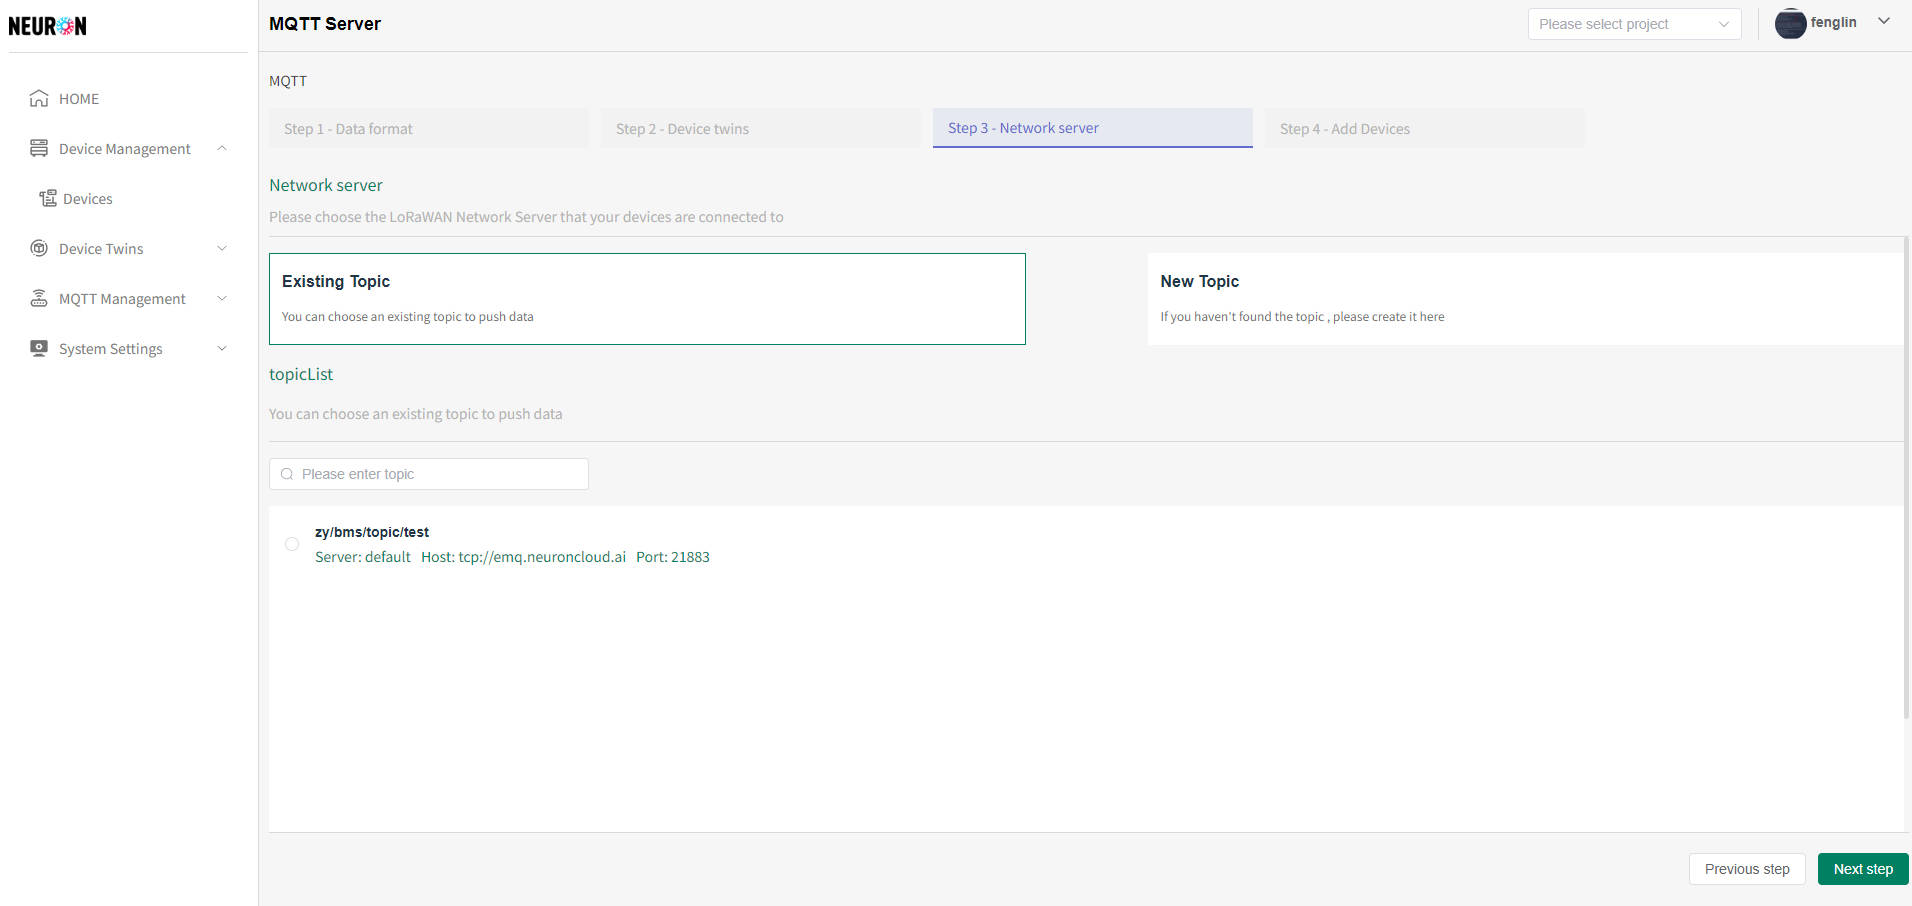
Network services are one of the core components of MQTT, responsible for subscribing to data reported by devices. It serves as a hub for data transmission, managing critical tasks such as terminal node connections and data forwarding. The system can select existing network services or create new ones by itself. The system defaults to selecting existing network services
- Select an existing network service
The system supports fuzzy name matching for searching network service data
Click on the desired network service, then click Next to register the device, as shown in the following figure
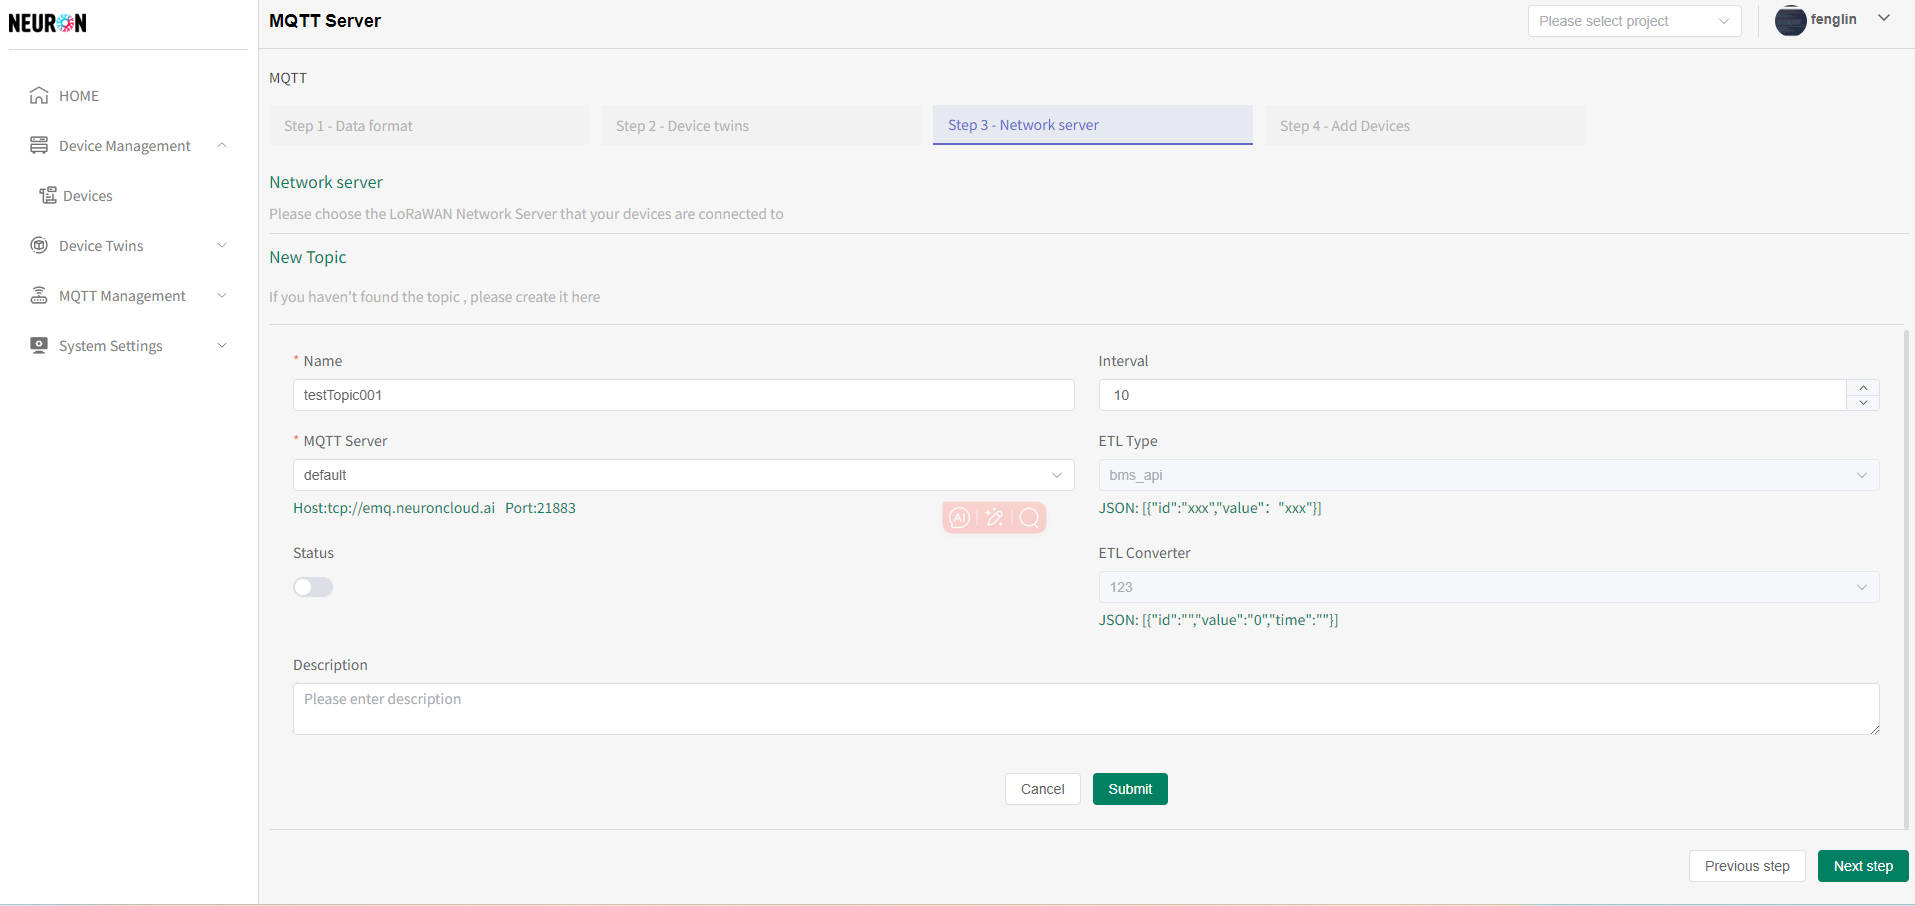
- Add network services
Network theme names cannot be duplicated. When submitting information, the system will verify the uniqueness of the name. If the name is duplicated, the addition will not be successful
- The default interface for network services, click on add, as shown in the following figure
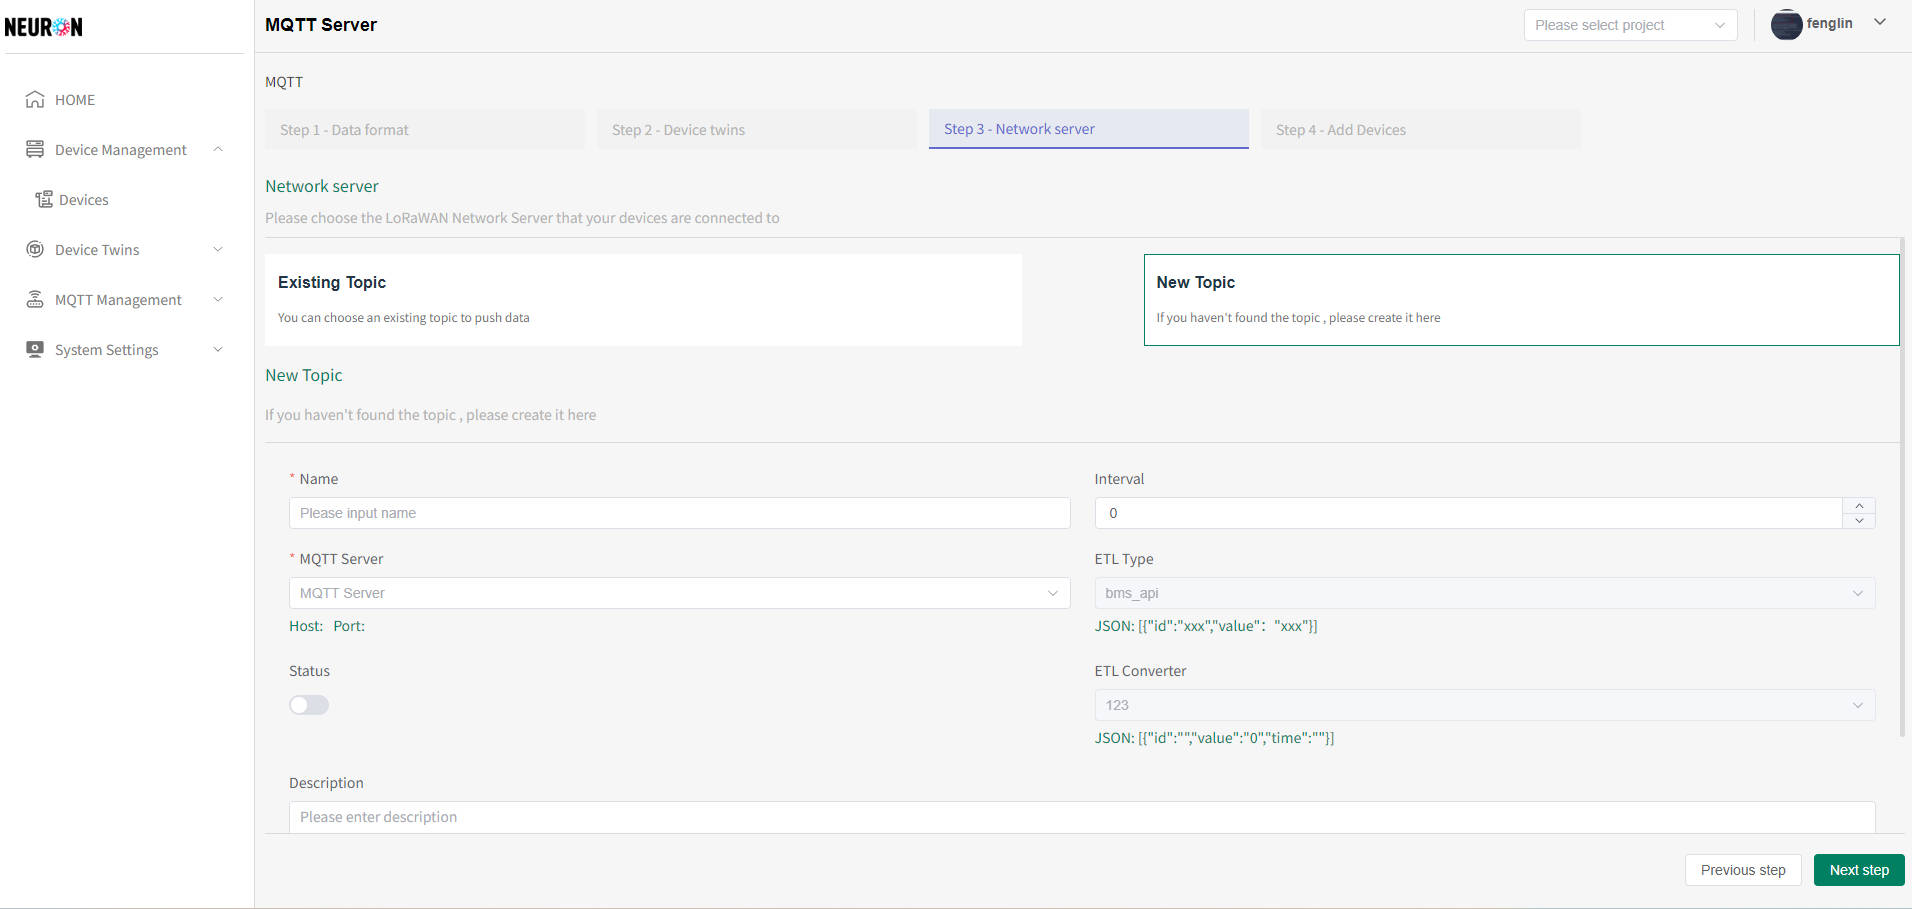 According to the above interface, after filling in the real information, click the submit button on the interface to complete the submission of the new network service, as shown in the following figure
Device registration
The system supports uploading and online editing while entering device data. The operation steps are: first download the template, then upload it to the page, then edit it online, and finally submit it to the system to complete device registration. The successful registration of the device only completes the device registration. The system needs to successfully subscribe to the device data and clean it before completing the device access
MQTT templates are divided into two types: IoT devices and non IoT devices. The following will introduce the operations of the two templates separately
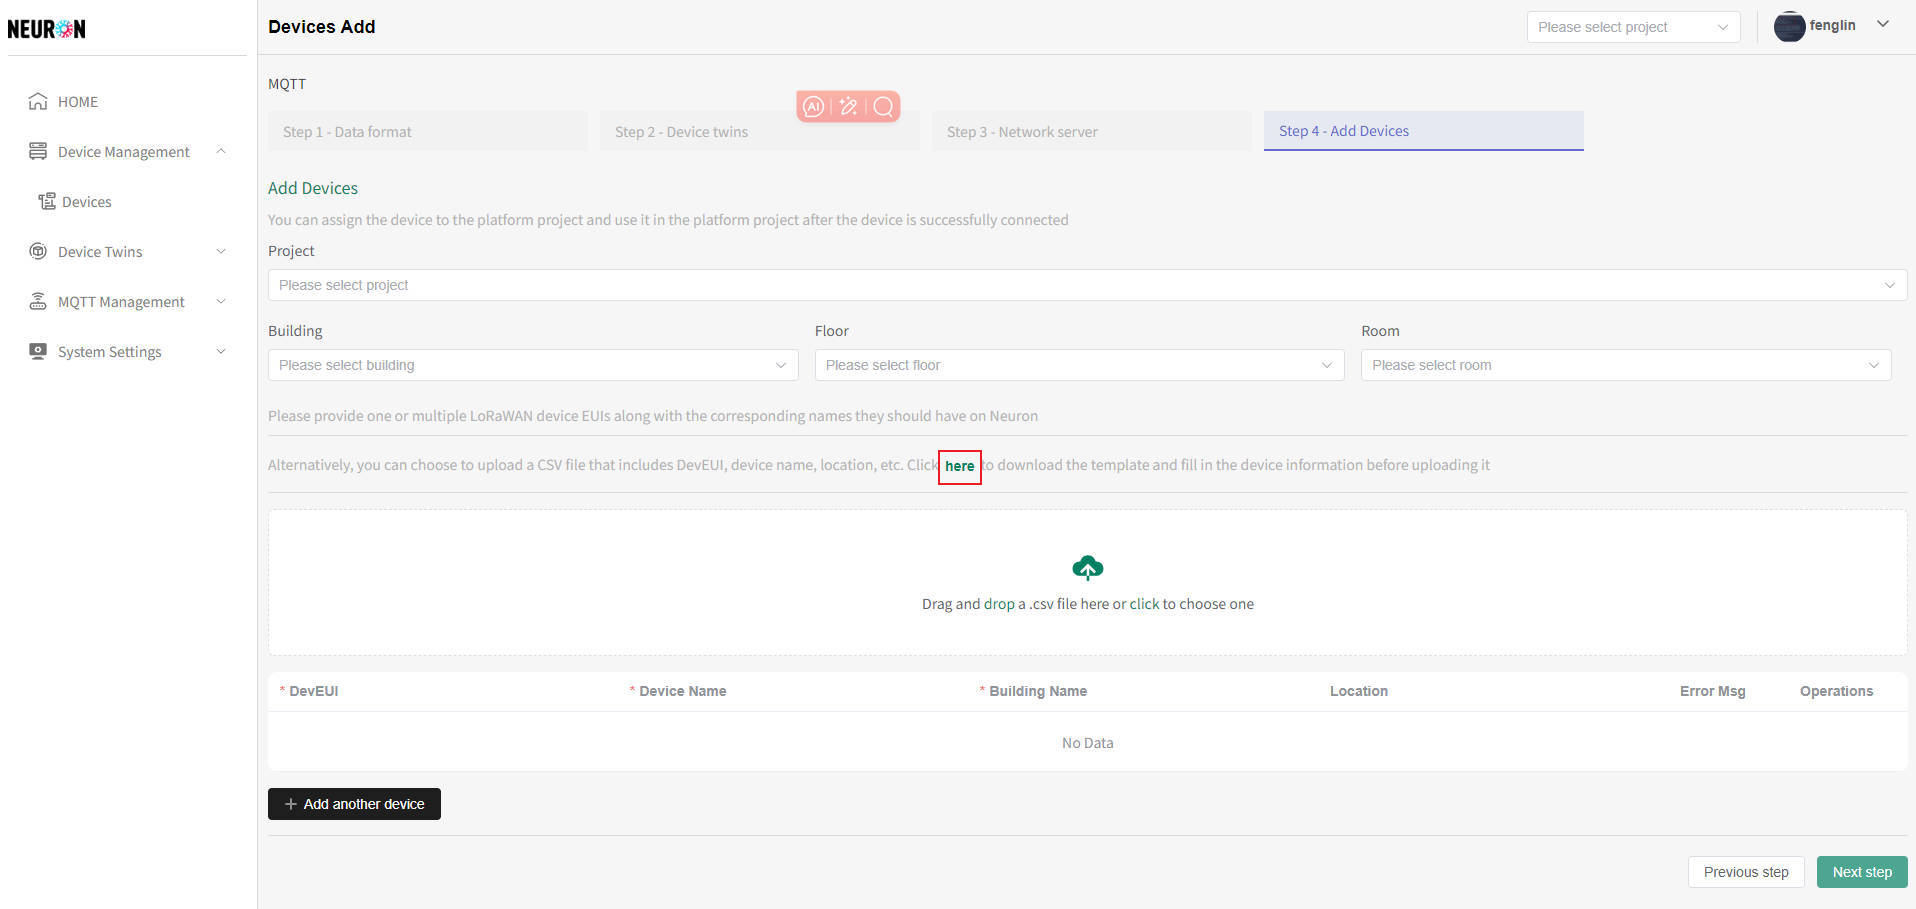
- IoT Device Template Download
On the device registration page, click on the red box in the following image to download the template file
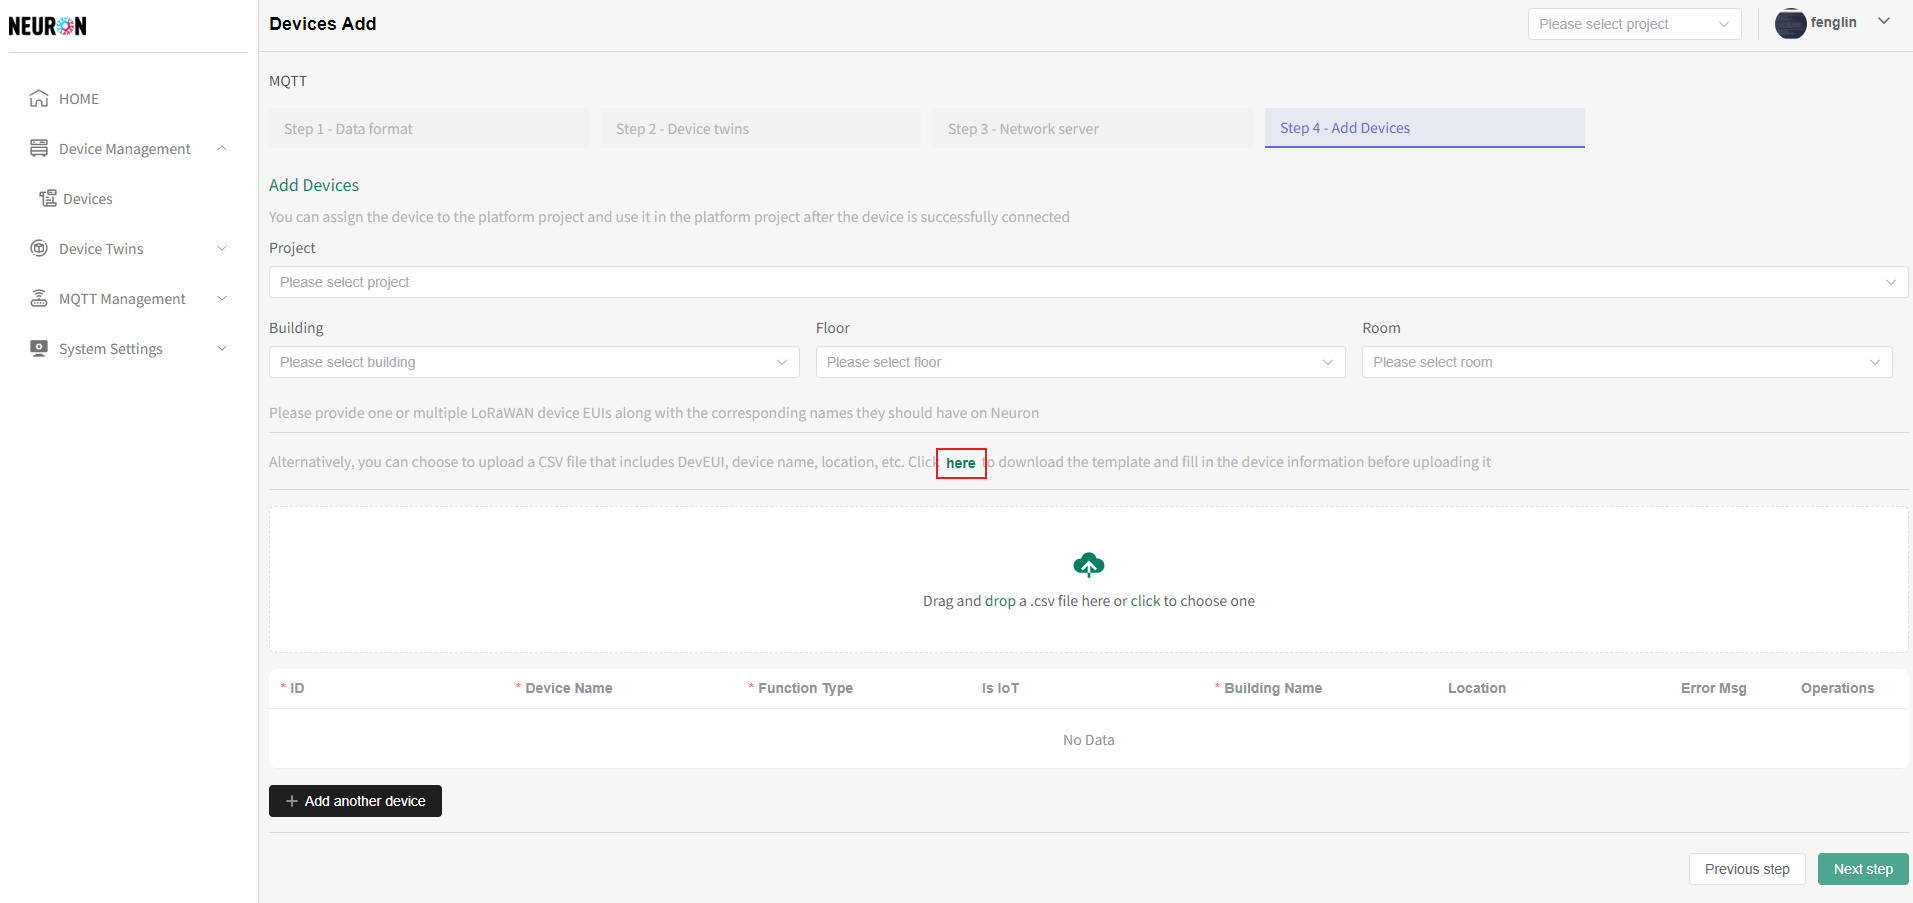
- Download templates for non IoT devices
On the device registration page, click on the red box in the following image to download the template file
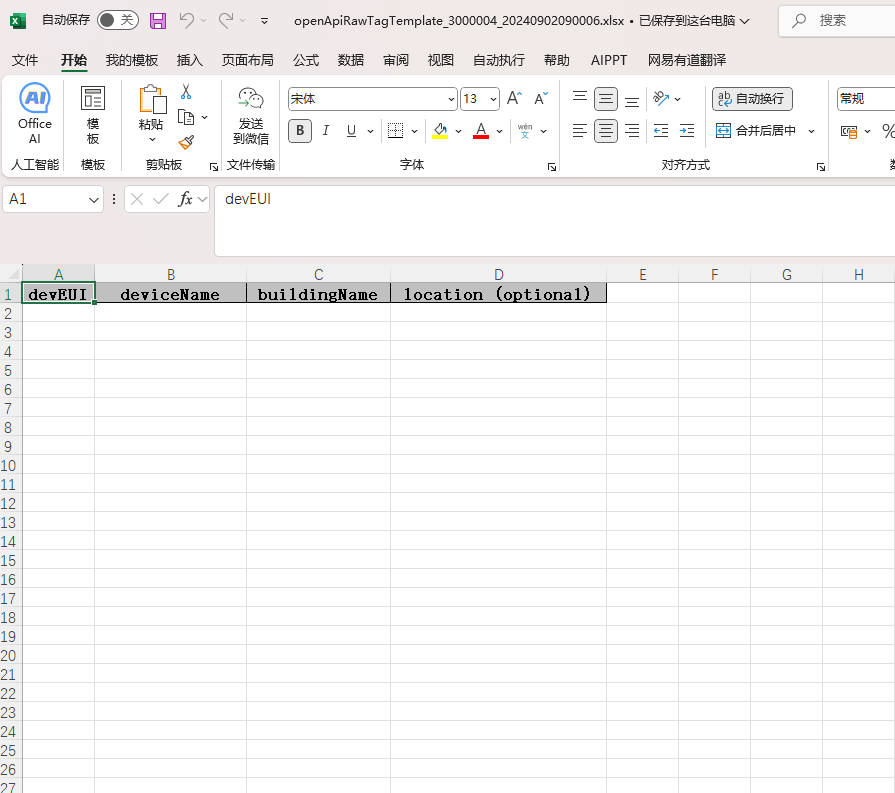
- Filling in IoT device template
As shown in the template, Device DevEUI (required) is the unique identifier for IoT devices. Simply fill in the DevEUI on the device, Device Name (required) is globally unique, Building Name (required) is building information, Location (not required), and fill in the device location

- Template filling for non IoT devices
As shown in the template, device rawId (required) is the unique identifier for non IoT devices, and the Id of the device's functional point can be filled in. buildingName (required) is the building information, and device Name (required) is globally unique (multiple functional points can be filled in with the same device name, and the system will consider them as the same device). functionType (required) is the functional point under the device, which needs to match the functional point under the system's physical model. Location (not required), fill in the device location, isIot (not required), and fill in whether it is an IoT device. If not filled in, the system will default to a non IoT device
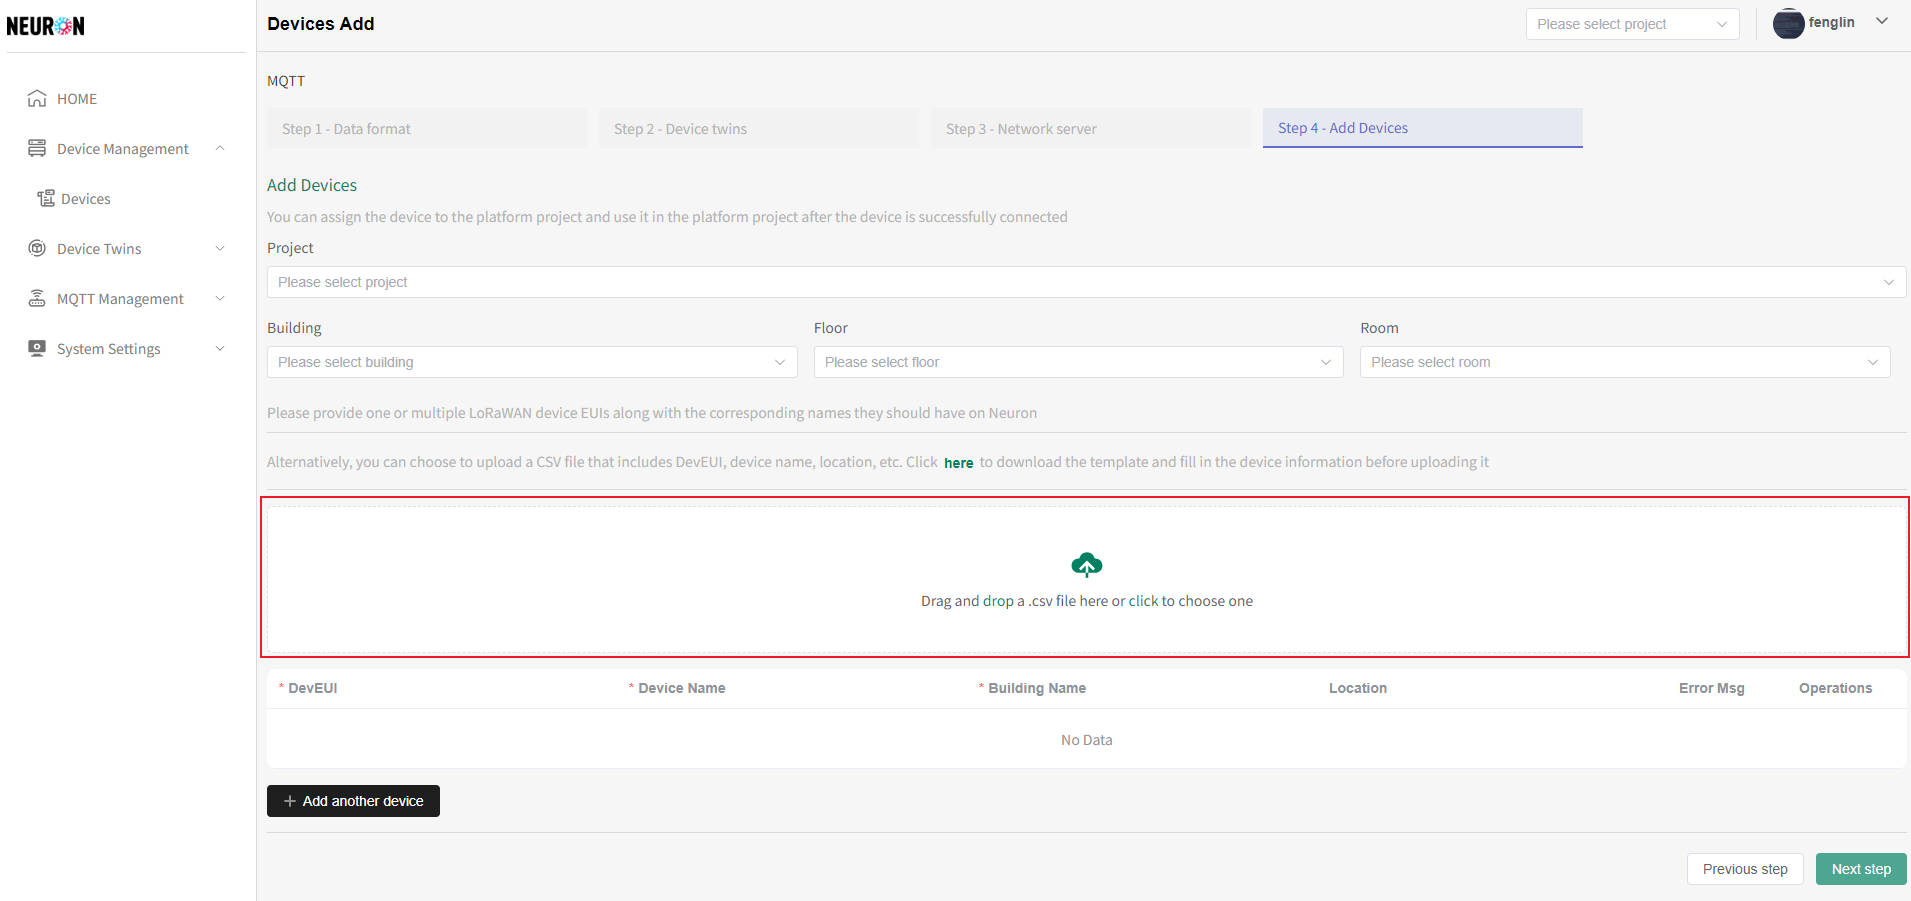
- IoT Template Upload
Upload the device information that has been filled in, and the page will display the uploaded device information. The page can also perform operations such as adding and deleting device data
Click on the red box in the following image and select the corresponding template file to complete the device registration data upload
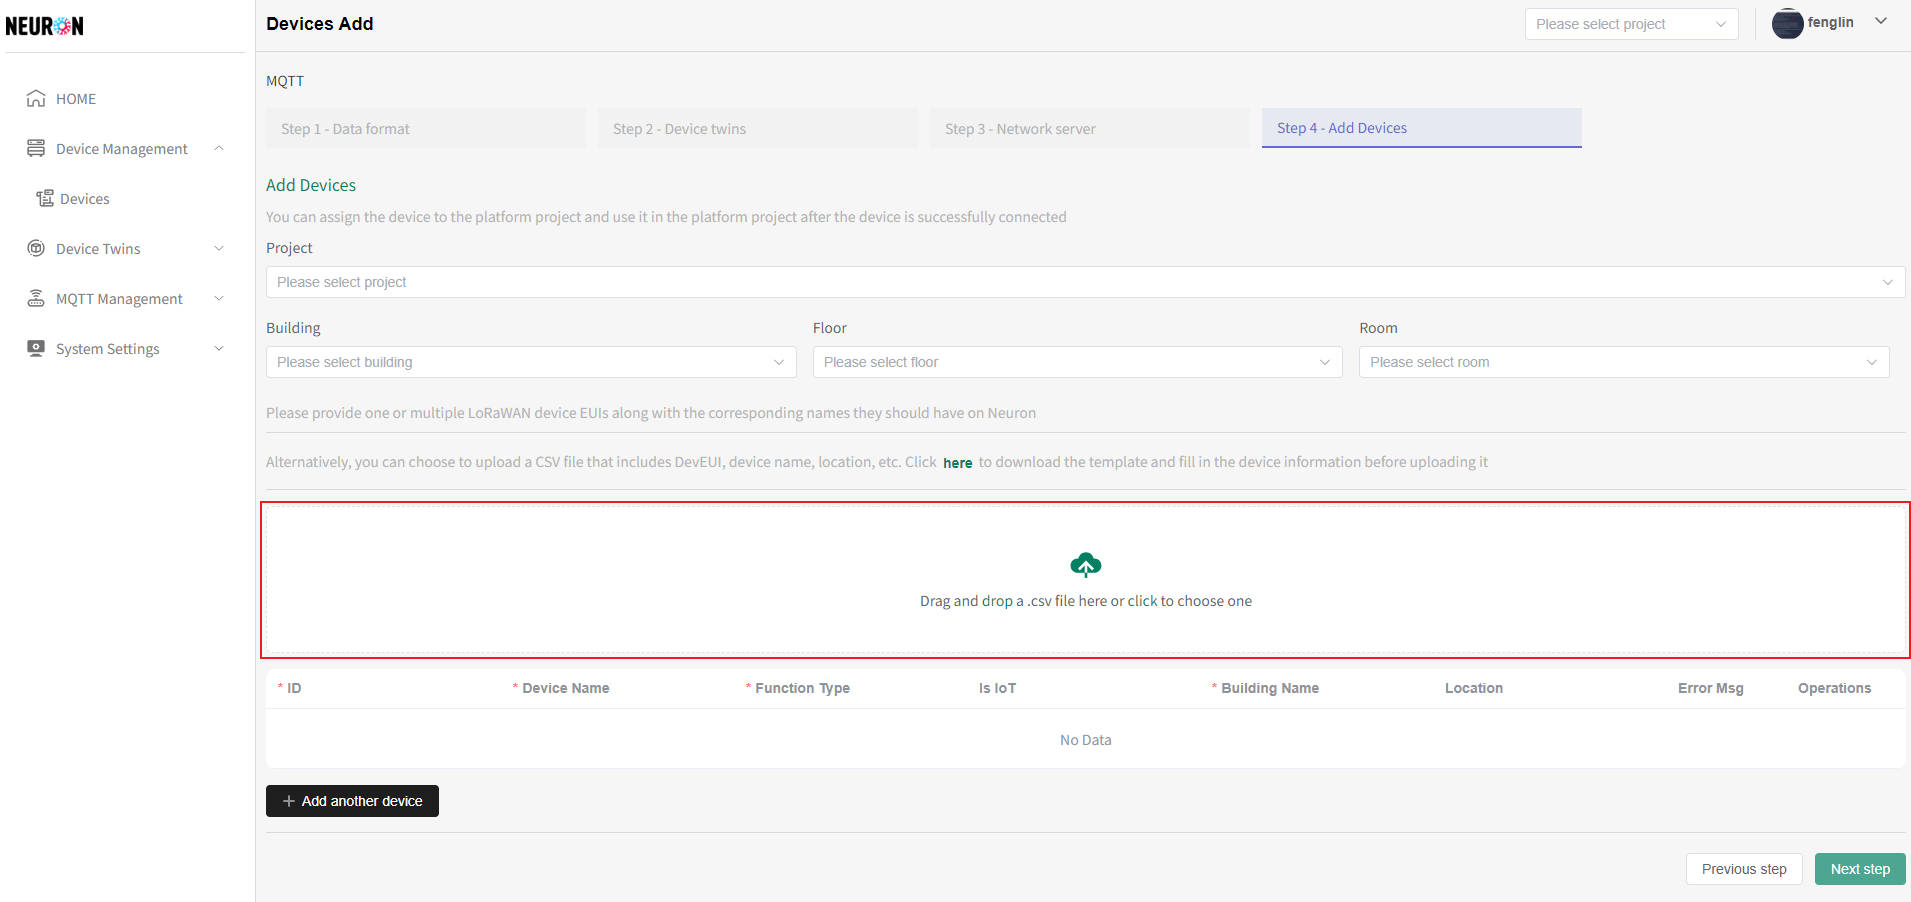
- Non IoT template upload
Upload the device information that has been filled in, and the page will display the uploaded device information. The page can also perform operations such as adding and deleting device data
Click on the red box in the following image and select the corresponding template file to complete the device registration data upload
-
IoT device online editing
- Add new device
The data on the page includes two types of device information uploaded by the user and added to the page, which can be added, deleted, and other operations
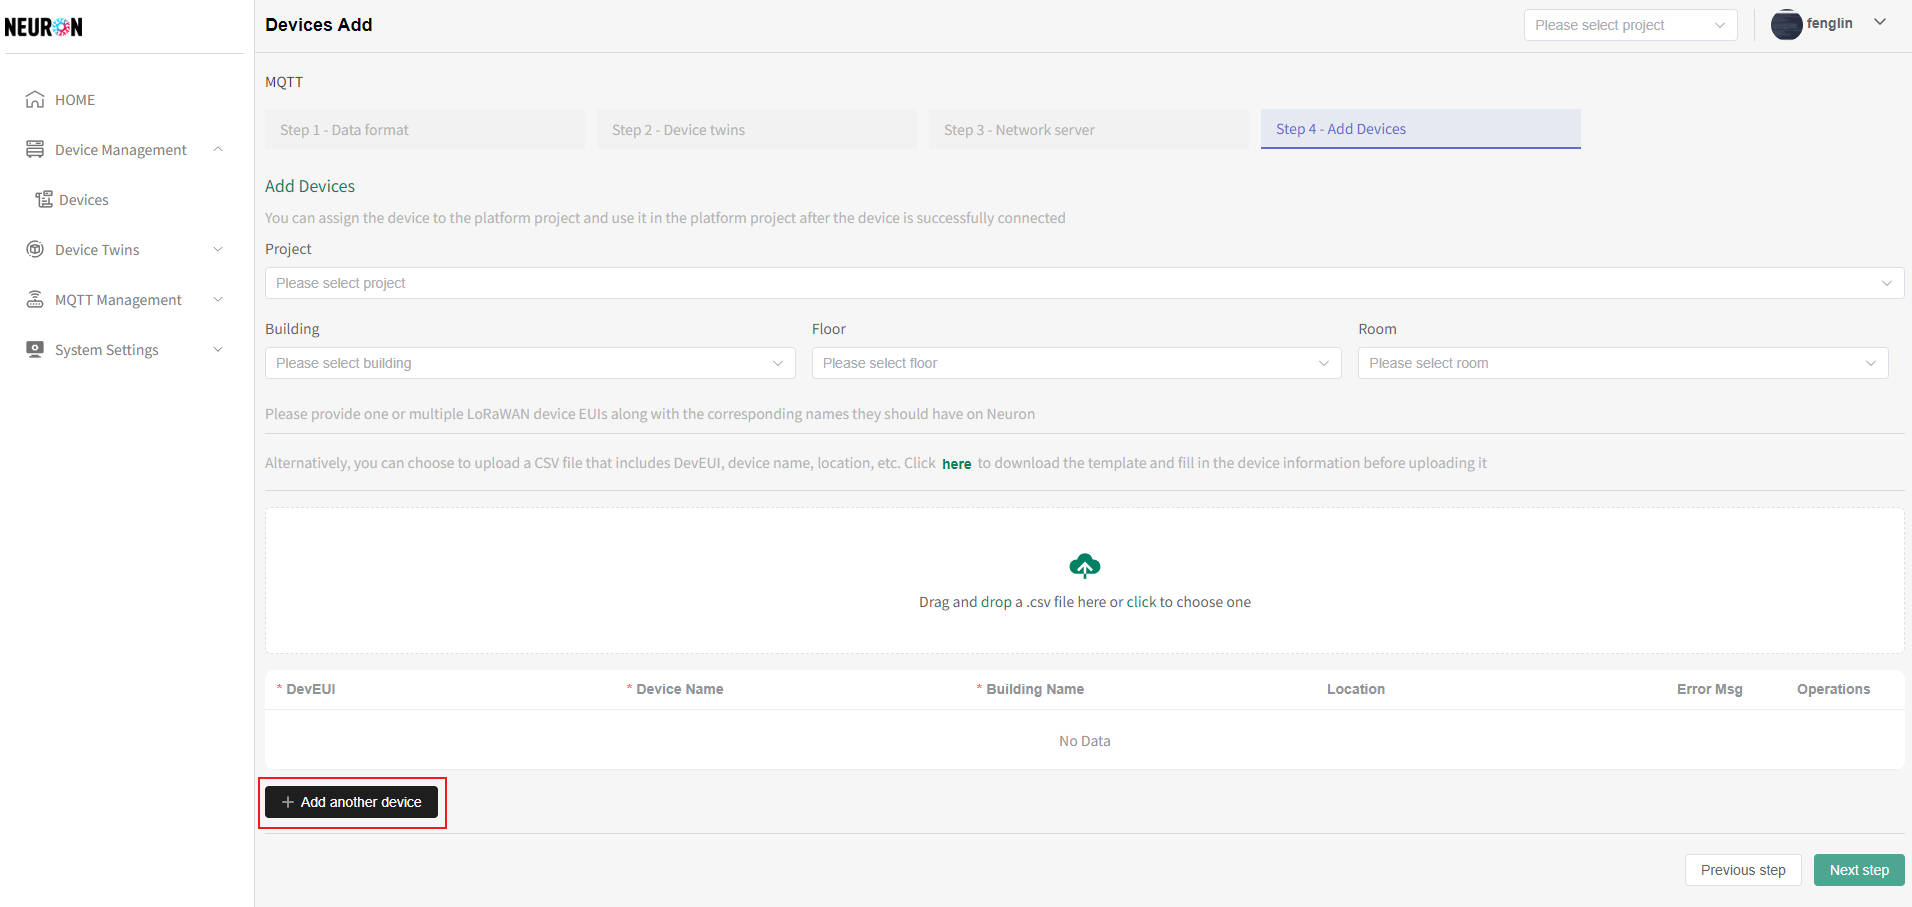
- Click on 'add other device' in the above image to add a new line and enter device information
- Add new device
-
Device Binding Platform Project
The system can bind platform projects while adding new devices. After successful submission, all devices added to the page will belong to the configured platform projects
- As shown in the following figure, select the project that needs to be bound to complete the binding between the platform and the newly added device
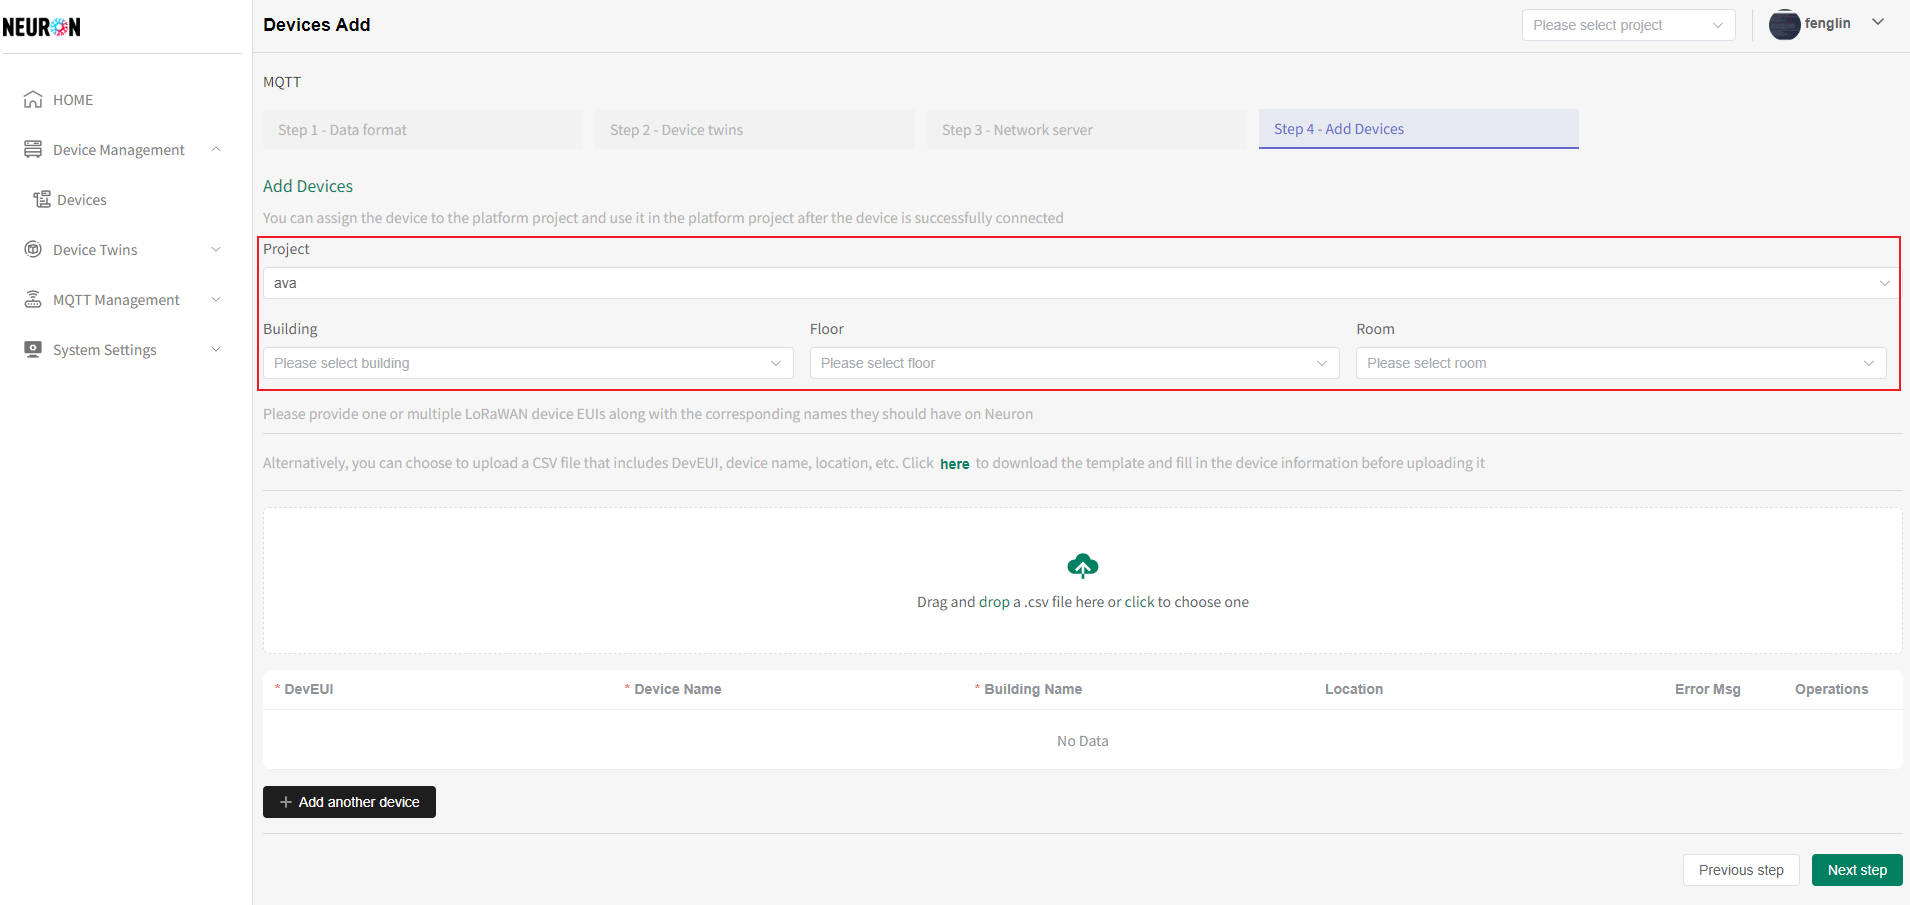
- As shown in the following figure, select the project that needs to be bound to complete the binding between the platform and the newly added device
-
Online editing for non IoT devices
- Add new device
The data on the page includes two types of device information uploaded by the user and added to the page, which can be added, deleted, and other operations
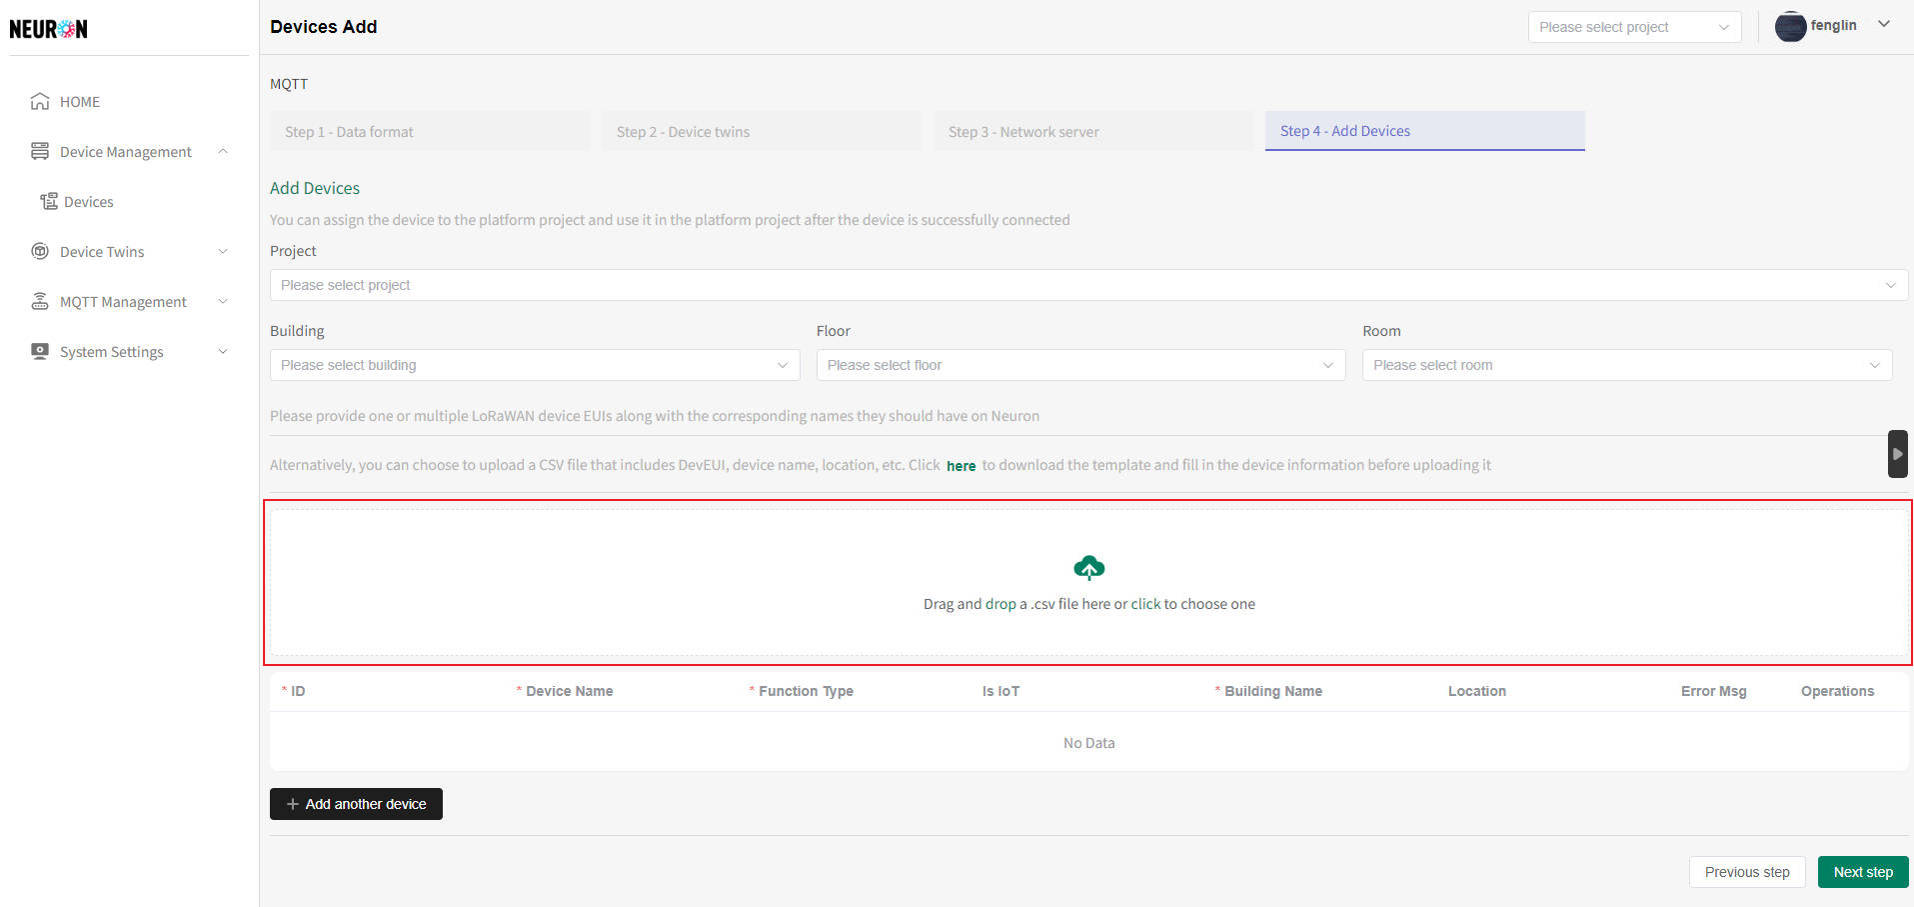
- Click on 'add other device' in the above image to add a new line and enter device information
- Device Binding Platform Project
The system can bind platform projects while adding new devices. After successful submission, all devices added to the page will belong to the configured platform projects
- As shown in the following figure, select the project that needs to be bound to complete the binding between the platform and the newly added device
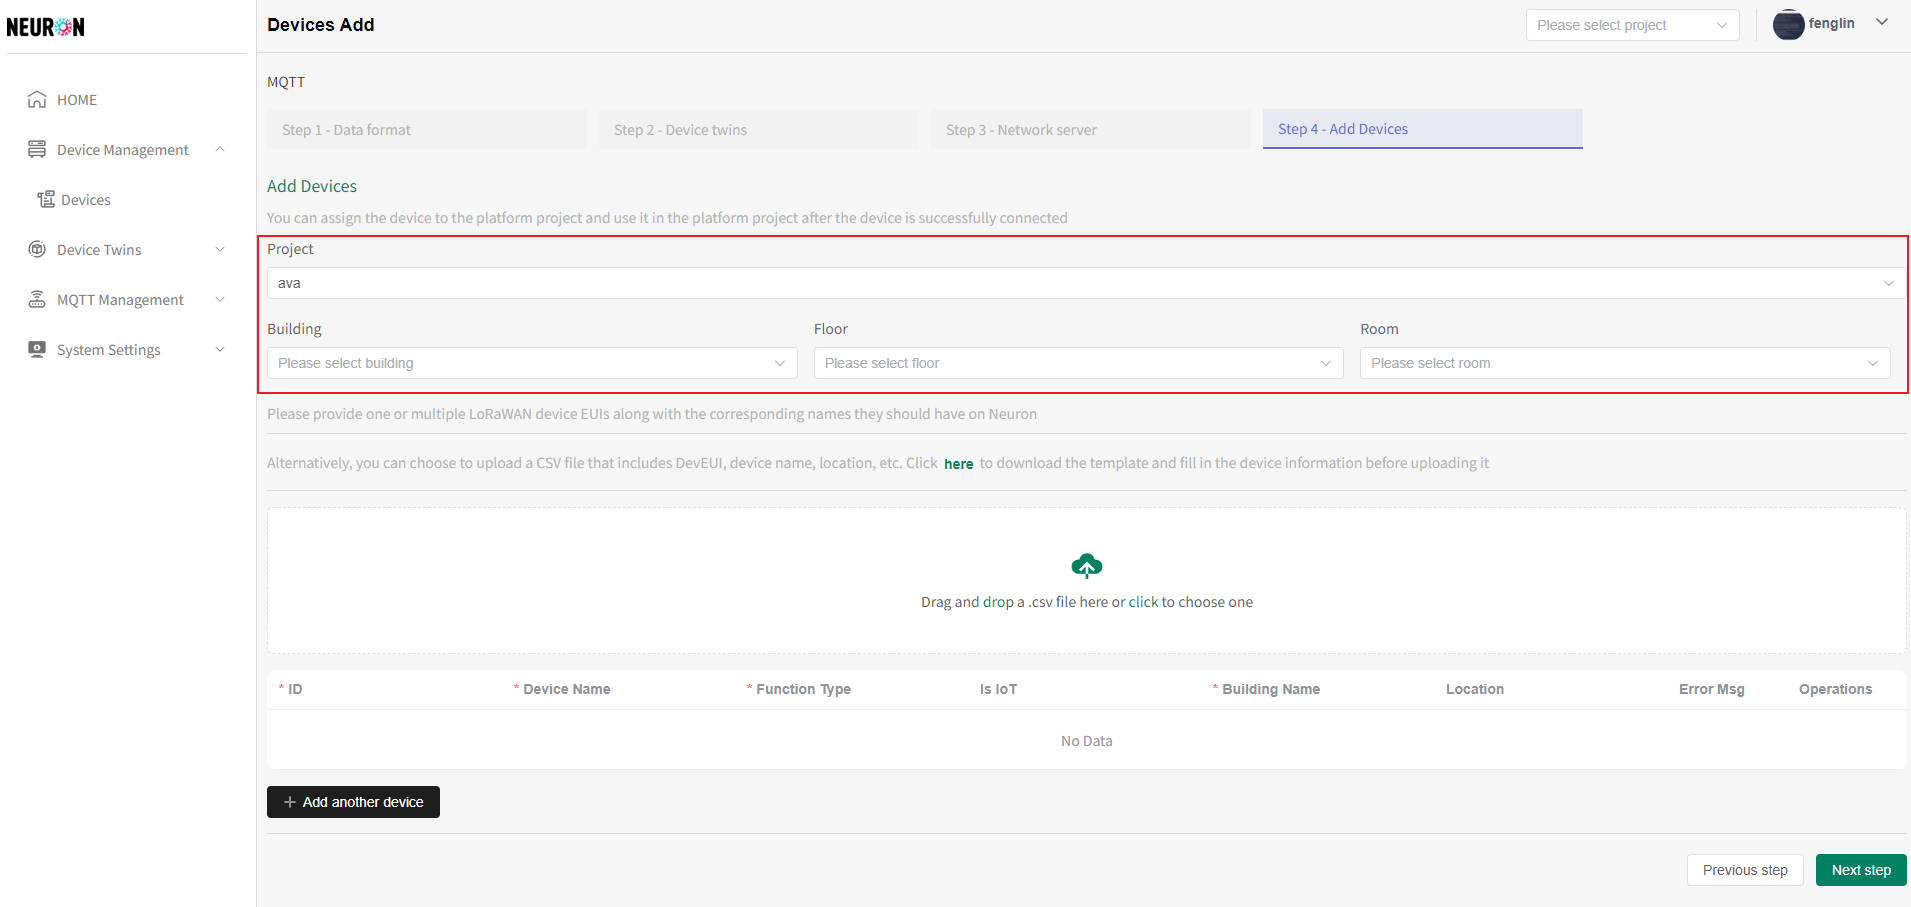
- As shown in the following figure, select the project that needs to be bound to complete the binding between the platform and the newly added device
- Add new device
-
IoT device addition submission
When submitting a device, the system will perform device information verification (such as if the device name already exists), and the abnormal device needs to be deleted before submitting
- After completing the device filling, click the submit button and a confirmation window will appear, as shown in the following figure
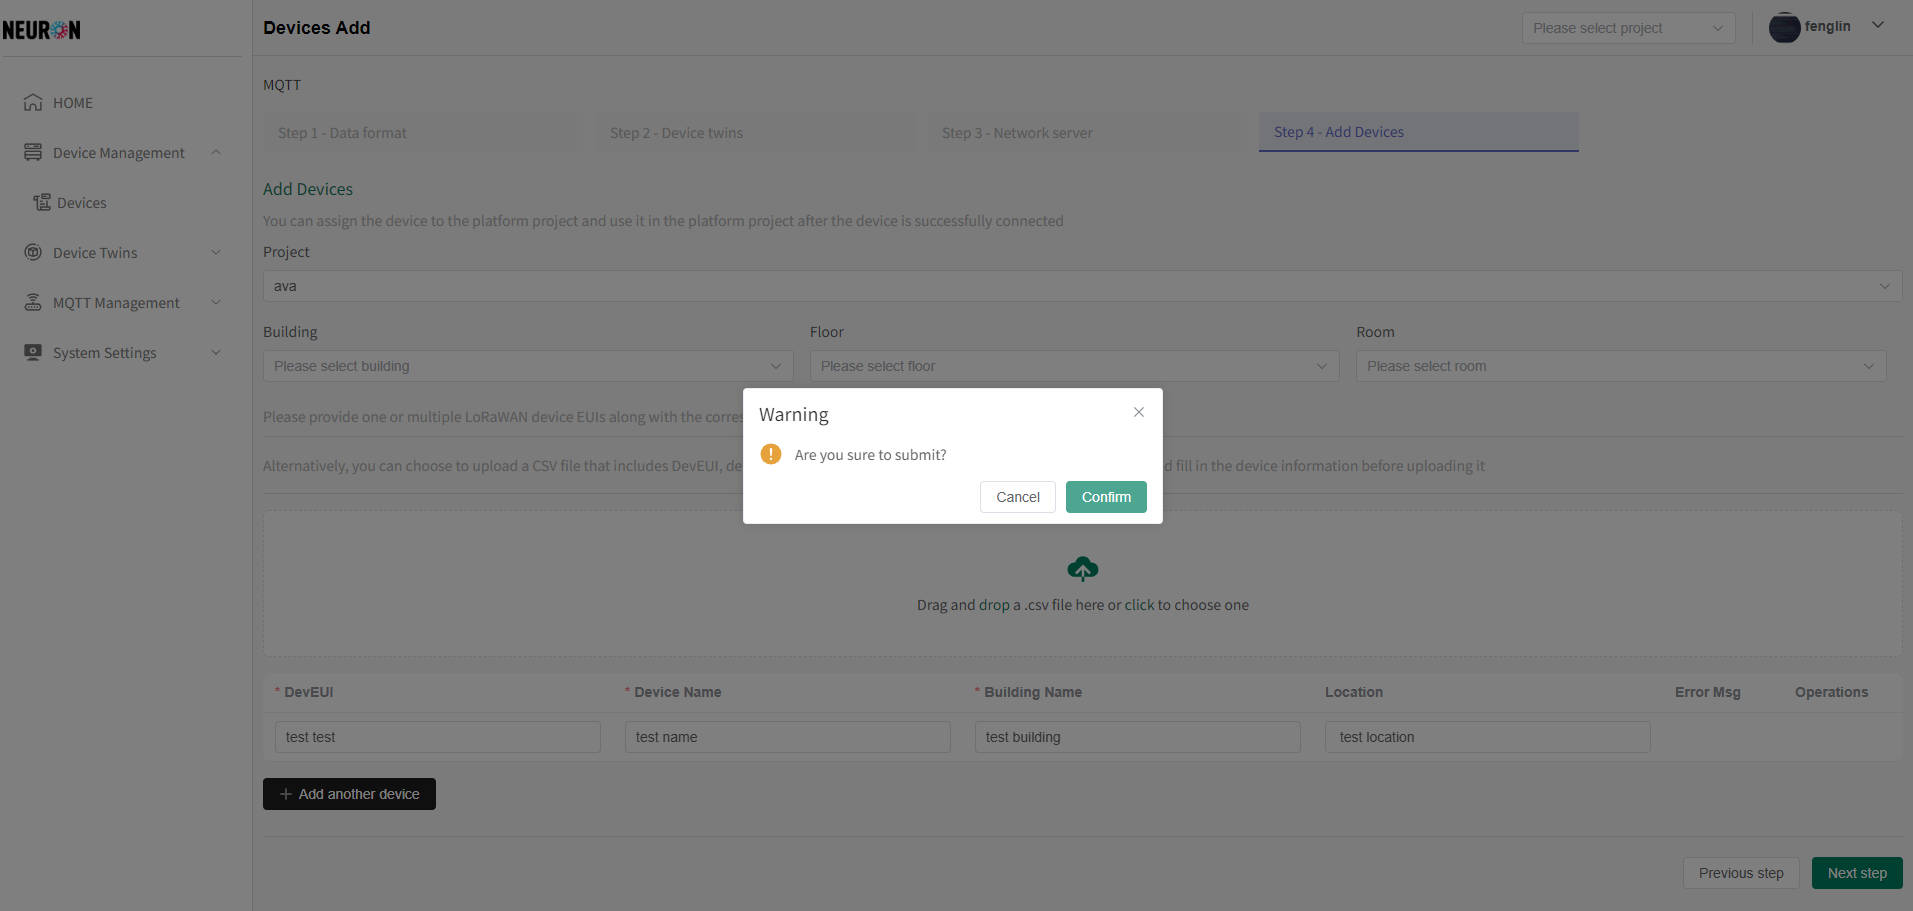
- After clicking confirm, submit device data
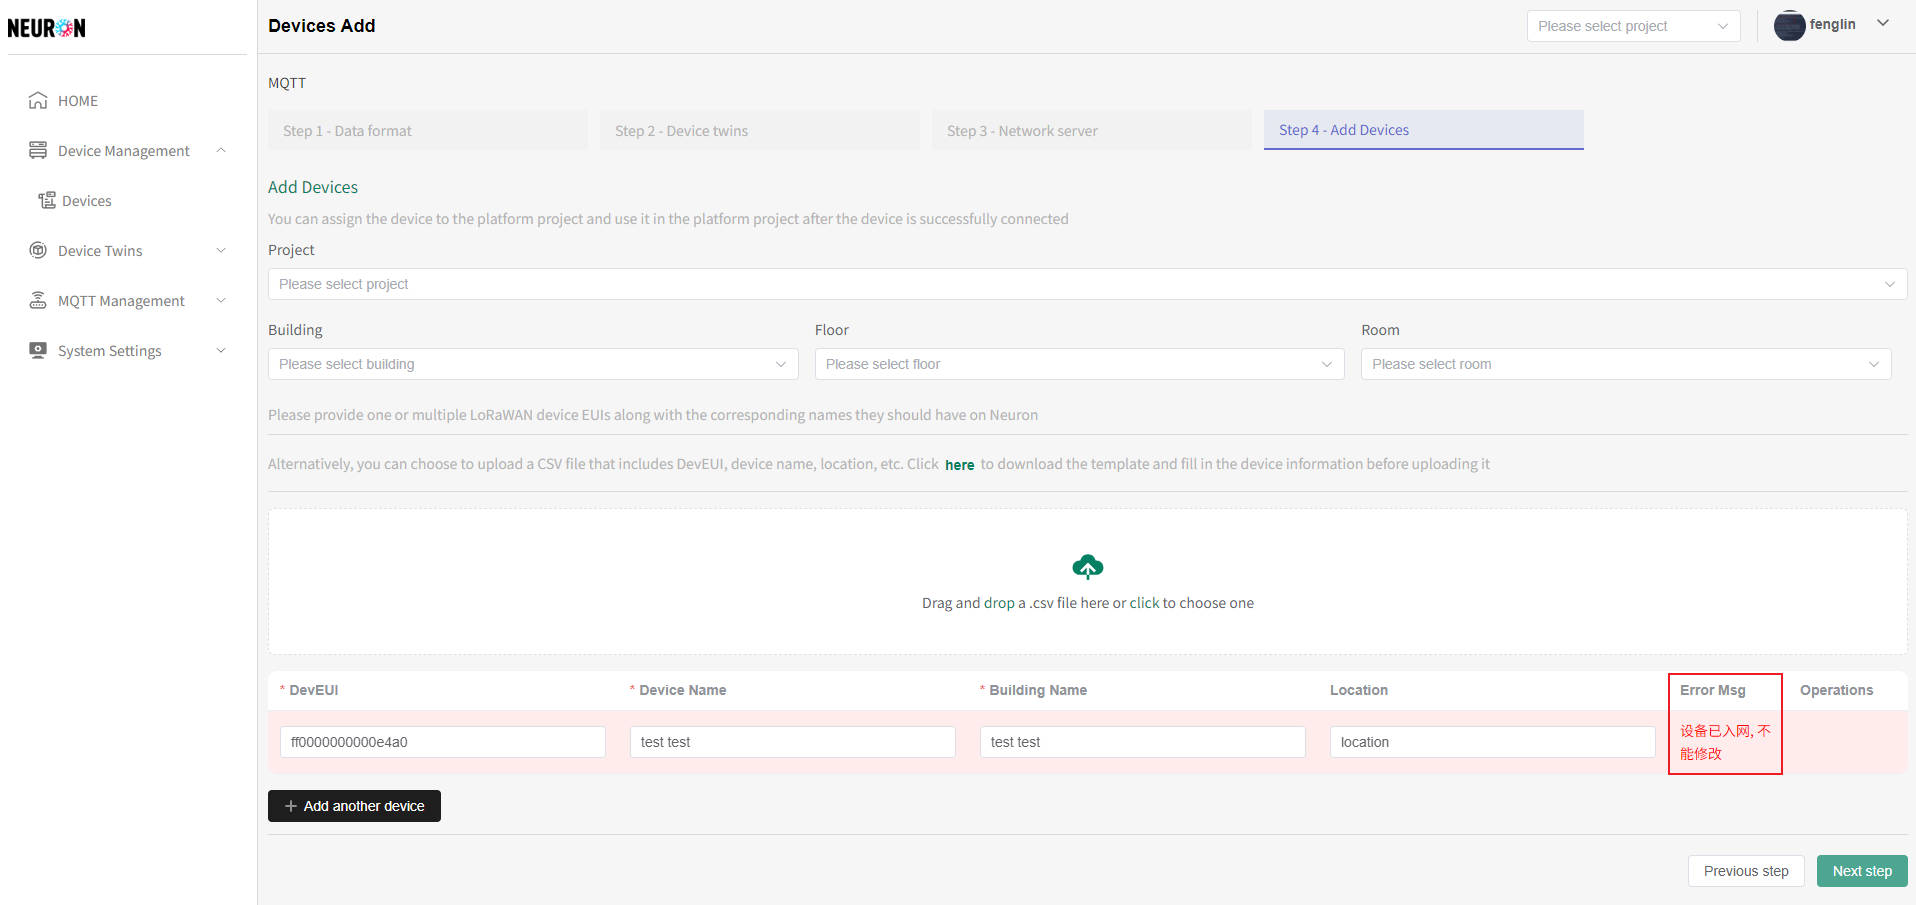
- The system prompts an error, as shown in the figure below. The background of the incorrect device is displayed in light red, and the data bar will show the reason for the error (see the red box in the figure below). After deleting or modifying the data, it can be resubmitted
- The system prompts success and will redirect to the device registration page (as shown in the red box below for newly registered device data). After subscribing to the standardized device data, the device can be successfully connected, as shown in the following figure
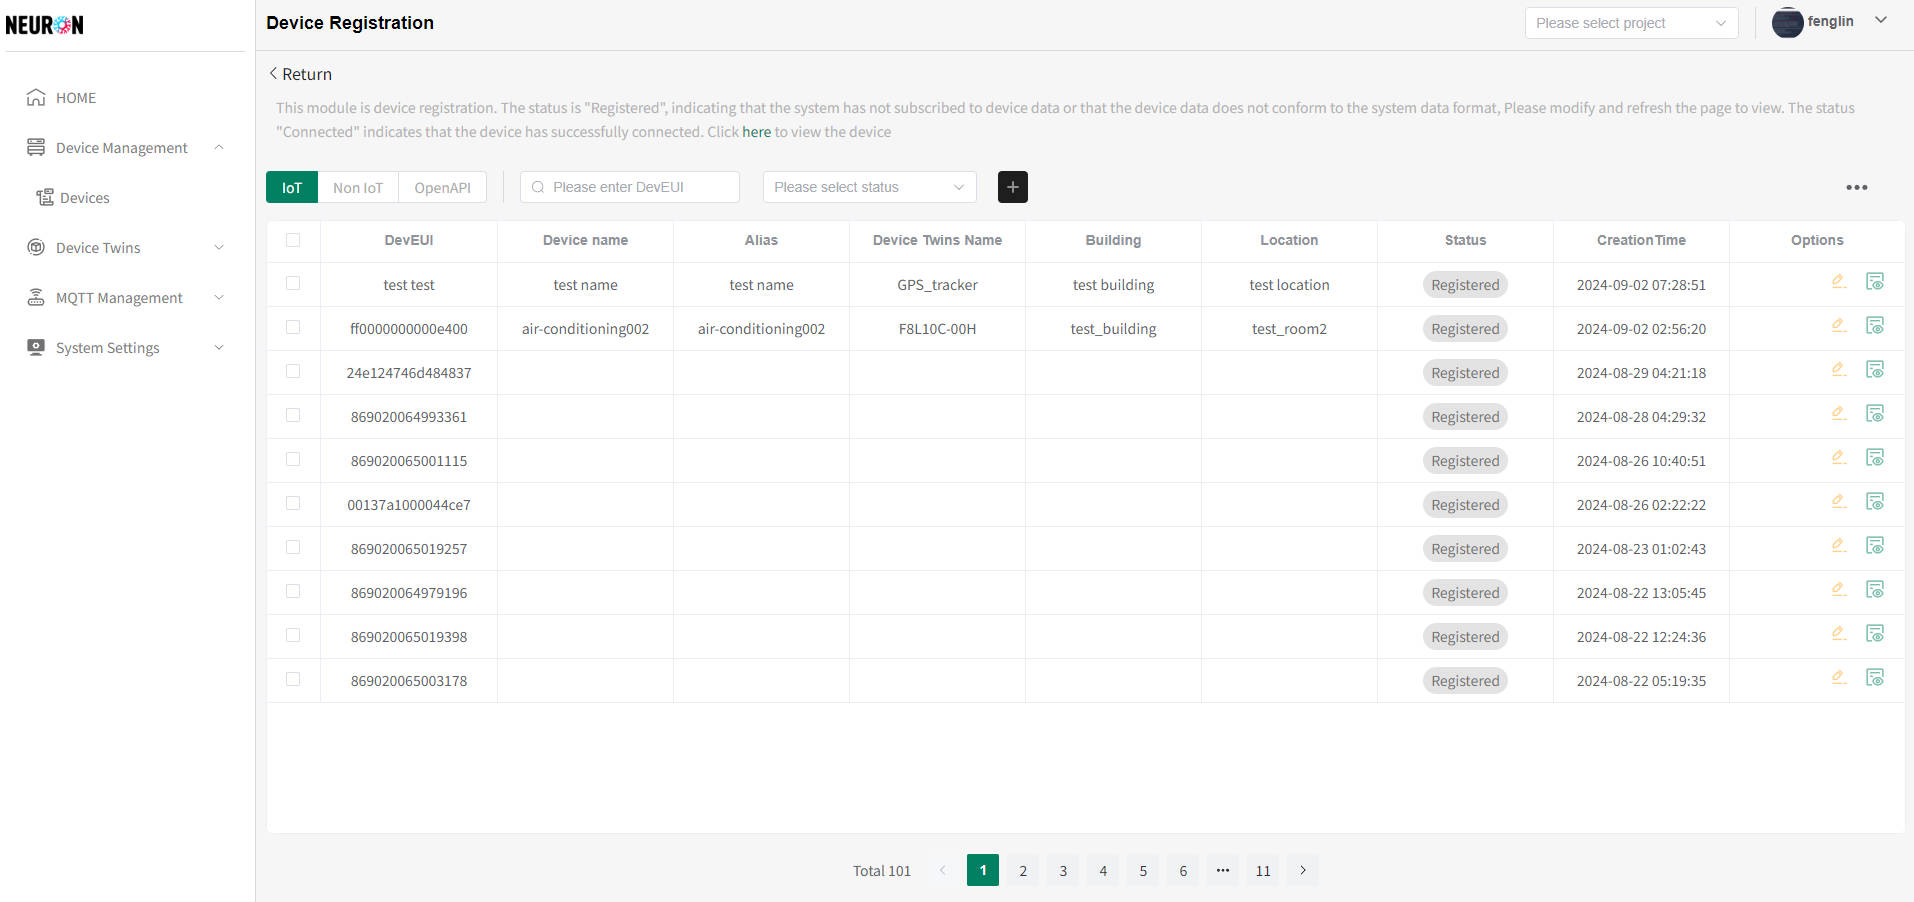 After the device is successfully connected, device management can be performed. For specific operations, please refer to the device management module Device Management
- The system prompts an error, as shown in the figure below. The background of the incorrect device is displayed in light red, and the data bar will show the reason for the error (see the red box in the figure below). After deleting or modifying the data, it can be resubmitted
- After completing the device filling, click the submit button and a confirmation window will appear, as shown in the following figure
-
New submission for non IoT devices
When submitting a device, the system will perform device information verification (such as if the device name already exists), and the abnormal device needs to be deleted before submitting
- After completing the device filling, click the submit button and a confirmation window will appear, as shown in the following figure
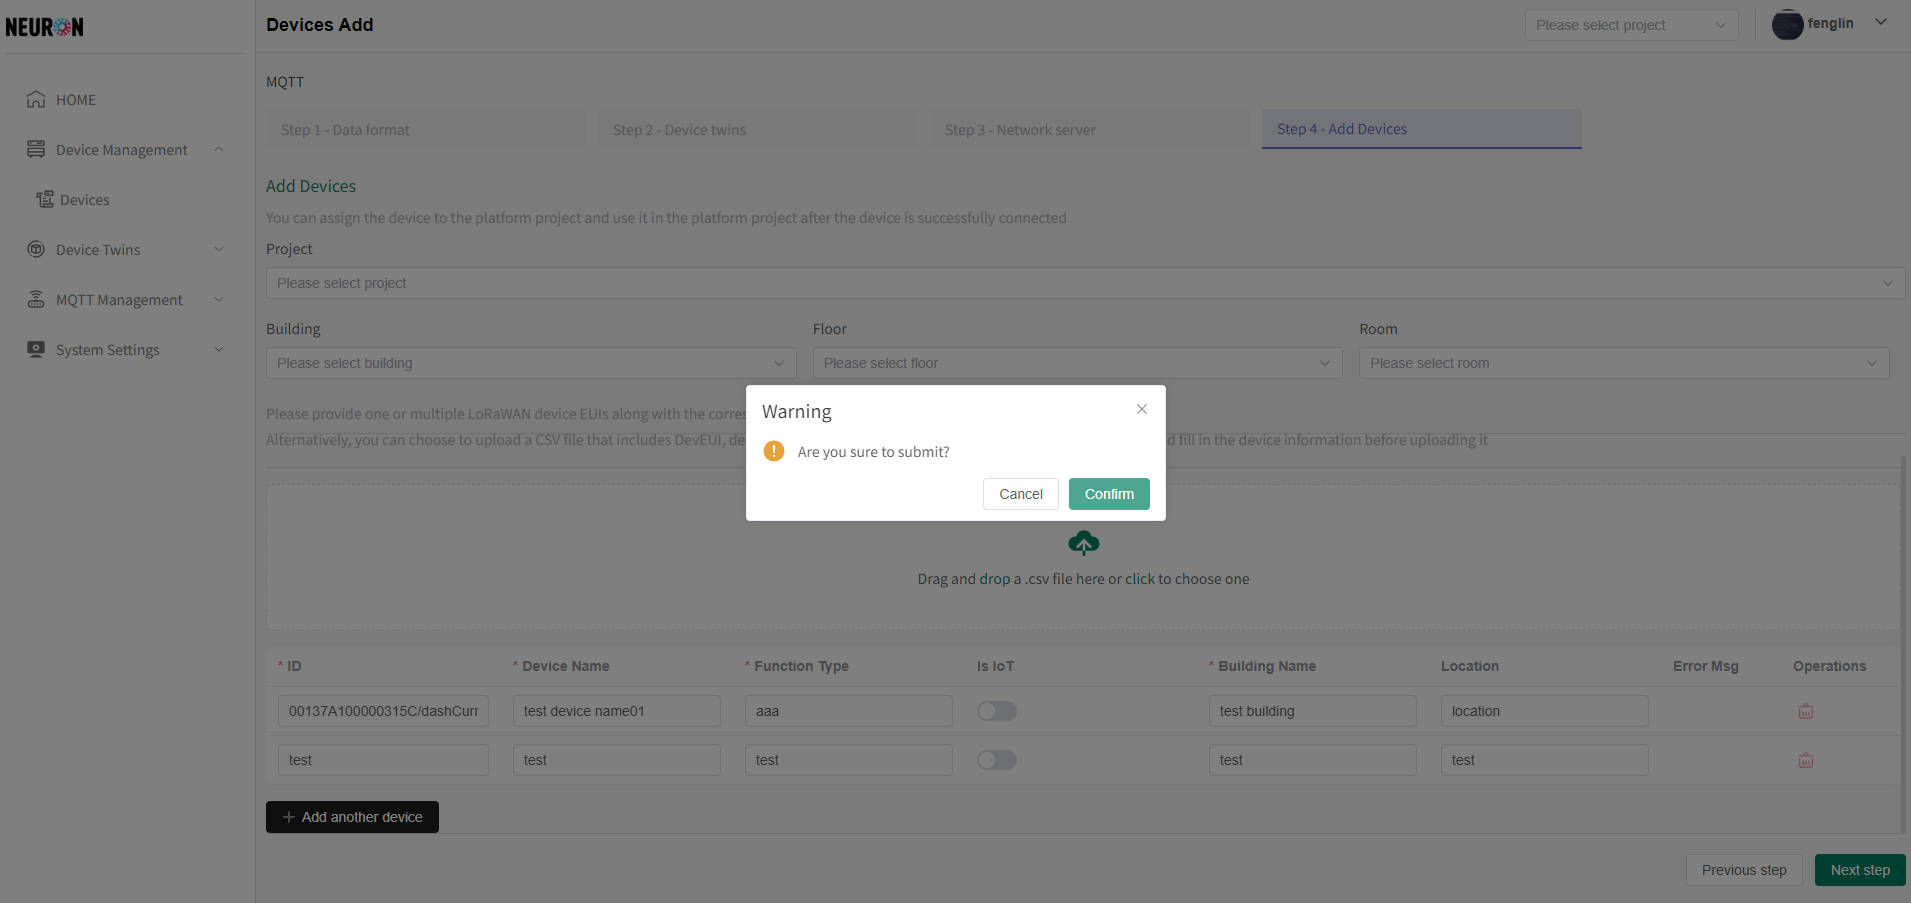
- After clicking confirm, submit device data
- The system prompts success and will redirect to the device registration page (as shown in the red box below for newly registered device data). After subscribing to the standardized device data, the device can be successfully connected, as shown in the following figure
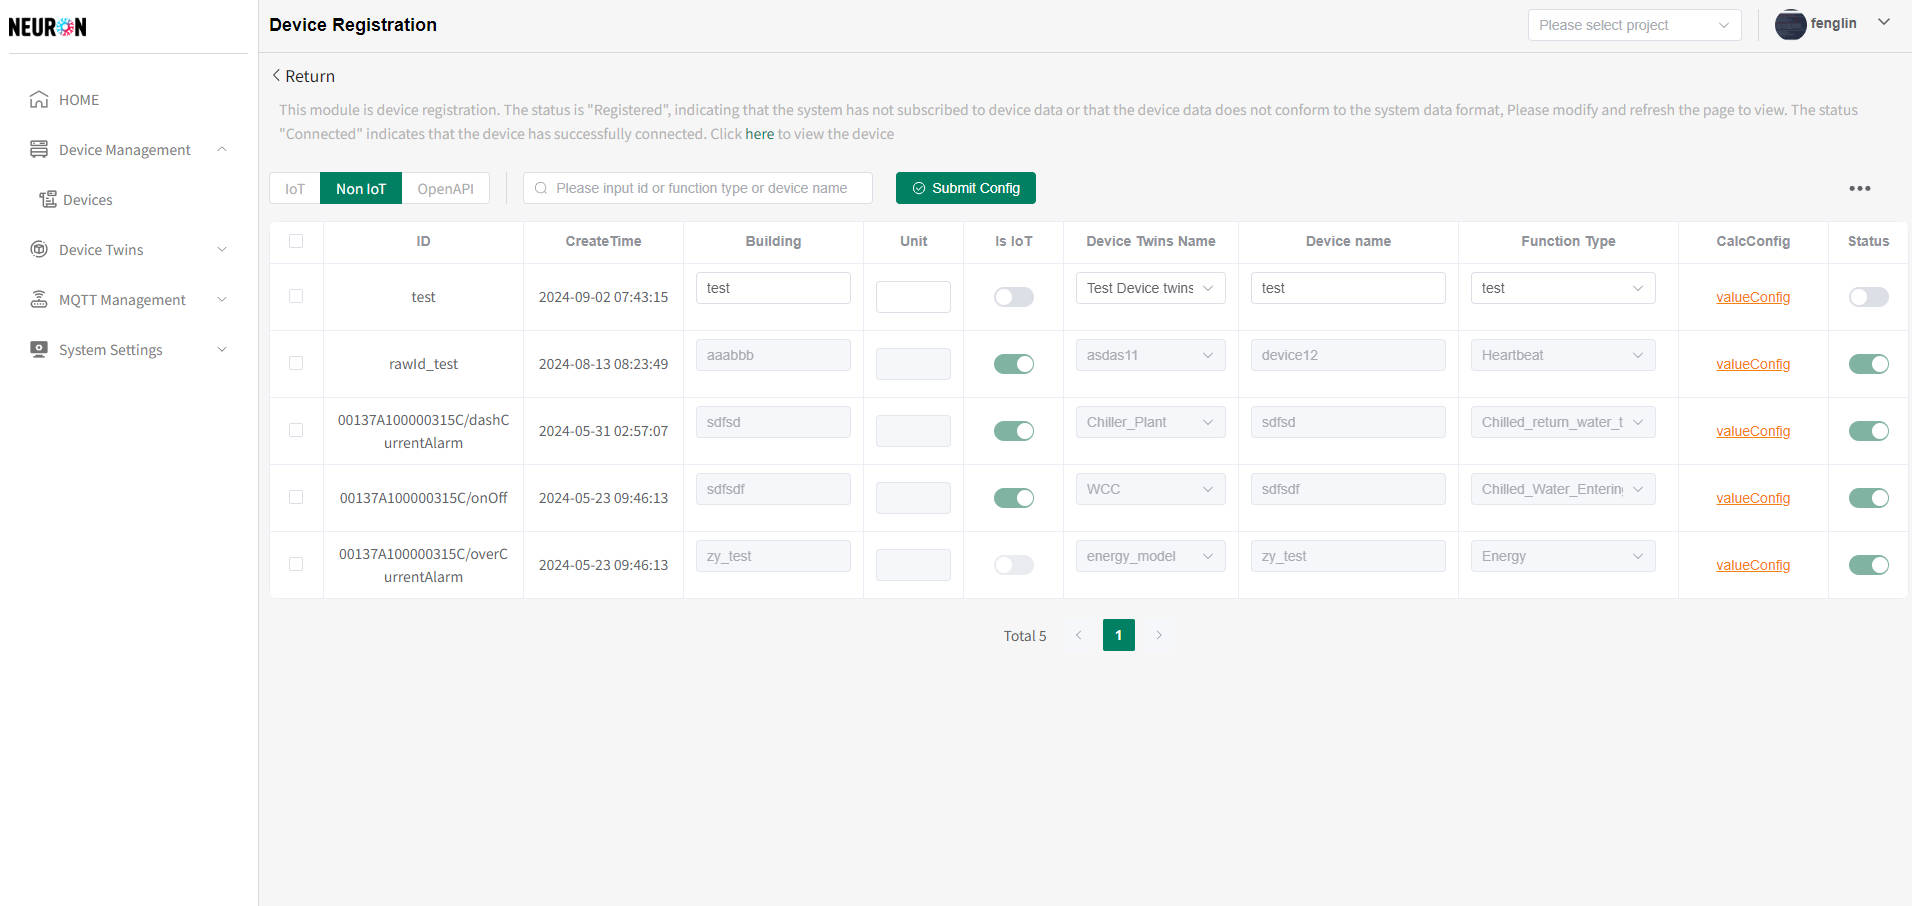 After the device is successfully connected, device management can be performed. For specific operations, please refer to the device management module Device Management
- The system prompts success and will redirect to the device registration page (as shown in the red box below for newly registered device data). After subscribing to the standardized device data, the device can be successfully connected, as shown in the following figure
- After completing the device filling, click the submit button and a confirmation window will appear, as shown in the following figure
API device access
The API can connect to all types of devices, and the specific operation process is as follows
-
In the device management module[Operation details can be found in Device Management], click the "Add" button to enter the device addition process, as shown in the following figure

-
In the device access interface, select API and click Next to perform API device access, as shown in the following figure

-
The API access is divided into three steps[applying for tokens, configuring device twins, and device registration]
Apply for Token
To use API to push device data, a token needs to be applied for in the system. According to the algorithm provided in the demo, the API interface is called to complete device access. The system can select existing tokens or create new ones. The system defaults to selecting existing tokens
-
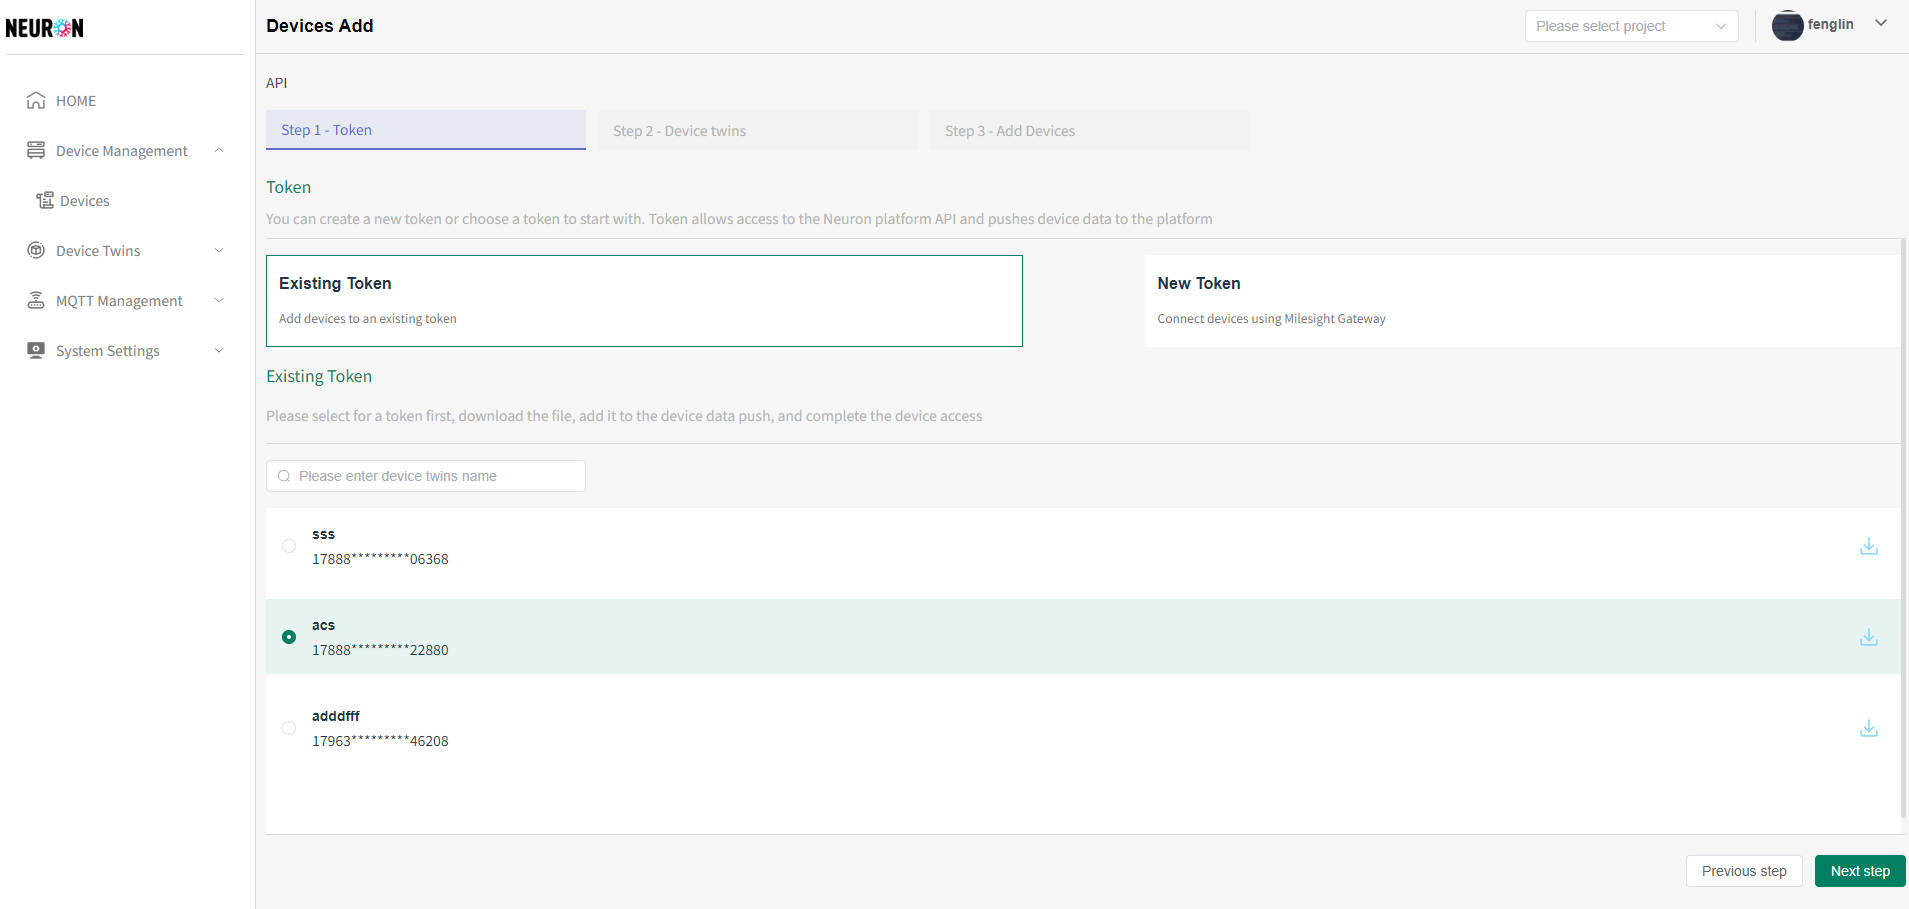
Select an existing token
The token list supports fuzzy name search, and the text corresponding to the token can be downloaded on the right side
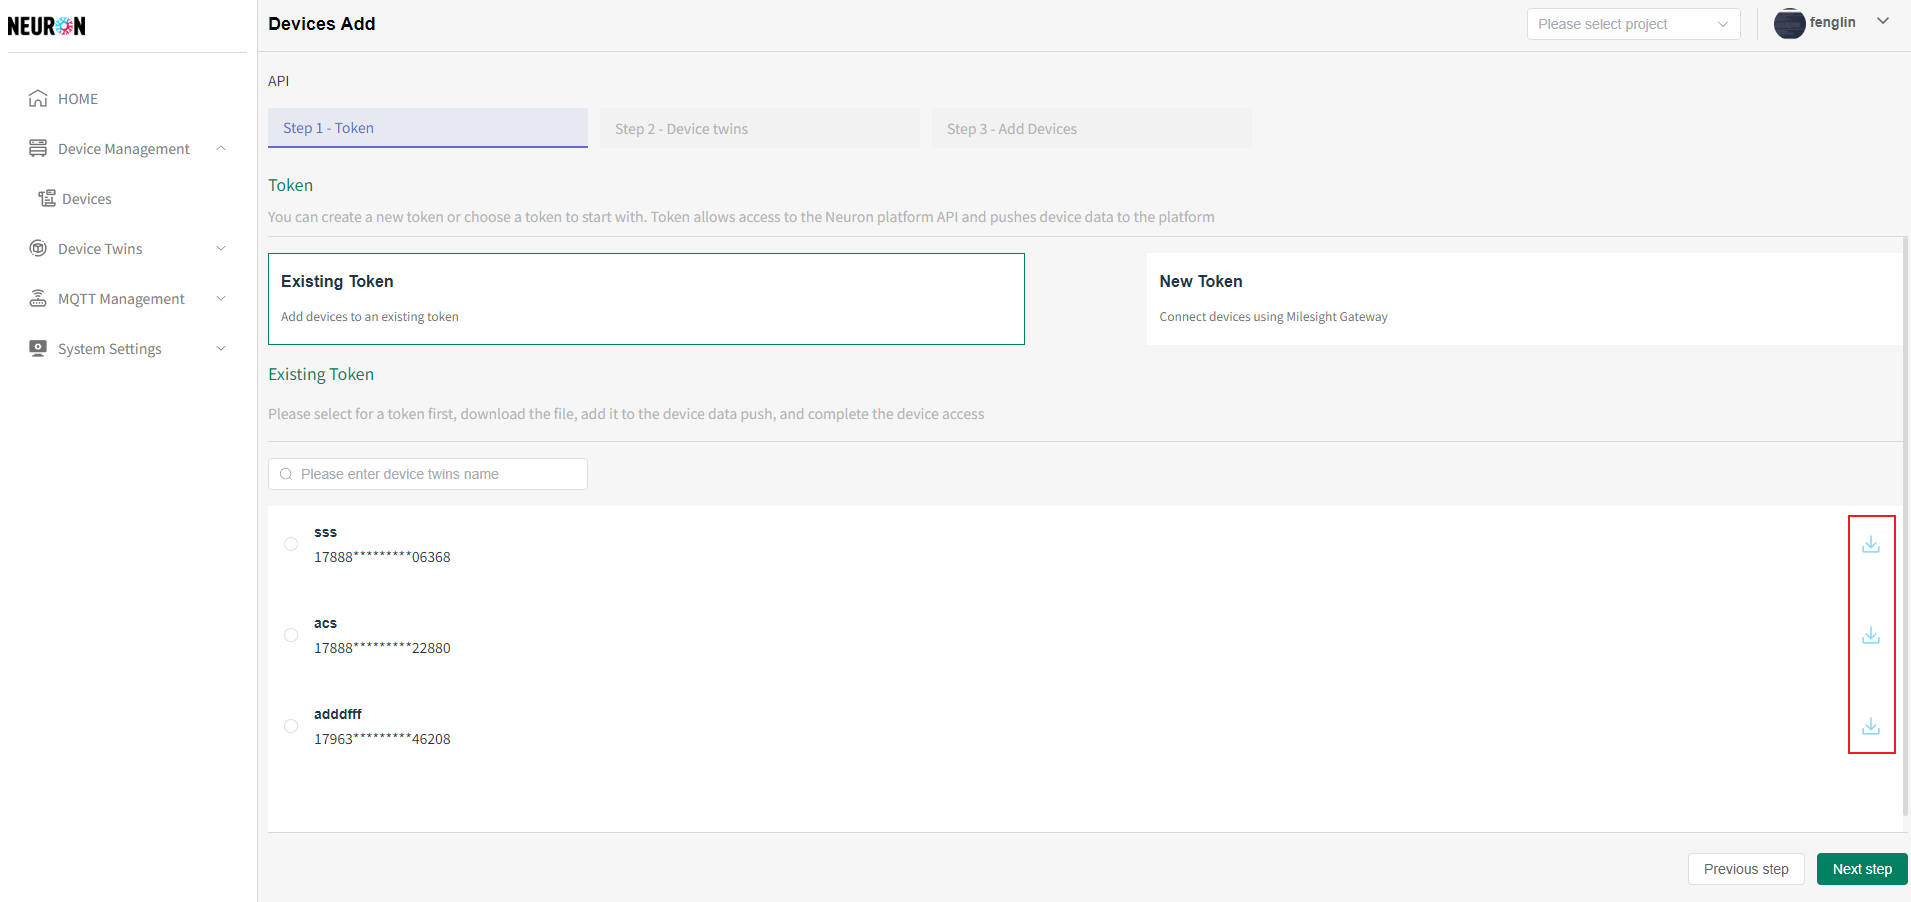 Select the required token and click Next to configure the device twins, as shown in the following figure
-
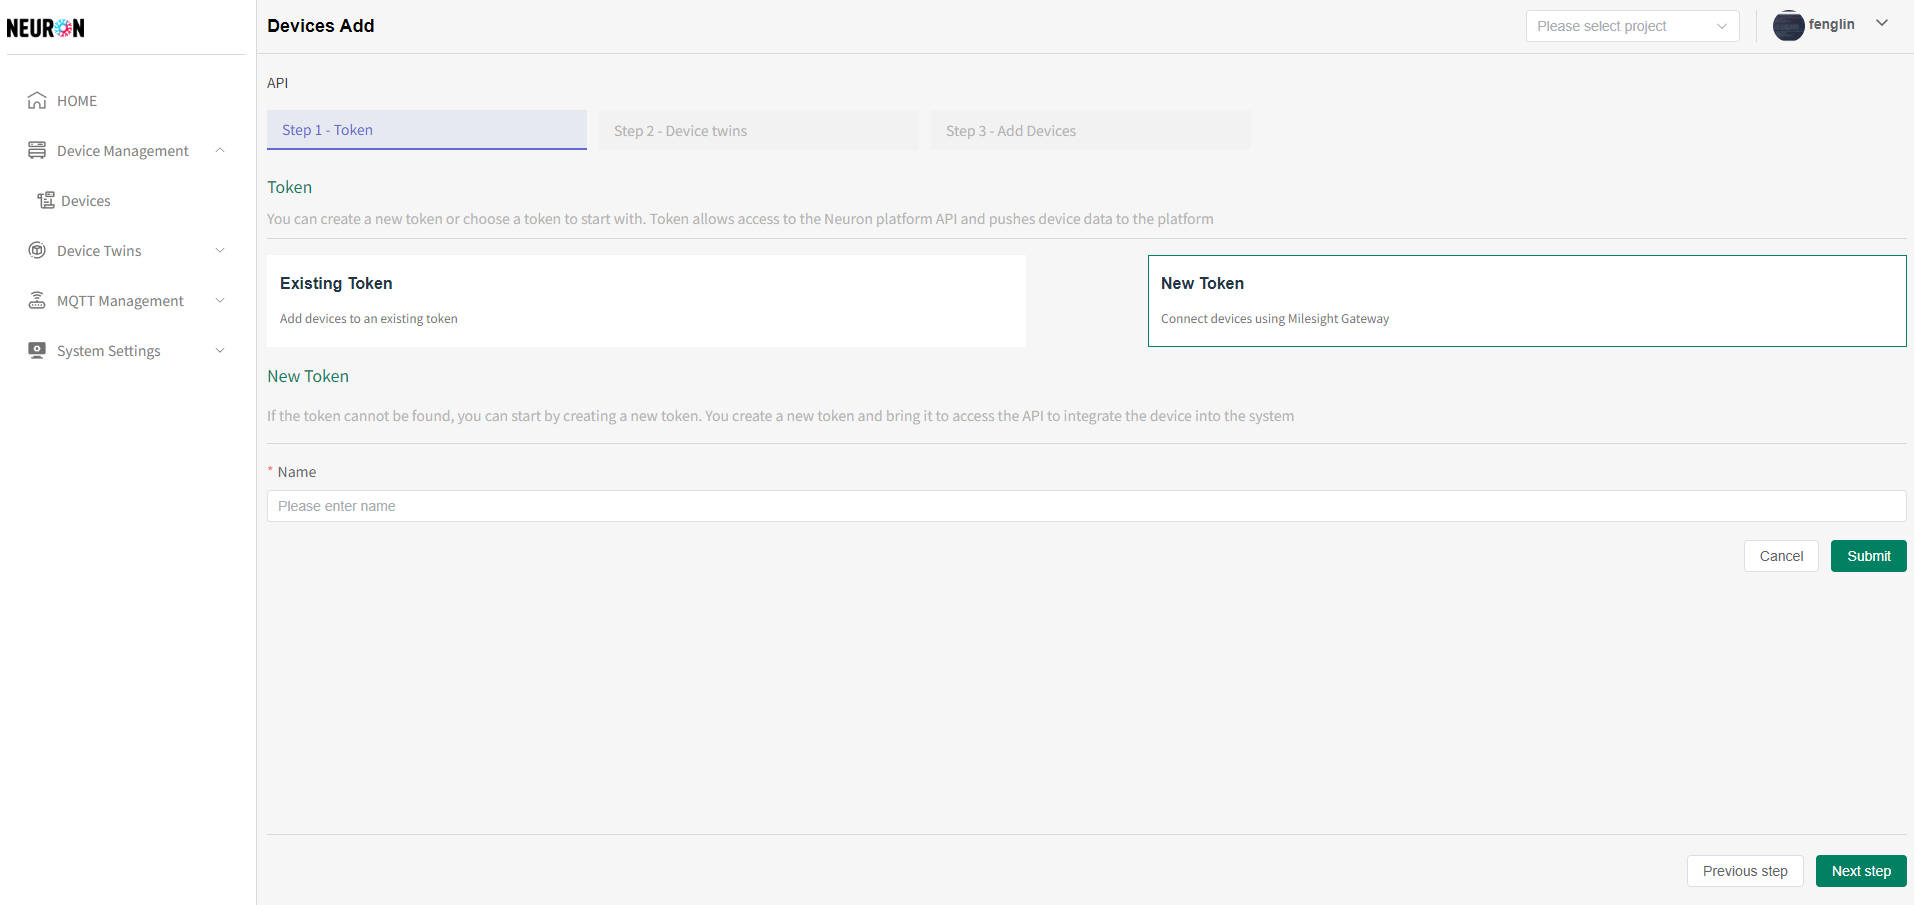
Add Token
Token names cannot be duplicated. When submitting information, the system will verify the uniqueness of the name. If the name is duplicated, the addition will not be successful
- The default interface for API tokens, click on add token, as shown in the following figure
- After completing the information input, click the "Submit" button. Once successful, proceed with the physical model configuration as shown in the following figure
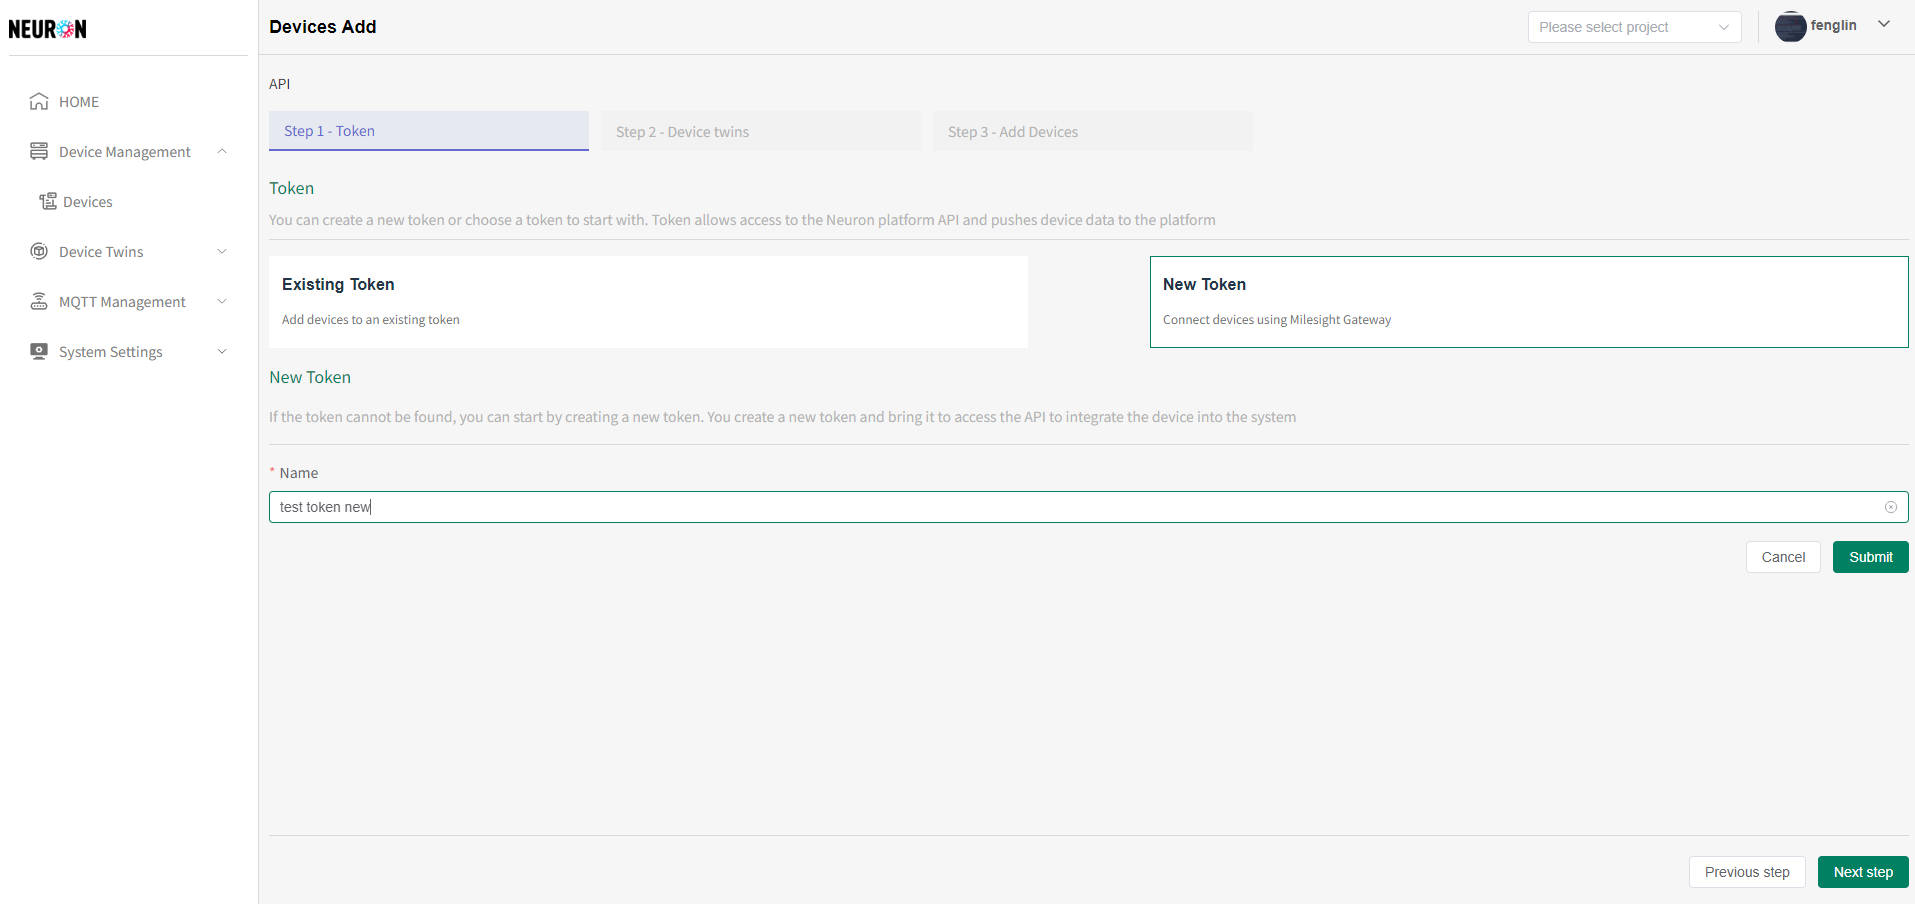
- The default interface for API tokens, click on add token, as shown in the following figure
Configuration device twins
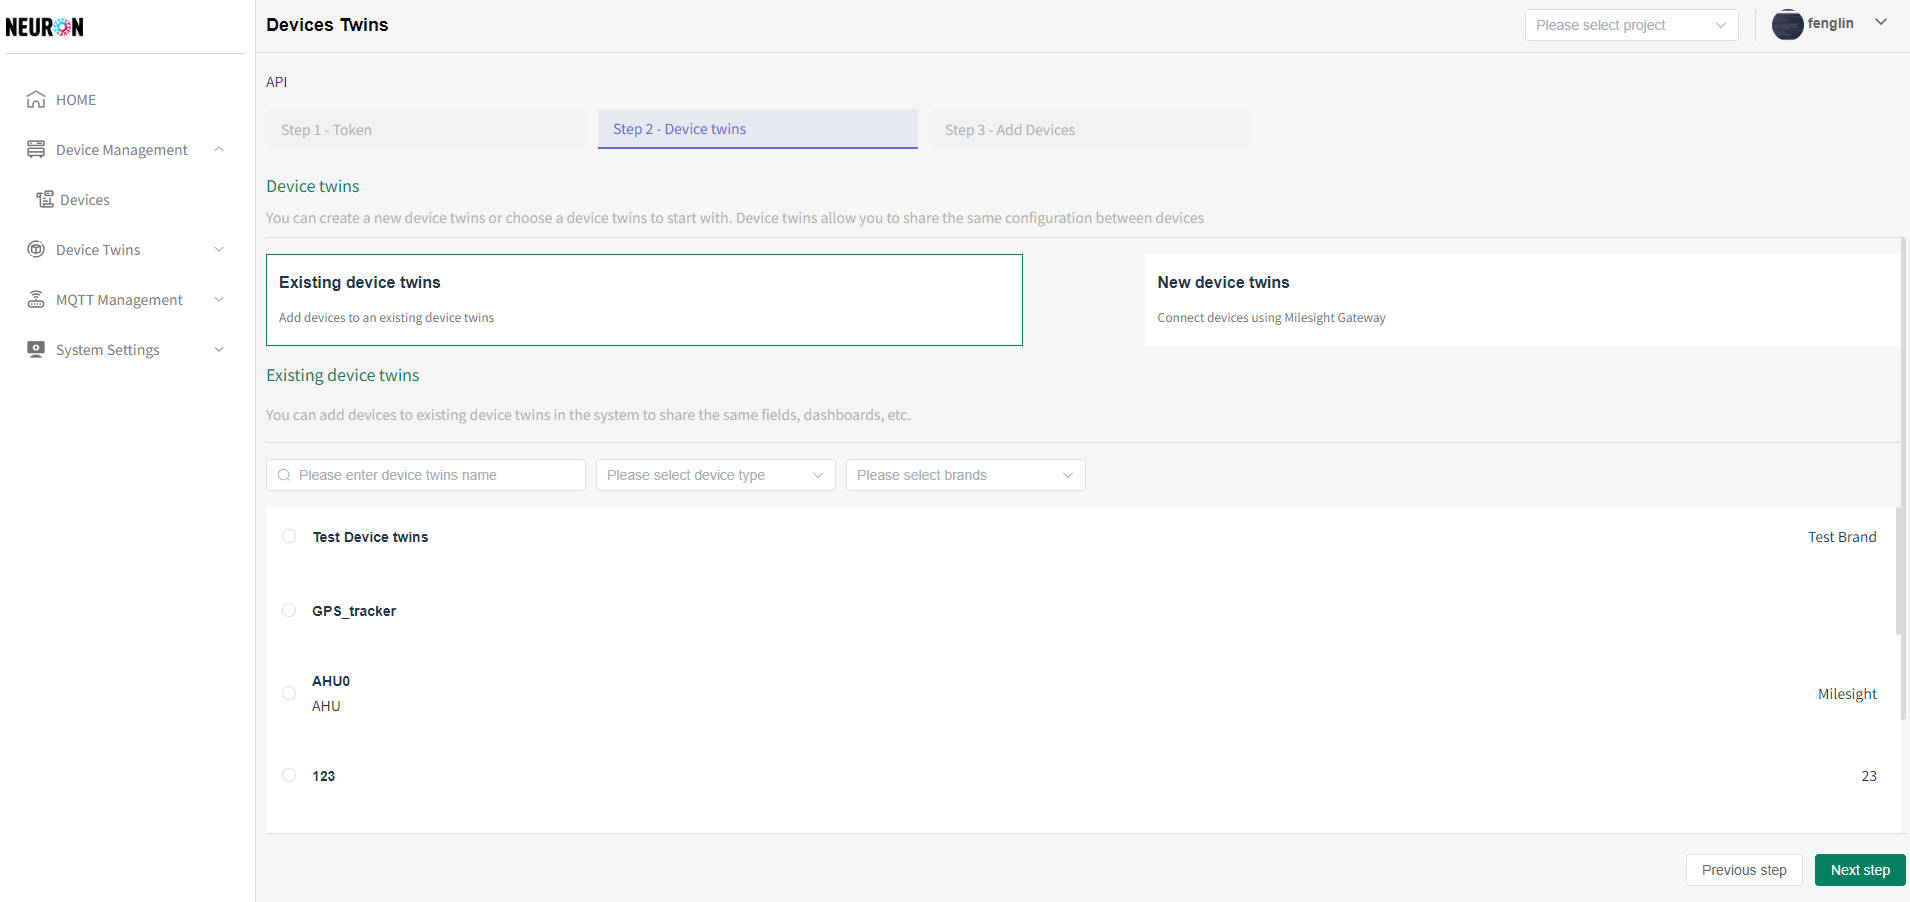
The system can select existing device twinss or create new ones by itself. The system defaults to selecting existing device twinss
-
Select an existing device twins
- Click on the desired device twins, then click Next to register the device, as shown in the following figure
The system supports fuzzy matching of names and precise matching of types and brands for searching device twins data
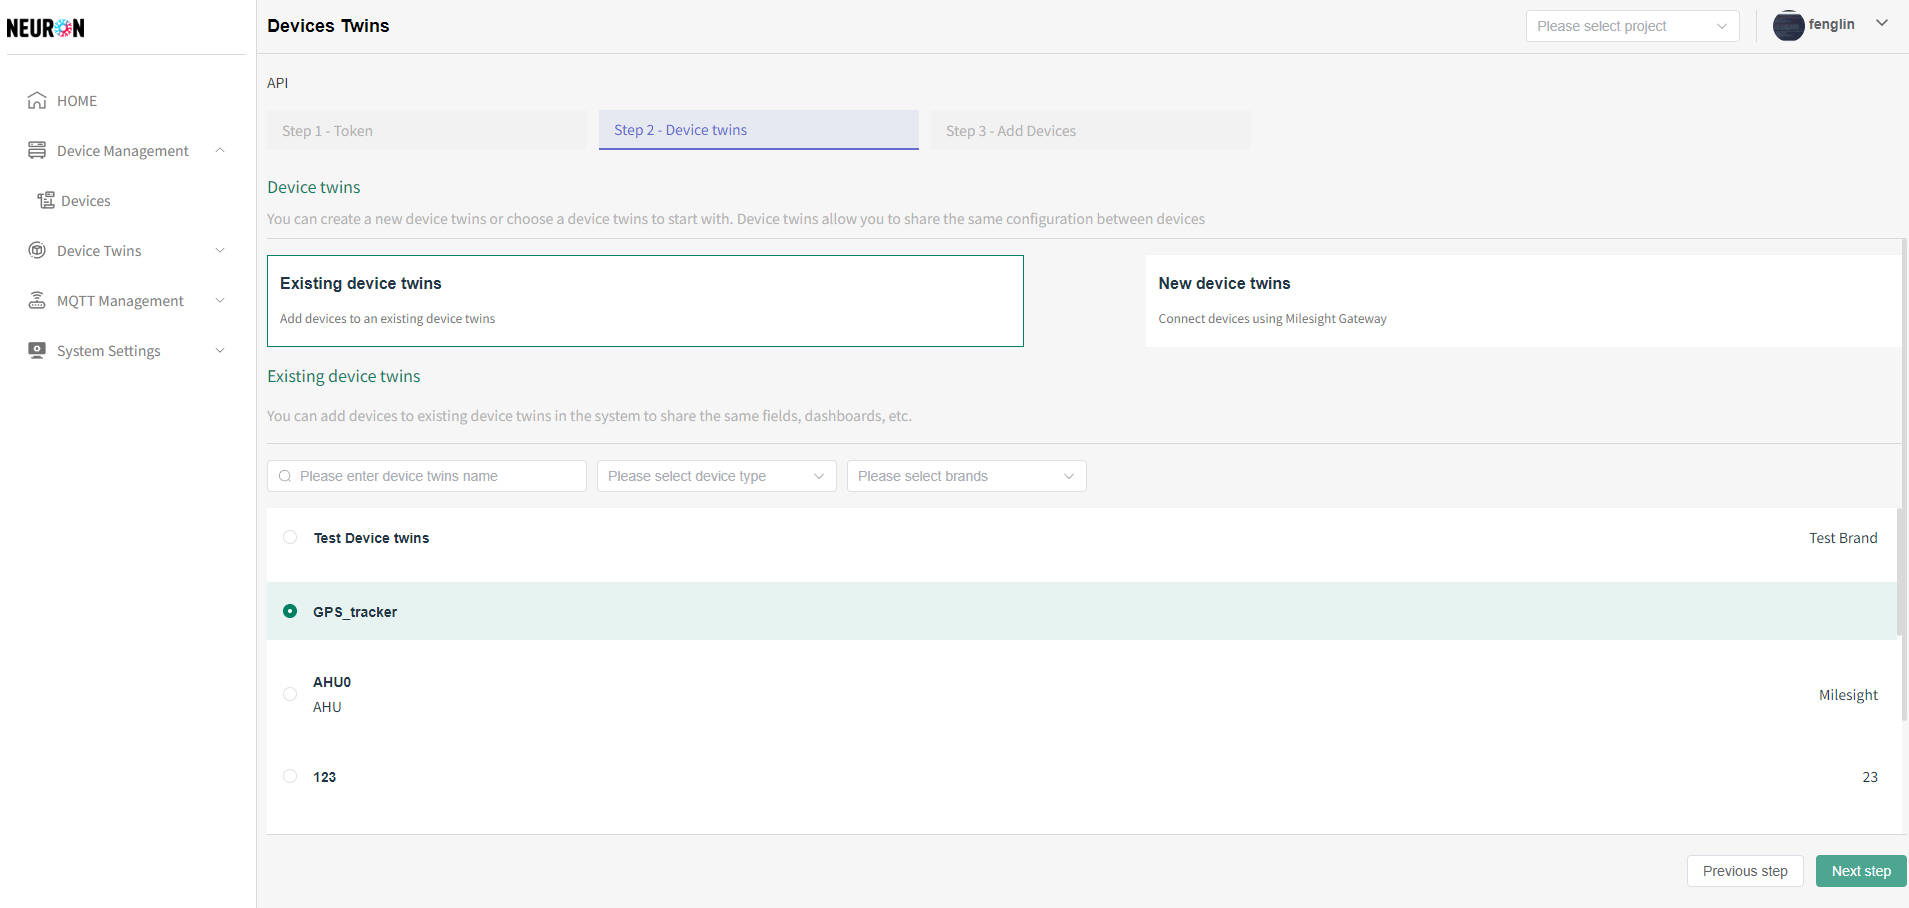
-
New device twins
The name of the device twins cannot be duplicated. When submitting information, the system will verify the uniqueness of the name. If the name is duplicated, the addition will not be successful
- Default API device twins interface, click on add device twins, as shown below
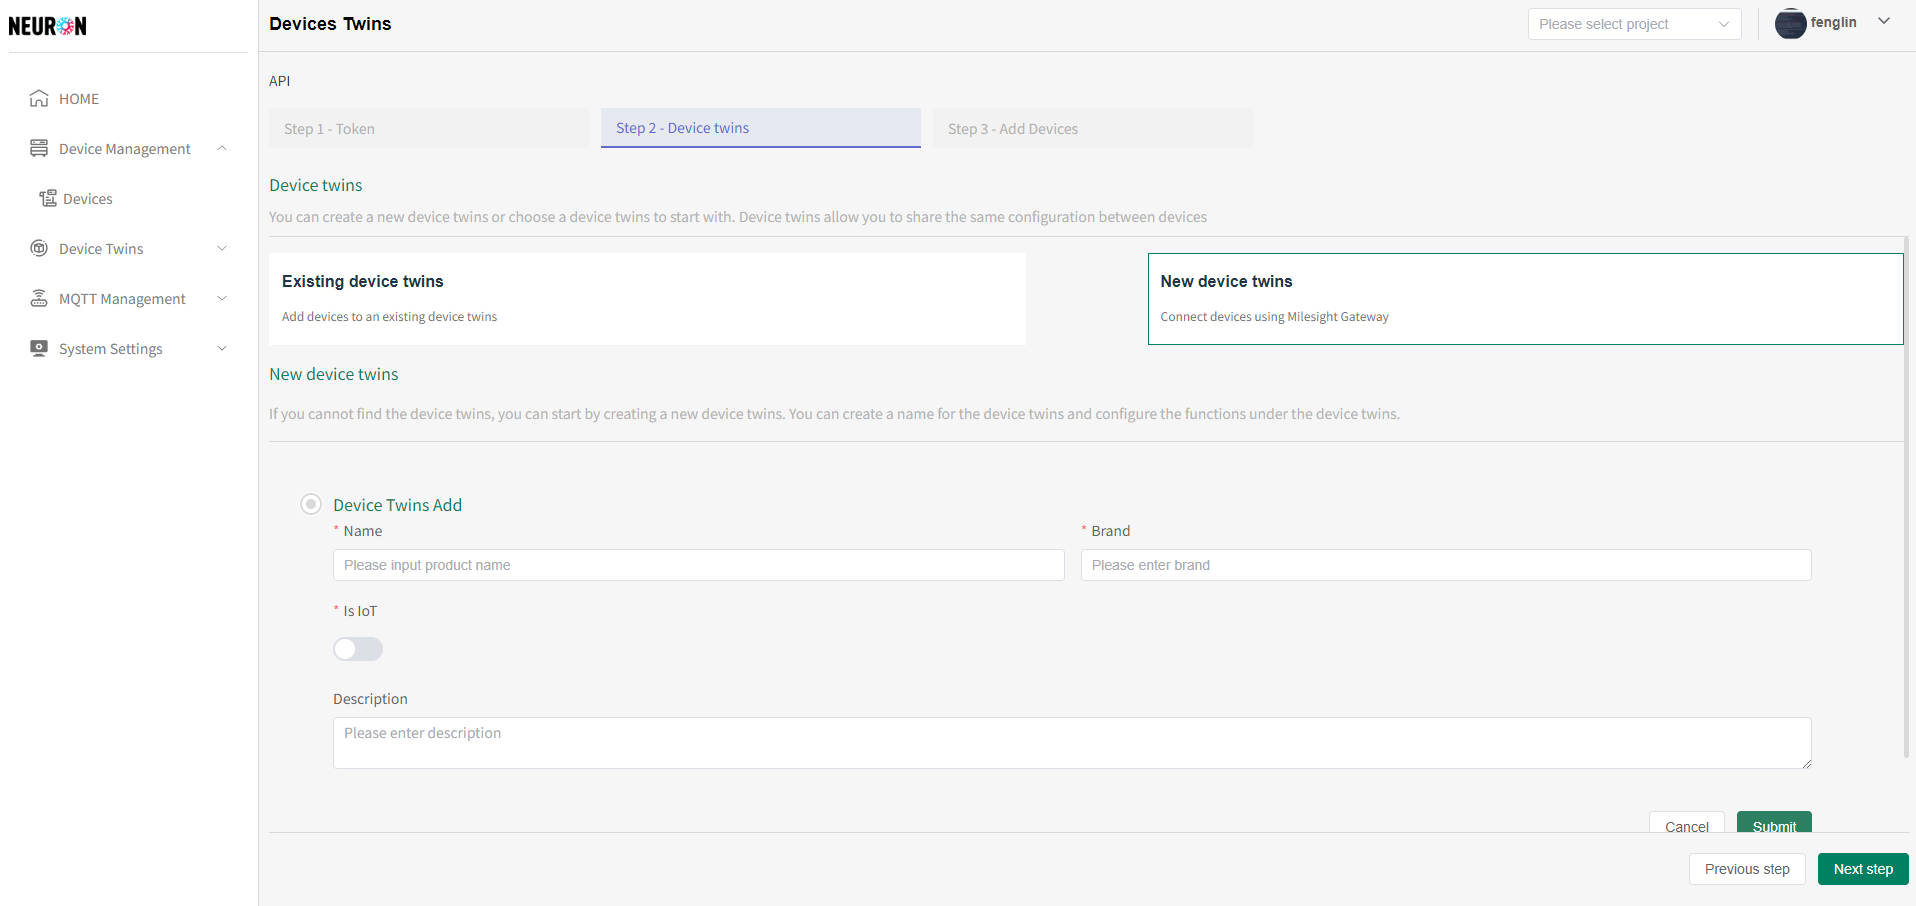
- After completing the information input, click the "Submit" button, as shown in the following figure
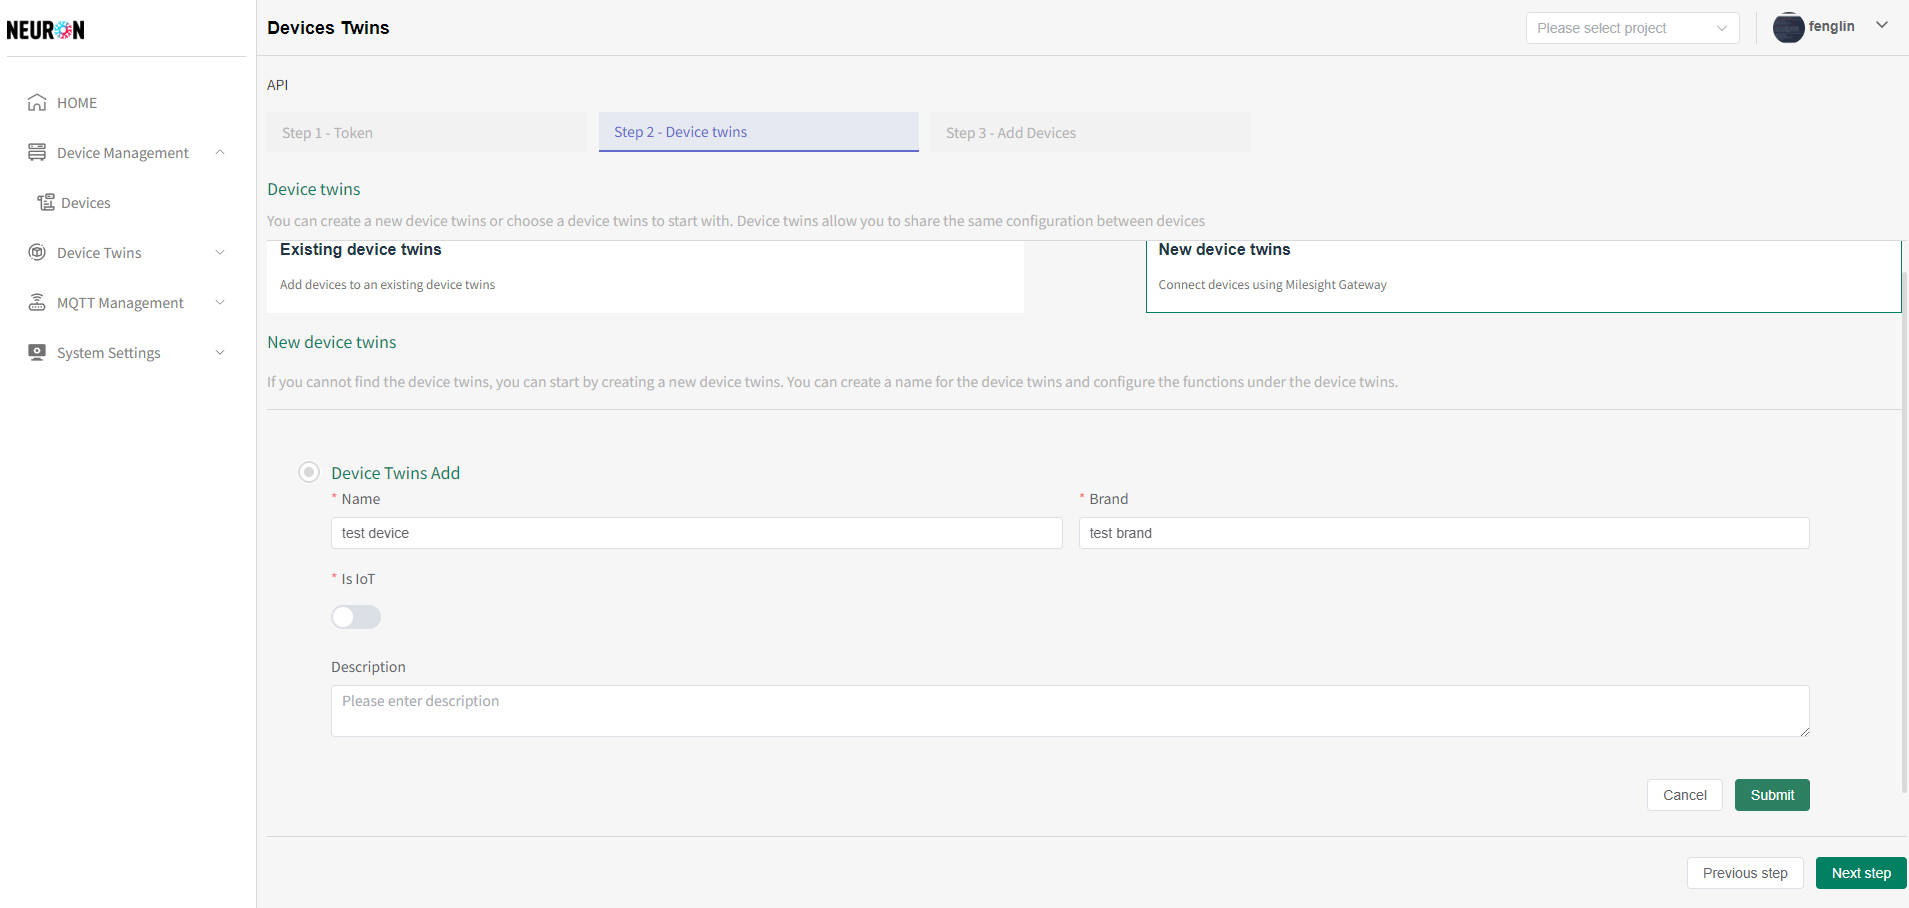
- After configuring the device twins name, the function points under the device twins can be configured, as shown in the following figure
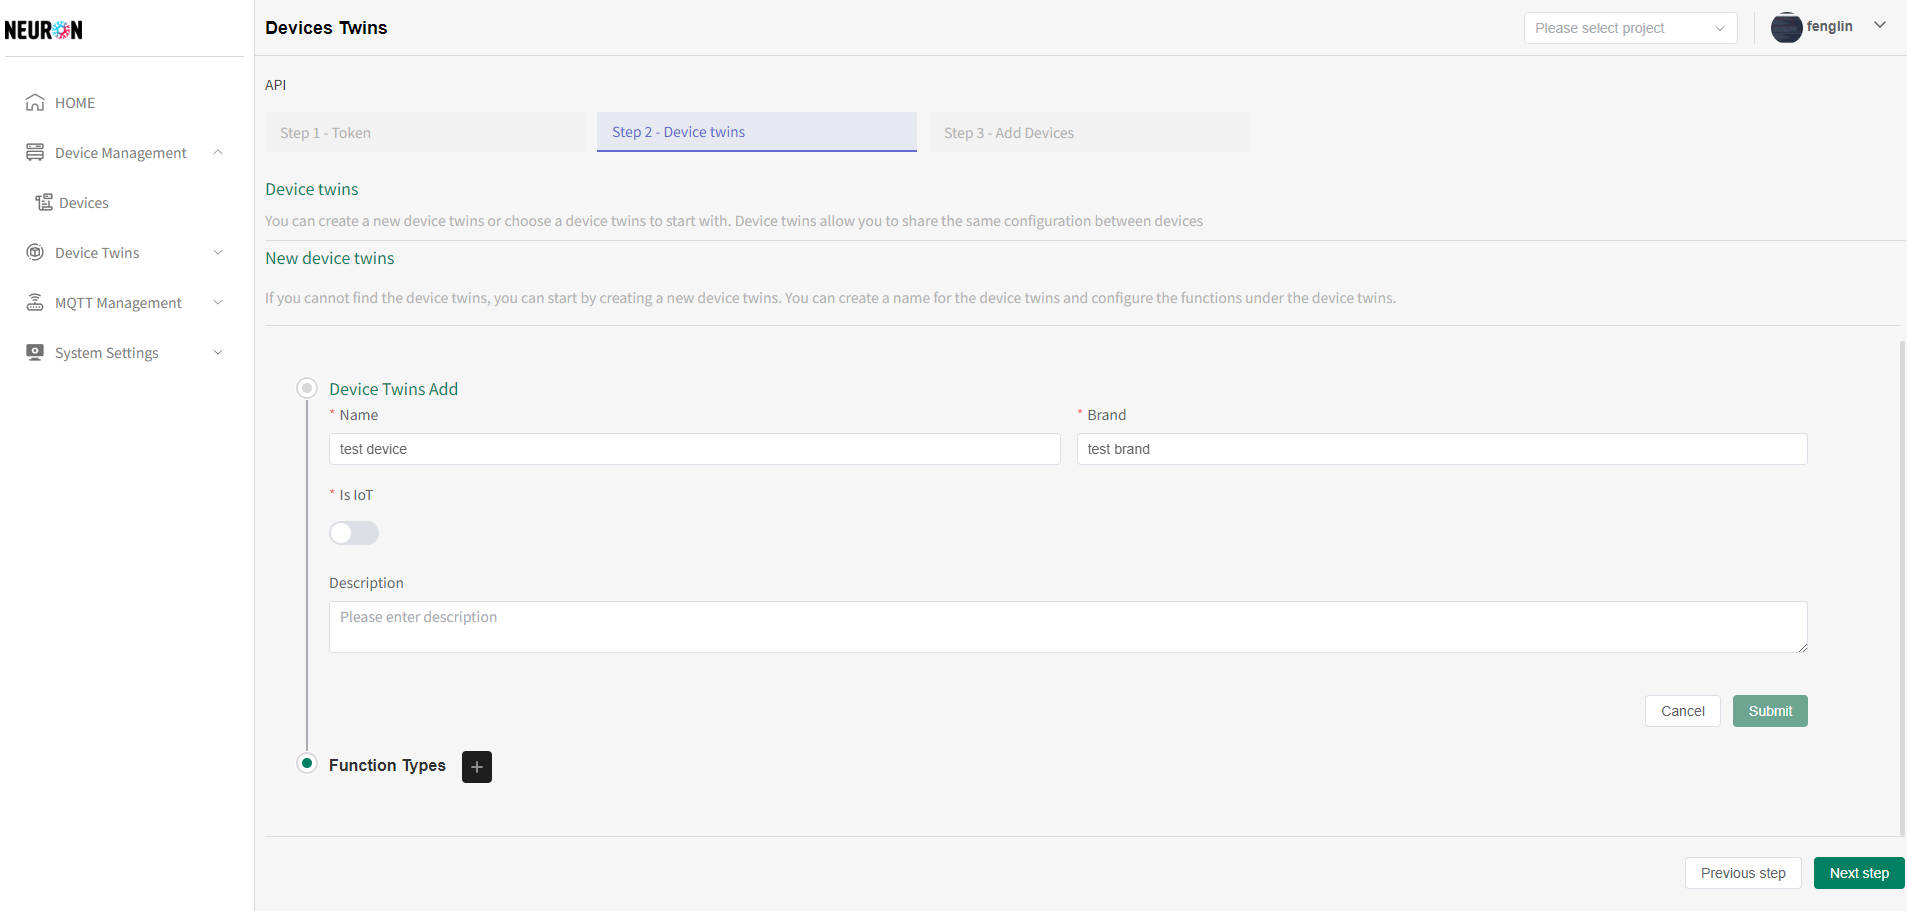
- Click the "plus" button next to the Function type in the new module of the device twins to add function points under the device twins, as shown in the following figure
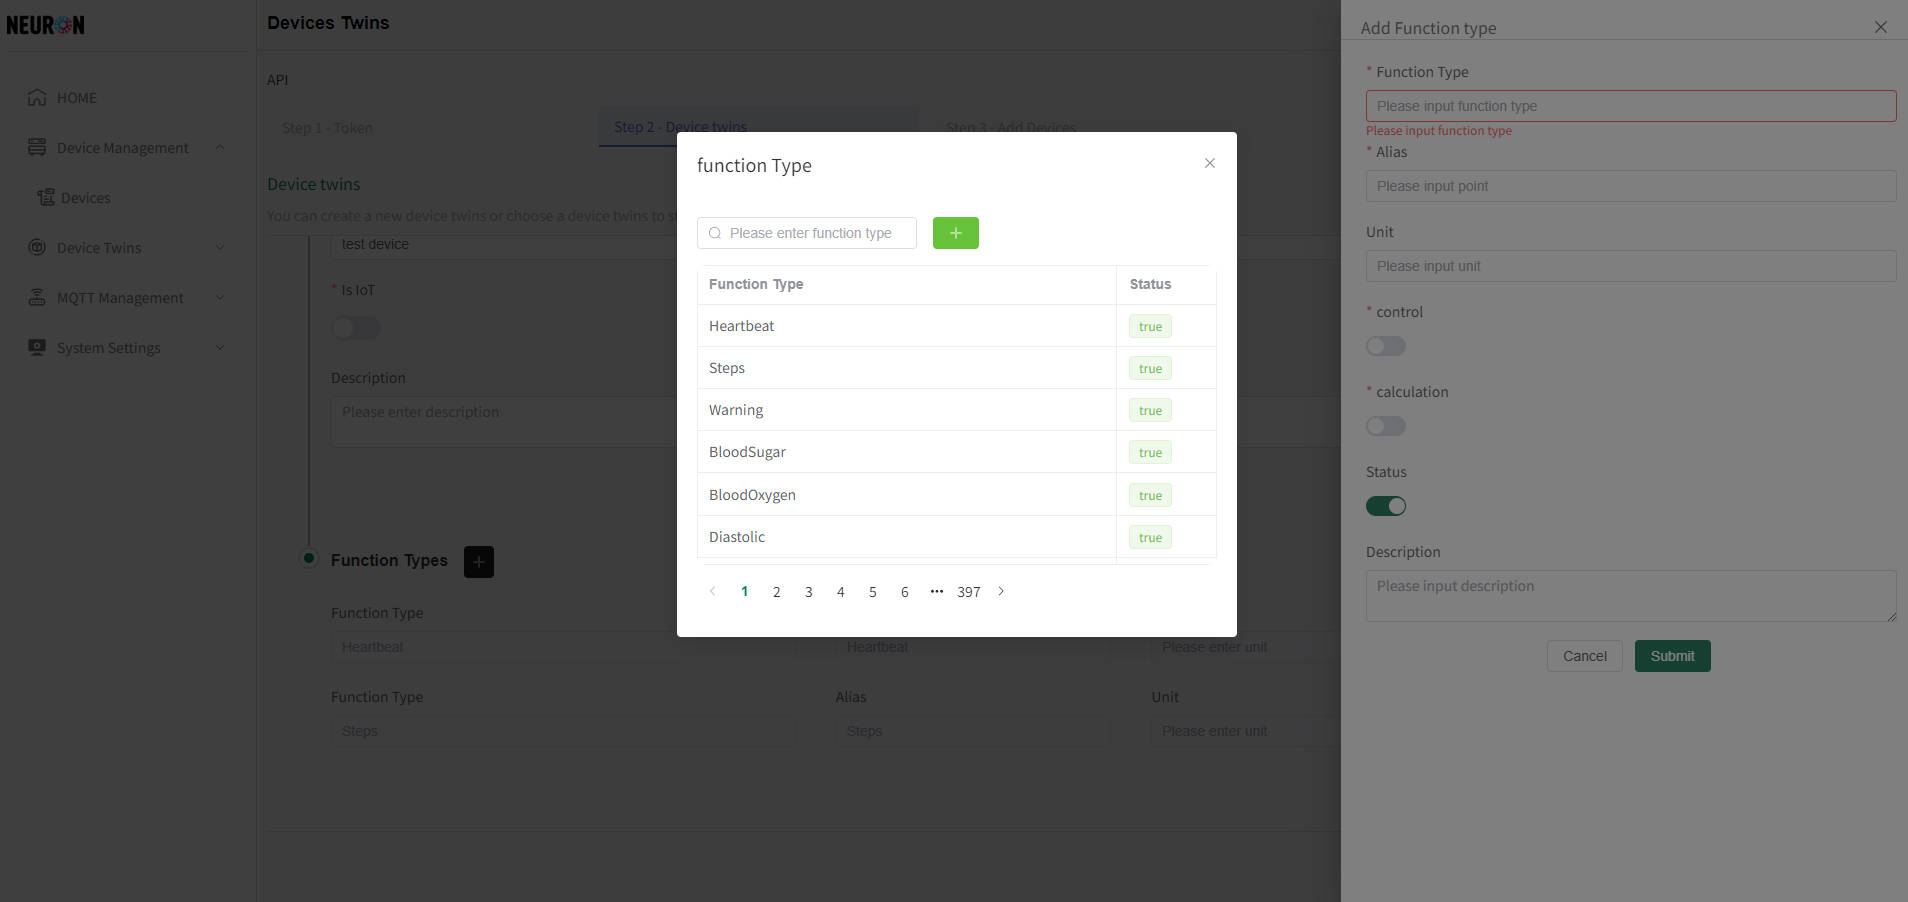
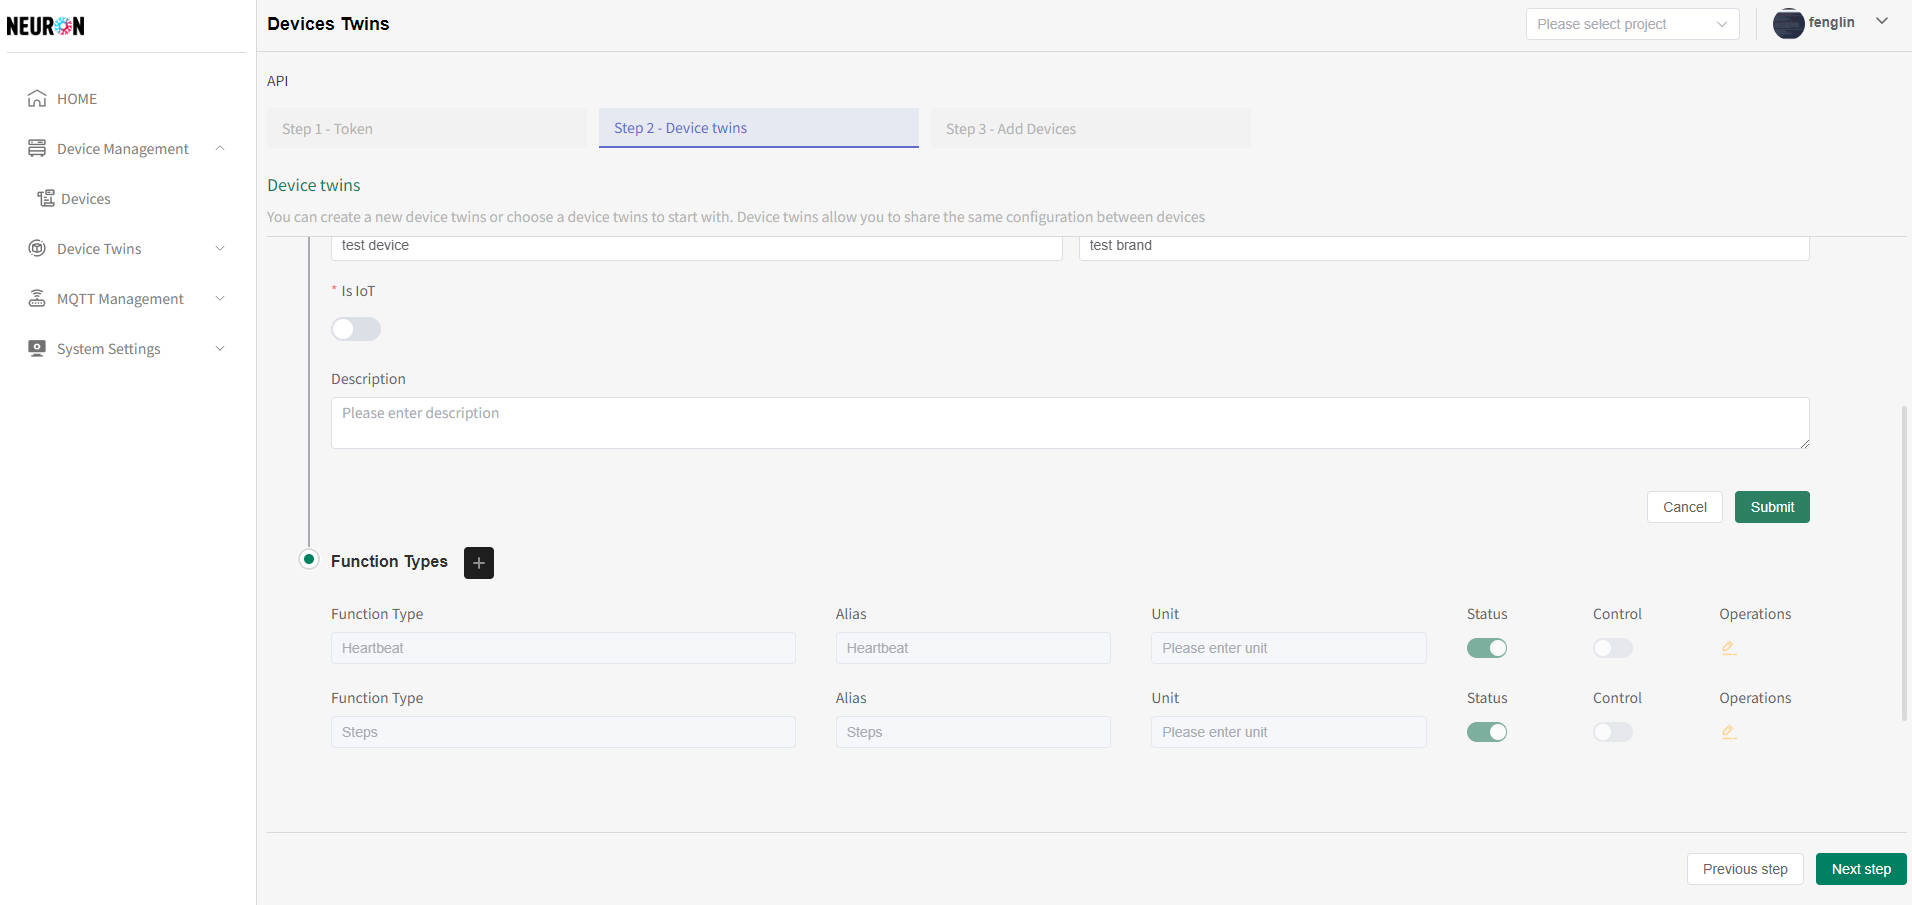
- You can repeat the above steps to add multiple functional points under the object model. After configuration is complete, click Next to configure the network service, as shown in the following figure
Device registration
- Default API device twins interface, click on add device twins, as shown below
The system supports uploading and online editing while entering device data. The operation steps are: first download the template, then upload it to the page, then edit it online, and finally submit it to the system to complete device registration. The successful registration of the device only completes the device registration. The system needs to successfully subscribe to the device data and clean it before completing the device access
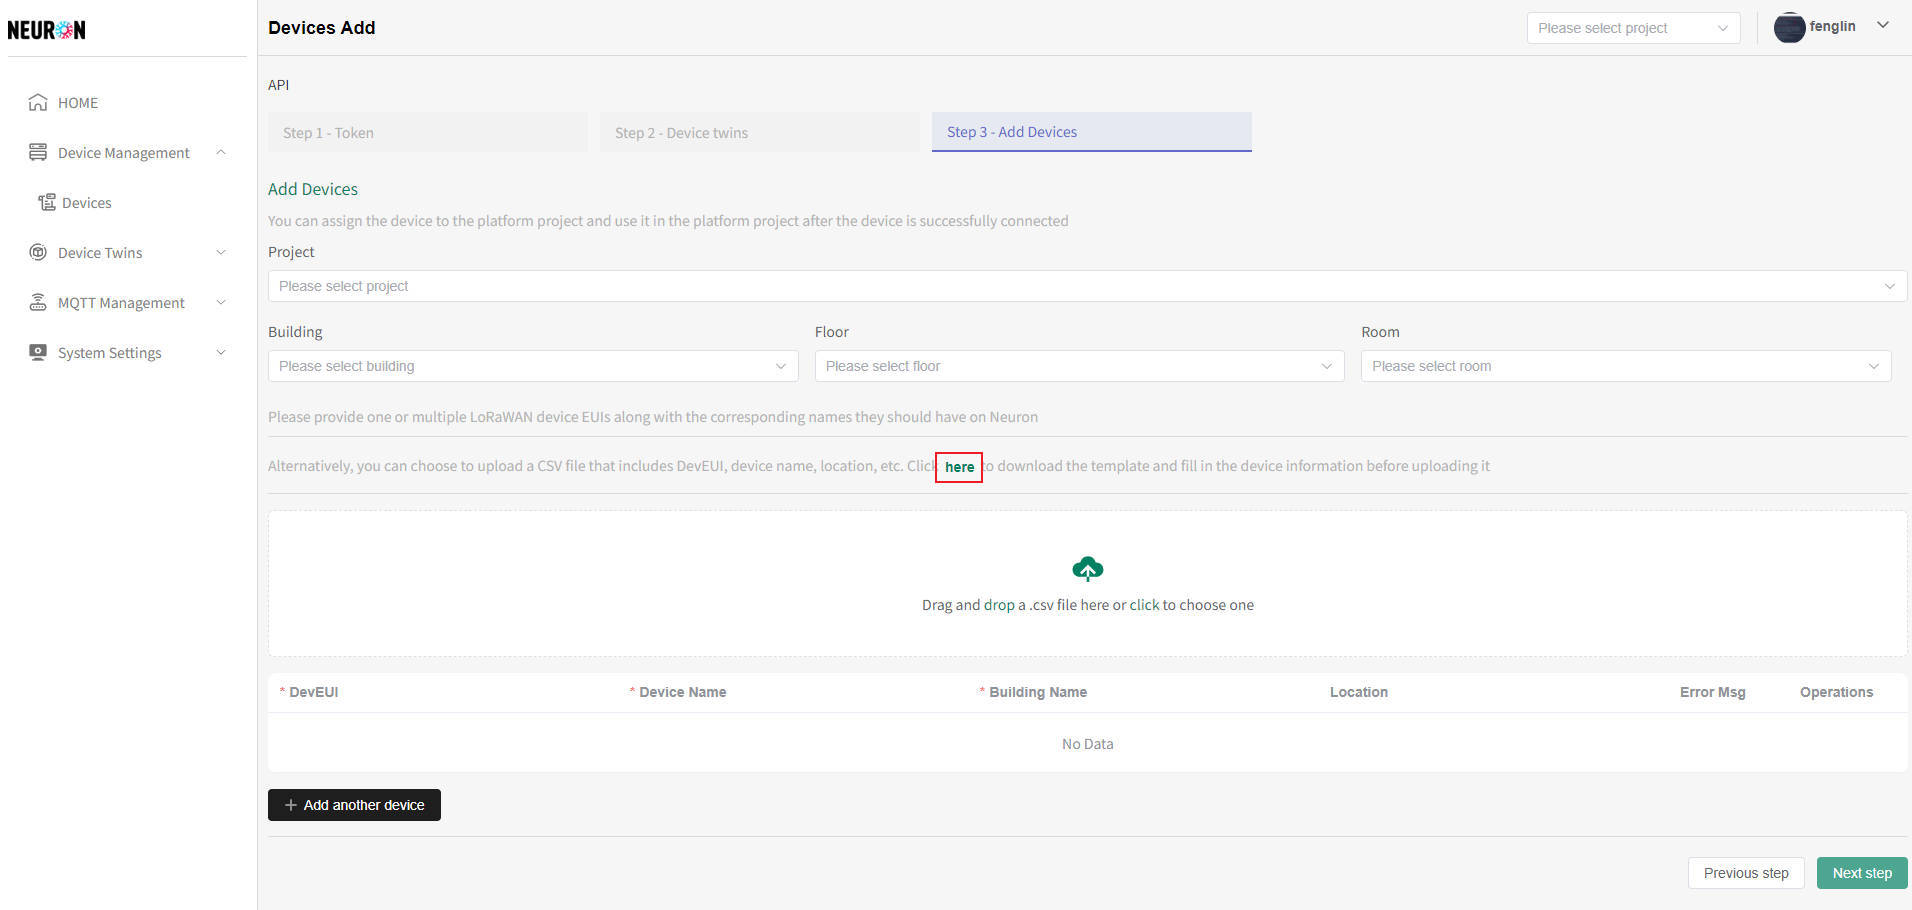
- Device Template Download
On the device registration page, click on the red box in the following image to download the template file
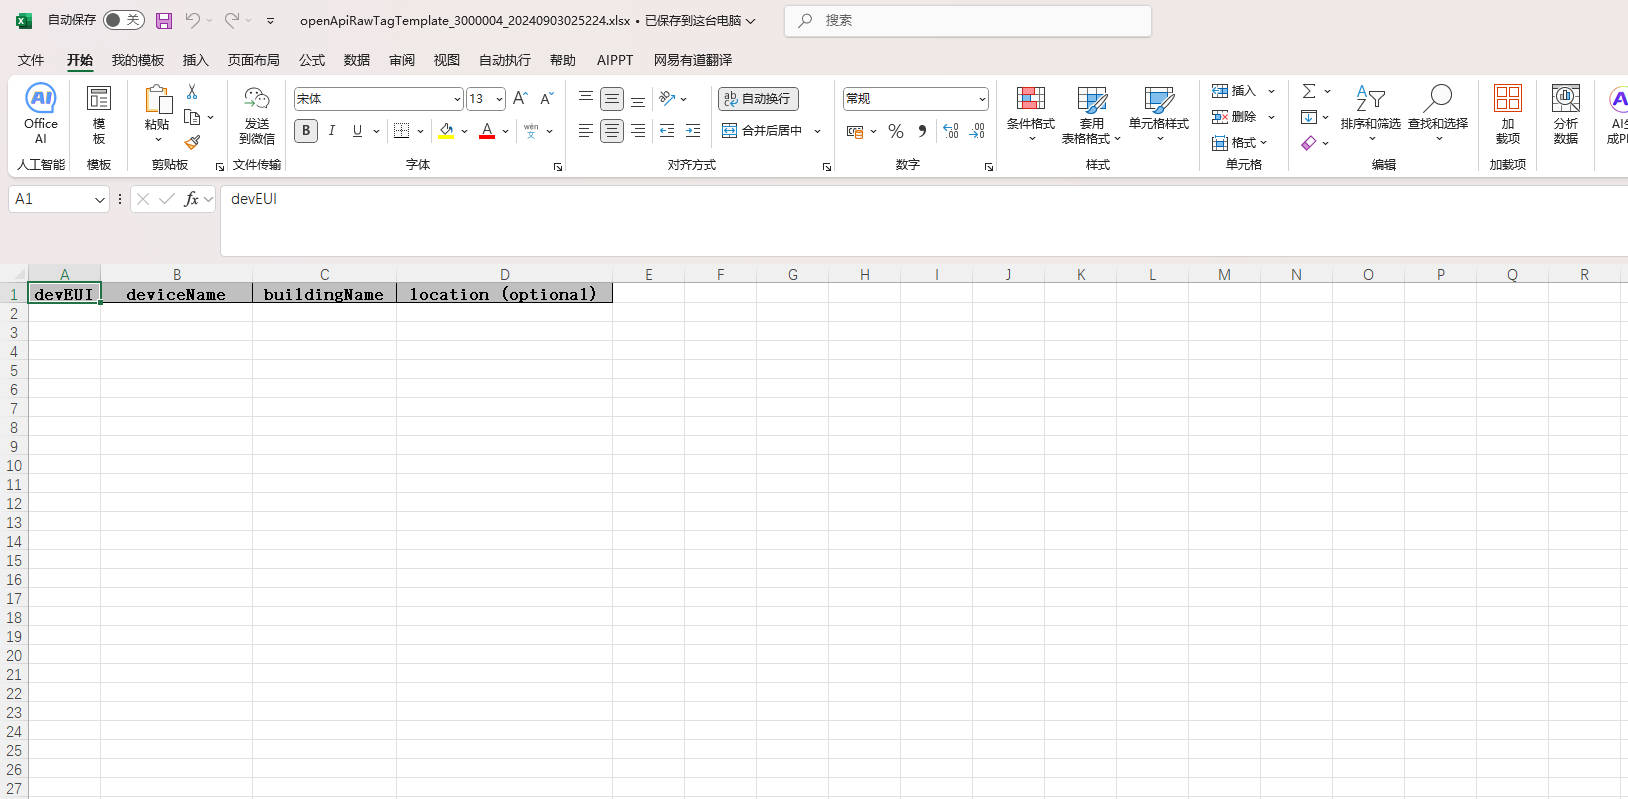
- Device template filling
As shown in the template, the device DevEUI (IoT device unique identifier) can be filled in with the DevEUI on the device for IoT devices, while other types of devices can be left blank. The device Name (required) is globally unique, the buildingName (required) is building information, and the location (non required) is filled in with the device location
- Upload device template
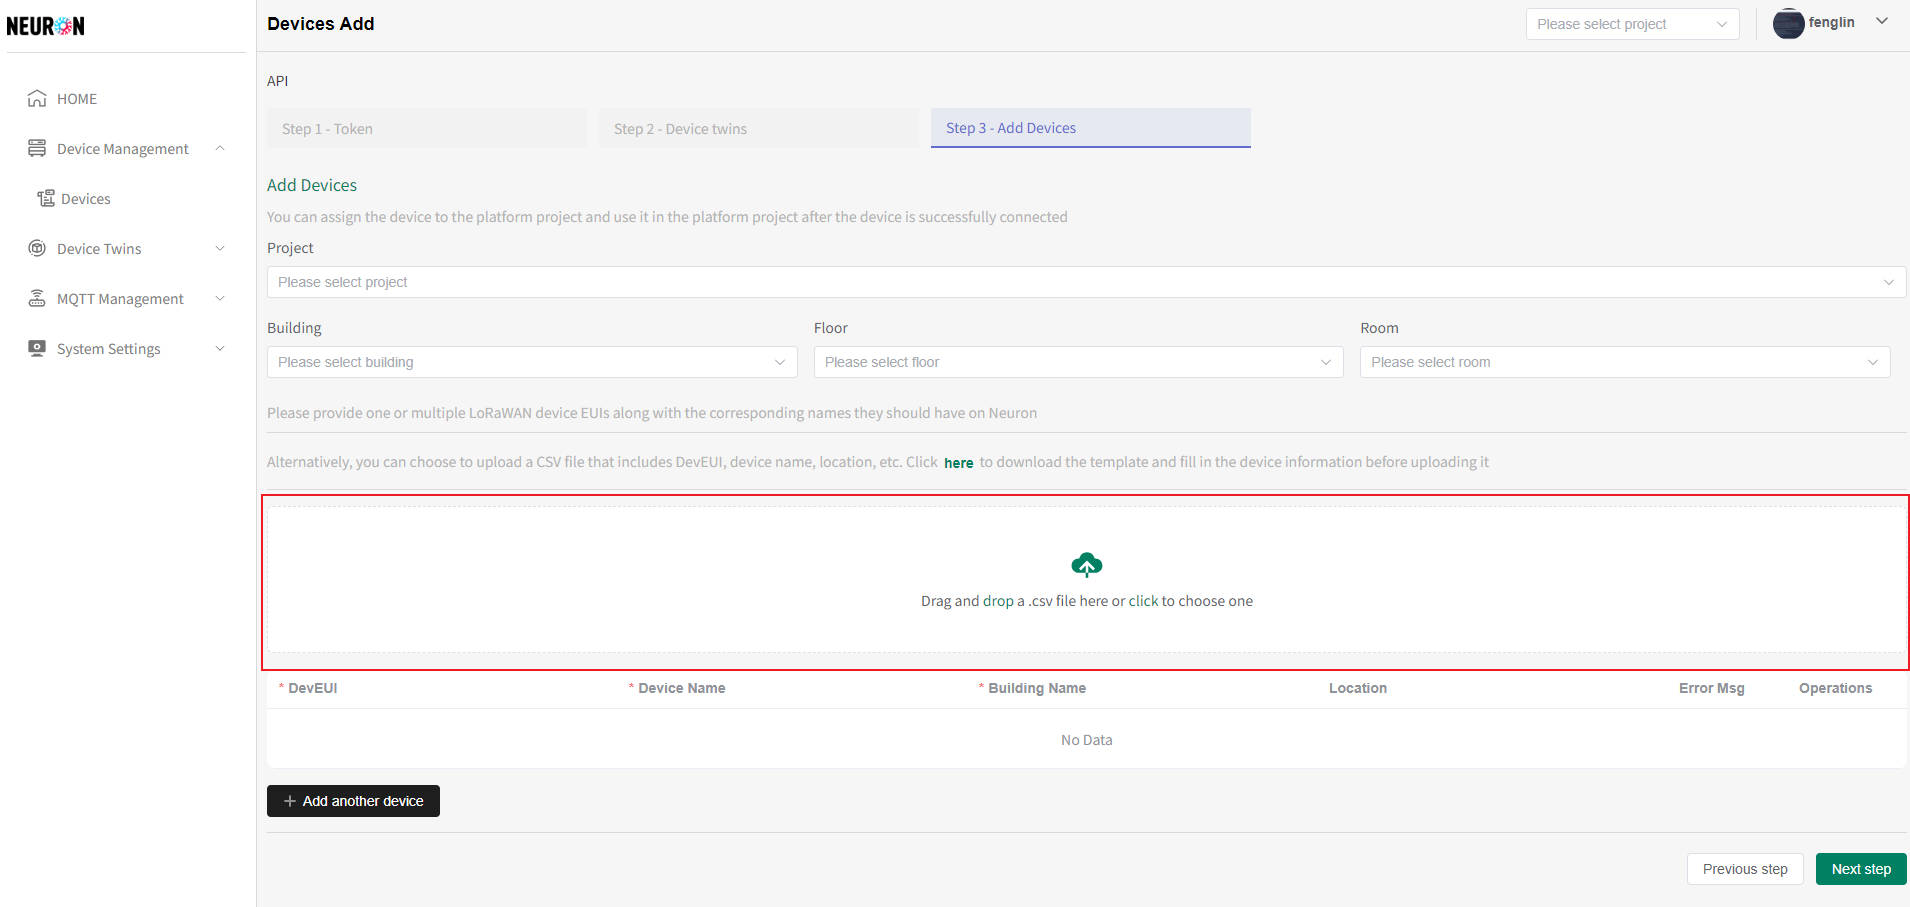
Upload the device information that has been filled in, and the page will display the uploaded device information. The page can also perform operations such as adding and deleting device data
Click on the red box in the following image and select the corresponding template file to complete the device registration data upload
- Device Binding Platform Project
The system can bind platform projects while adding new devices. After successful submission, all devices added to the page will belong to the configured platform projects
- As shown in the following figure, select the project that needs to be bound to complete the binding between the platform and the newly added device
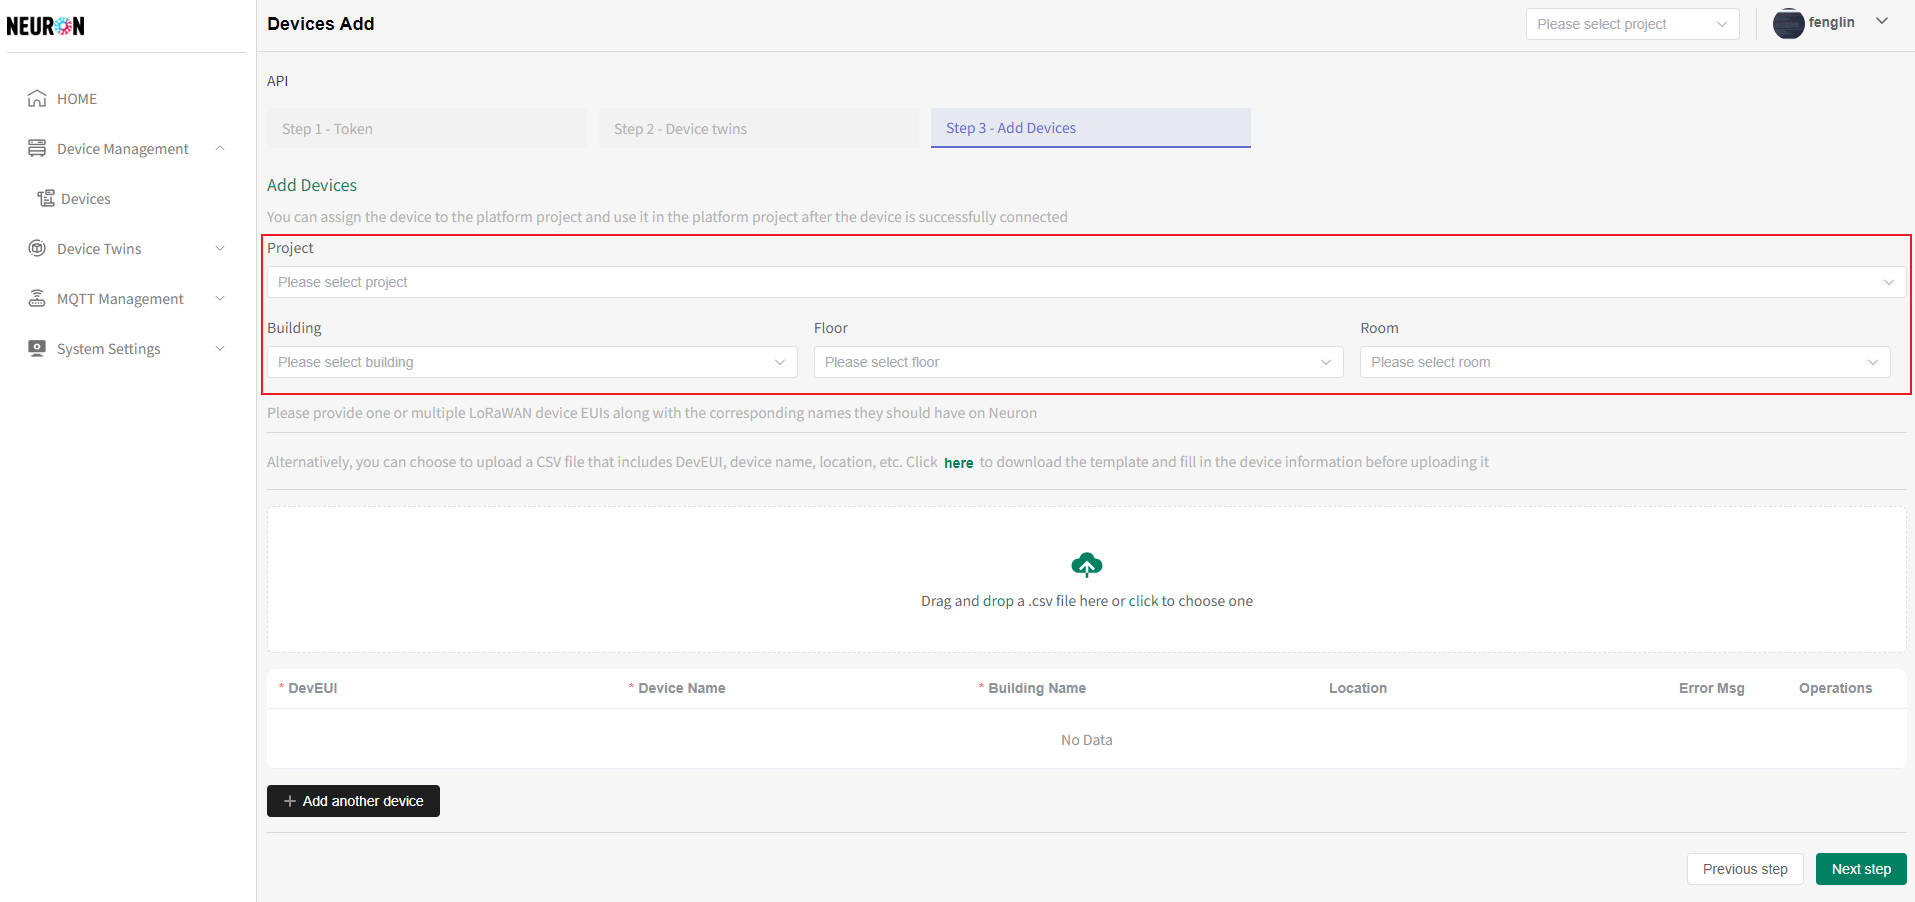
- As shown in the following figure, select the project that needs to be bound to complete the binding between the platform and the newly added device
- Device addition submission
When submitting a device, the system will perform device information verification (such as if the device name already exists), and the abnormal device needs to be deleted before submitting
- After completing the device filling, click the submit button and a confirmation window will appear, as shown in the following figure
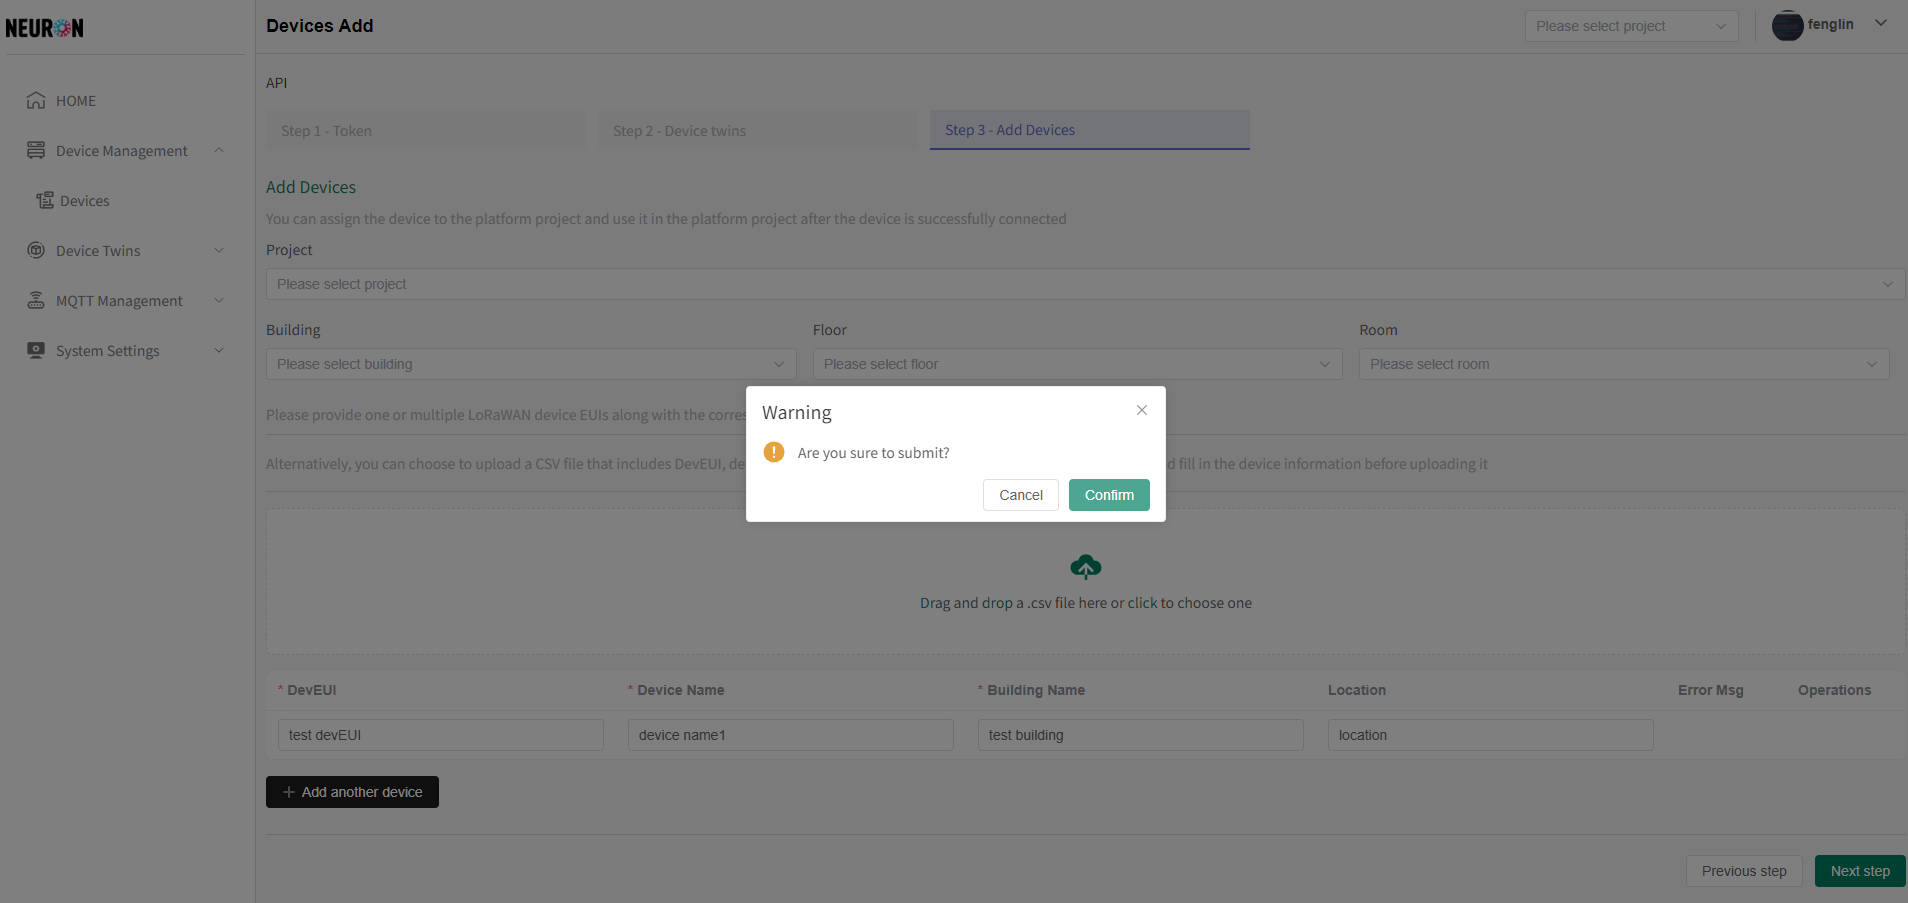
- After clicking confirm, submit device data
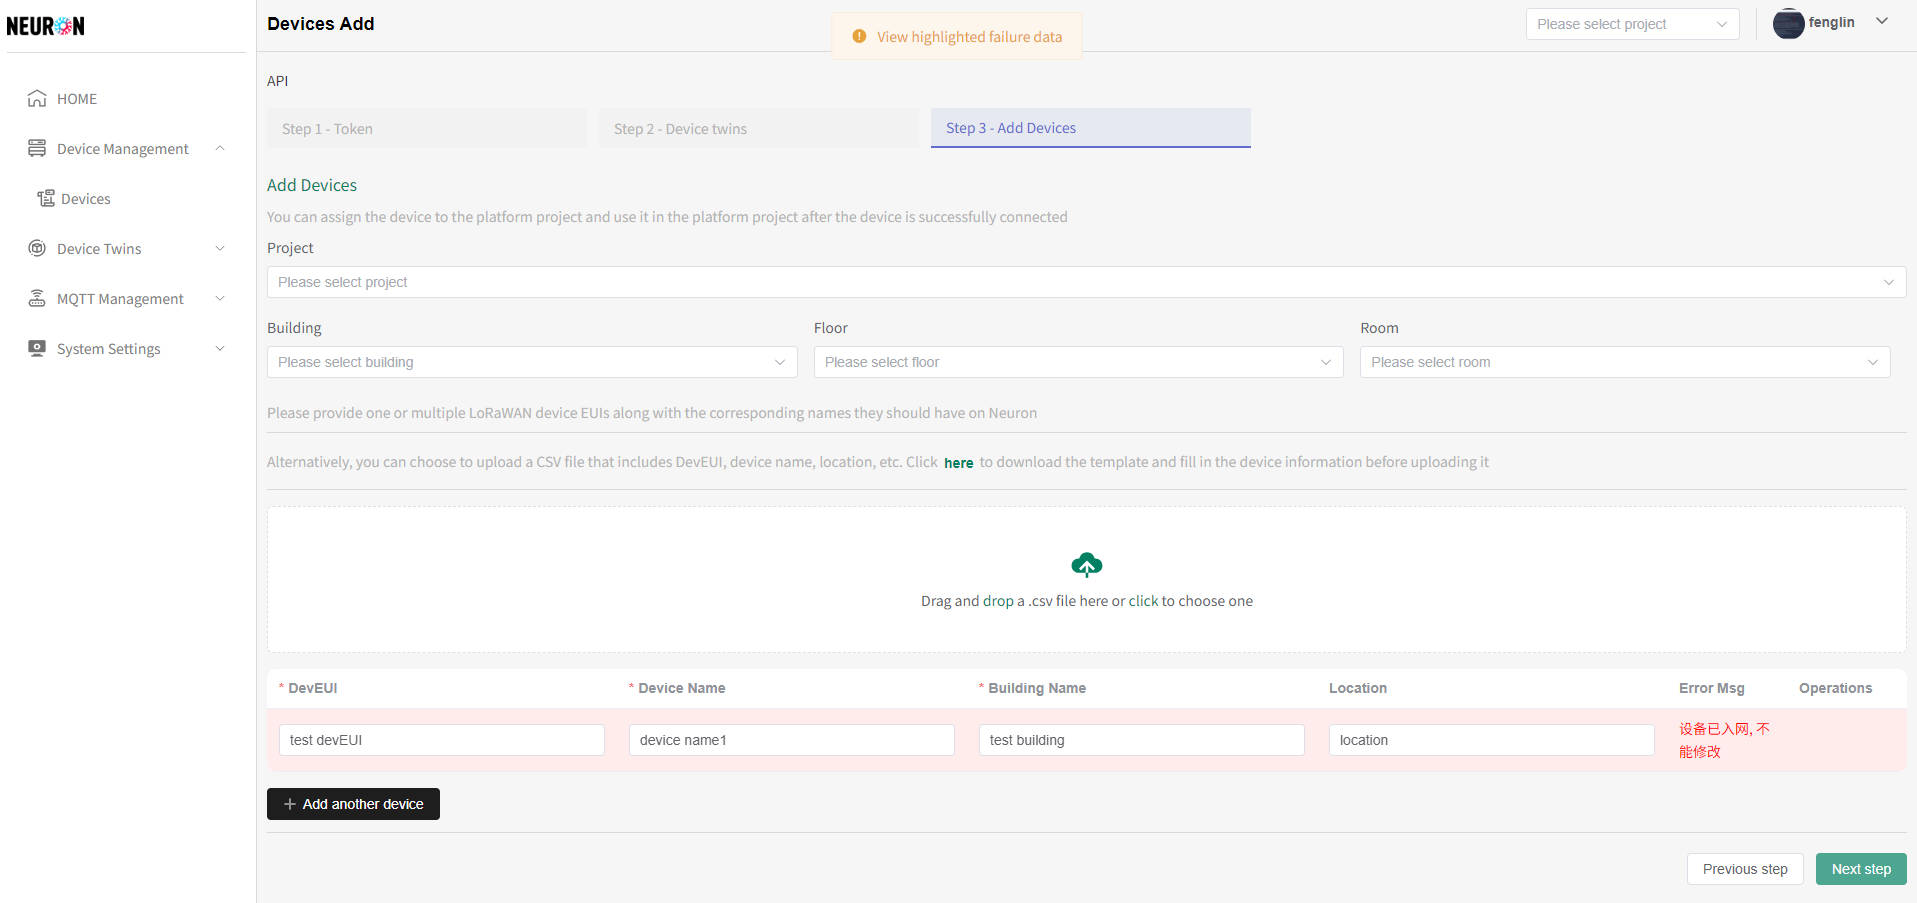
- The system prompts an error, as shown in the figure below. The background of the incorrect device is displayed in light red, and the data bar will show the reason for the error (see the red box in the figure below). After deleting or modifying the data, it can be resubmitted
- The system prompts success and will redirect to the device registration page (as shown in the figure below). After subscribing to the matching device data, the device can be successfully connected, as shown in the figure below
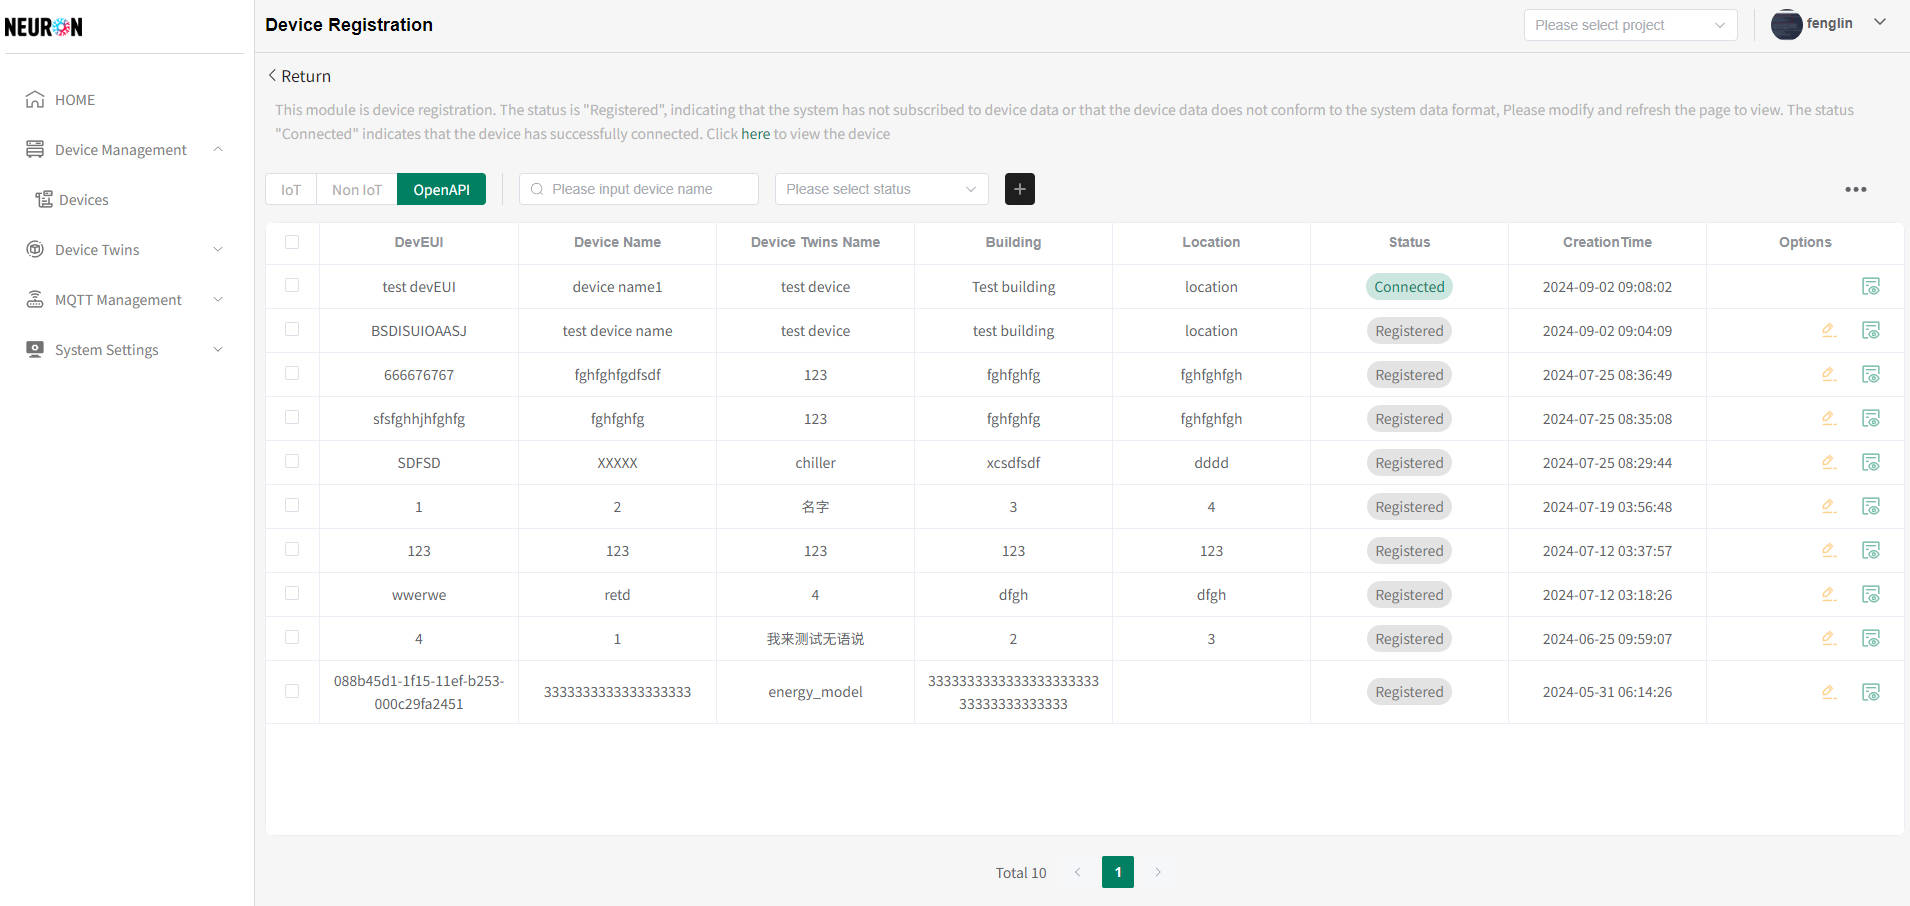 After the device is successfully connected, device management can be performed. For specific operations, please refer to the device management module Device Management
- The system prompts an error, as shown in the figure below. The background of the incorrect device is displayed in light red, and the data bar will show the reason for the error (see the red box in the figure below). After deleting or modifying the data, it can be resubmitted
- After completing the device filling, click the submit button and a confirmation window will appear, as shown in the following figure